
At Skybrud.dk we recently launched a new website for Danish Crown - one of the worlds largest meat processing companies. The website has a high focus on food targeted the regular consumer, and as such it also has a section for recipes (opskrifter in Danish).
Each recipe is accompanied by a photo, and to improve the user experience and looks of the section, my task was to implement some code to extract the primary colors of each image (which is what this article is about). The article will describe how this can be accomplished in .NET in general, but also finish off with how this can be accomplished in Umbraco.
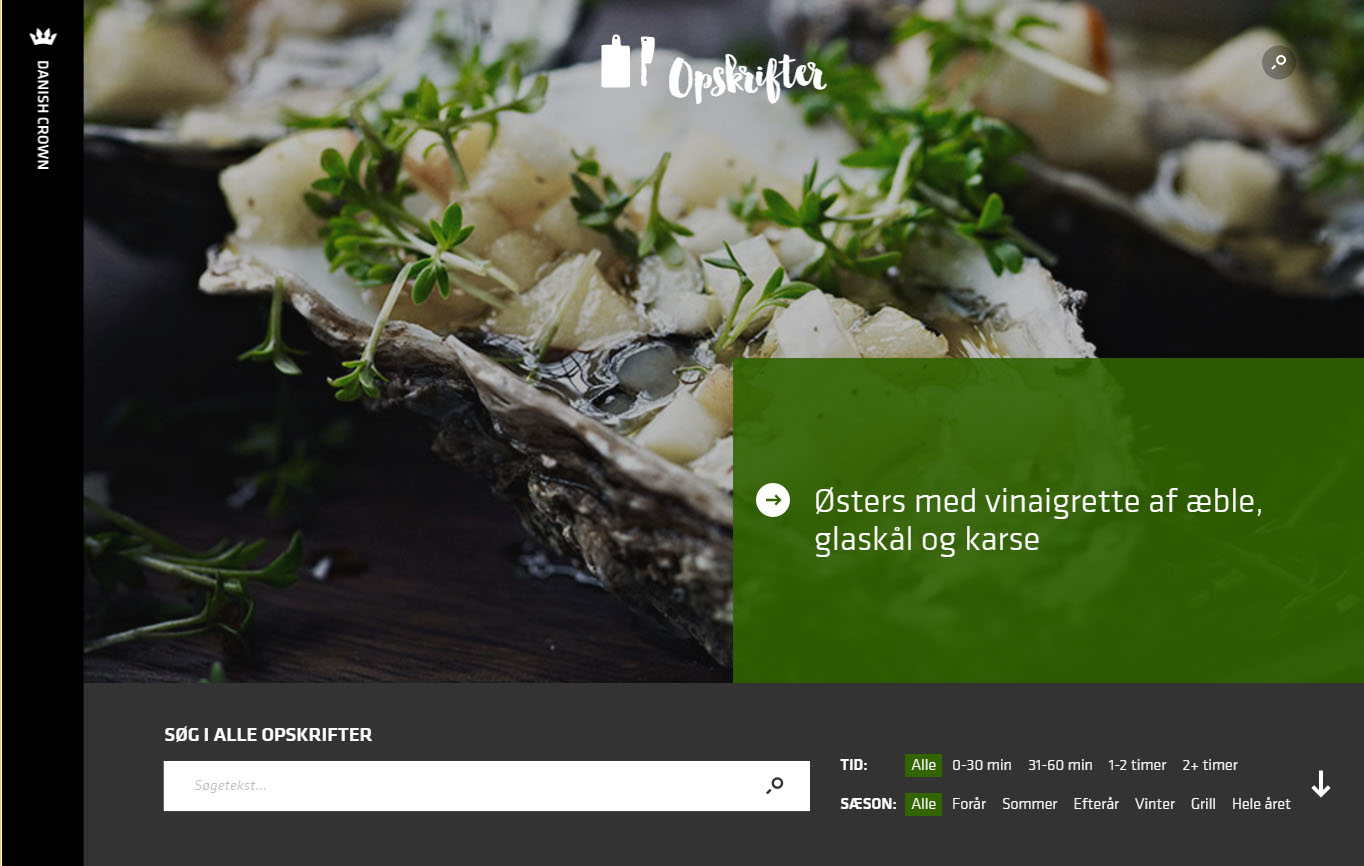
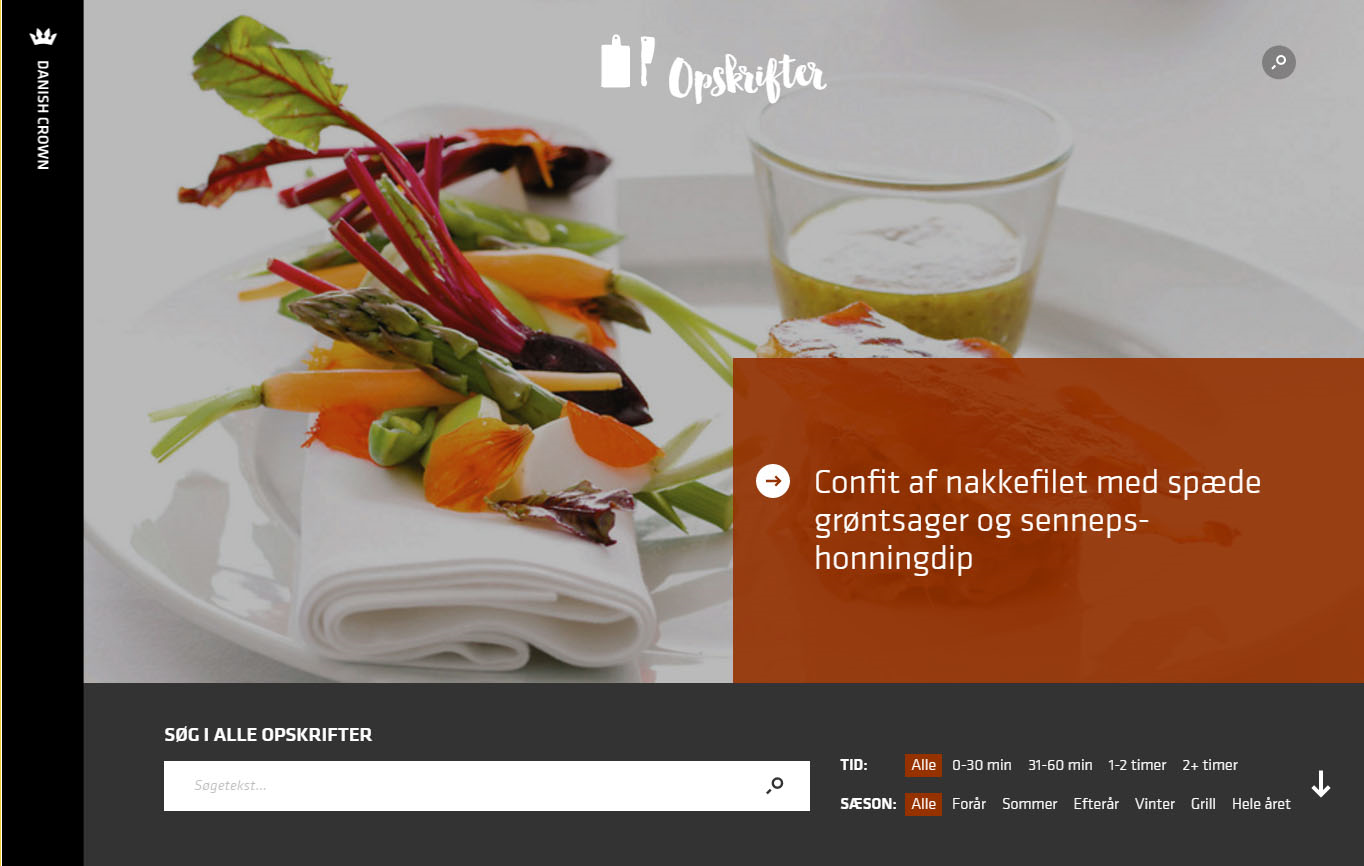
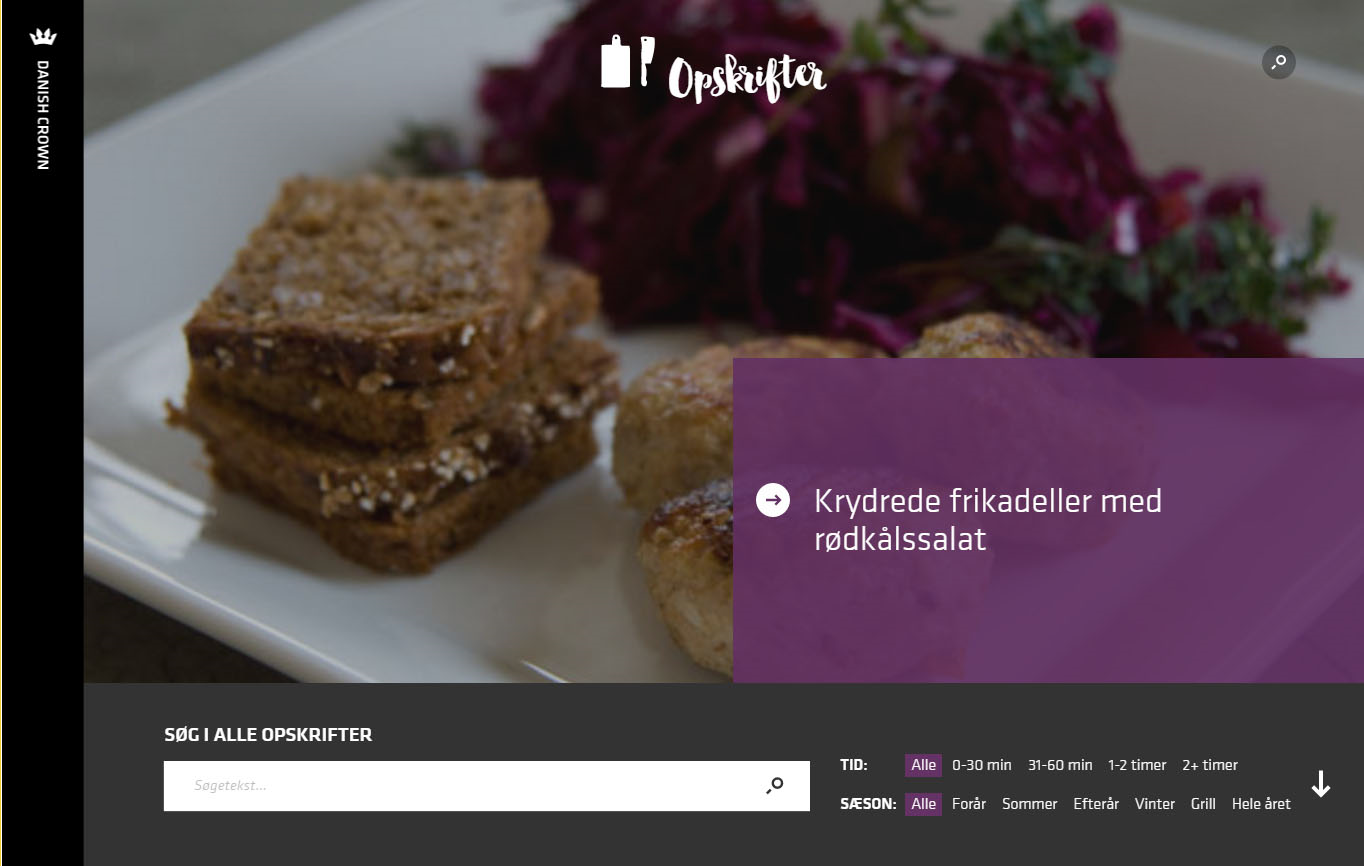
The recipes section contains a search page to browse through all the recipes, and then an individual page for each recipe. For the search page, a random recipe will be shown at the top, and a box with the title of the recipe then overlays the image. With the example below, even though the green color from the cress (karse in Danish) isn't the most used color, the code will find colors with a high contrast that also work well with the white text (using the HSL color model and WCAG contrast ratio of two colors) - in this case the white text color and the green color from the cress. A few other examples could be an orange color from the carrots in the image, or a purple color from some beetroots.
Getting started
If we look at the code behind, the first step is to extract the color of each pixel of a given image. There are probably multiple ways to archive this, but I went with the Bitmap class in the System.Drawing namespace/assembly. My initial code for this would then look like:
@using System.Drawing
@{

    string pathToImage = "D:/ExamplePhotos/ExamplePhoto.jpg";

    // Load the image into a new instance of "Bitmap"
    using (Bitmap bitmap = new Bitmap(pathToImage)) {

        // Dictionary for keeping track of all the colors
        Dictionary<Color, int> colors = new Dictionary<Color, int>();

        // Iterate through each pixel to find it's color
        for (int x = 0; x < bitmap.Width; x++) {

            for (int y = 0; y < bitmap.Height; y++) {

                // Get the color from the pixel
                Color color = bitmap.GetPixel(x, y);

                // Add or increment the color to the dictionary
                int count;
                if (colors.TryGetValue(color, out count)) {
                    colors[color]++;
                } else {
                    colors[color] = 1;
                }
            }
        }
    }
}
The colors are added to a dictionary including a counter, so we can keep track of how many pixels are using a given color. With this code, I quickly discovered two things:
- Looking at each pixel of the image is expensive when looking at performance. I tested with some large stock photos, and the code above could easily take several seconds to complete for each image. For the case with Danish Crown, we had a fixed amount of images, and as such I could simply run the code on my local dev machine, and add the colors somewhere in an XML file. So performance didn't really matter here (I come back to performance later).
- Most images contains thousands of different colors, typically small variations of the same color - so I would most oftenly end up with an unexpected primary color. This meant that I had to add some more logic to my code to get some more "expected" results.
Grouping similar colors
One of the things I then added to the process, was grouping of similar colors. Looking at the colors using the RGB color model, I would then group colors within similar color ranges. This would mean that a color like rgb(239, 239, 239) would be grouped with and considered equal to rgb(255, 255, 255).
In lack of a better word, I added a fuzzyness parameter describing how similar colors should be before they would be grouped. The updated code would then look like:
@using System.Drawing
@{

    string pathToImage = "D:/ExamplePhotos/ExamplePhoto.jpg";

    int fuzzyness = 25;

    // Load the image into a new instance of "Bitmap"
    using (Bitmap bitmap = new Bitmap(pathToImage)) {

        // Dictionary for keeping track of all the colors
        Dictionary<Color, int> colors = new Dictionary<Color, int>();

        // Iterate through each pixel to find it's color
        for (int x = 0; x < bitmap.Width; x++) {

            for (int y = 0; y < bitmap.Height; y++) {

                // Get the color from the pixel
                Color color = bitmap.GetPixel(x, y);

                // Apply fuzzyness (if greater than 0)
                if (fuzzyness > 0) {
                    int red = color.R / fuzzyness * fuzzyness;
                    int green = color.G / fuzzyness * fuzzyness;
                    int blue = color.B / fuzzyness * fuzzyness;
                    color = Color.FromArgb(red, green, blue);
                }

                // Add the color to the dictionary (or increment the value if already present)
                int count;
                if (colors.TryGetValue(color, out count)) {
                    colors[color]++;
                } else {
                    colors[color] = 1;
                }
            }
        }
    }
}
For most images, a good value for fuzzyness seems to be 25. However for the case with Danish Crown, I ended up setting fuzzyness to 50 (more colors are grouped).
Finding suitable colors using HSL and WCAG
Until now, we have only looked at the colors using the RGB color model (red, green and blue). Another color model is HSL (hue, saturation and lightness), which describes colors in a different way.
In HSL, saturation represents the amount of color, and is described as either a decimal number (from 0 to 1) or as percent (from 0% to 100%) - eg. a grey color would have a saturation of 0, while the orange Umbraco color has a saturation of 1/100%.
At Skybrud.dk we have created the Skybrud.Colors package for working with various color models. The package contains a RgbColor class, which can be converted to an instance of HslColor - and of course the other way around.
The package also contains a helper class called WcagHelpers with a few static methods for finding the contrast ratio between two colors. WCAG (or Web Content Accessibility Guidelines) is a standard with various steps for improving accessibility on the web.
A part of WCAG describes the contrast ratio between two colors - eg. to make sure a text color and a background color is not too similar, and the text is readable on top of the background color. The WCAG contrast ratio is specified as a decimal number between 1.0 and 21.0. Following the WCAG specification, level AA requires a contrast ratio of 3.0 or higher for text over 18 pixels, while smaller text requires a minimum contrast ratio of 4.5.
With our Skybrud.Colors package, I have implemented a MostUsedColor class that can be used for further calculations:
public class MostUsedColor {

    /// <summary>
    /// Gets the amount of times this color was used in the image (after fuzzyness has been applied).
    /// </summary>
    public int Count { get; set; }

    /// <summary>
    /// Gets an instance of <see cref="RgbColor"/> representing the color in the RGB color model.
    /// </summary>
    public RgbColor Rgb { get; set; }

    /// <summary>
    /// Gets an instance of <see cref="HslColor"/> representing the color in the HSL color model.
    /// </summary>
    public HslColor Hsl { get; set; }

    /// <summary>
    /// Gets the WCAG contrast ratio compared to a reference color (eg. white).
    /// </summary>
    public double Wcag { get; set; }

}
For the recipes, we wanted to exclude very dark colors, which could be achieved by excluding colors with a saturation below 0.15 and a WCAG contrast above 10 (other numbers may be better suited for other types of images).
Since the text in the box is white, we also wanted to exclude very light colors. In a similar way, this was achieved by excluding all colors with a WCAG contrast ratio below 4.0.
The updated code looks like below. Notice that it is also favorable not to look at all colors found in the in the previous steps. In our case, I only look at the 25 most used colors. Finally the primary colors are sorted by the WCAG contrast ratio in descending order - that is; colors with the highest contrast first.
@using System.Drawing
@using Skybrud.Colors
@using Skybrud.Colors.Html
@using Skybrud.Colors.Wcag
@{

    // ... code from previous examples omitted

    // Convert the dictionary to a collection of "MostUsedColor"
    IEnumerable<MostUsedColor> mostUsedColors = (
        from color in colors
        orderby color.Value descending
        let rgb = new RgbColor(color.Key.R, color.Key.G, color.Key.B)
        select new MostUsedColor {
            Rgb = rgb,
            Hsl = rgb.ToHsl(),
            Count = color.Value,
            Wcag = WcagHelpers.GetContrastRatio(rgb, HtmlColors.White)
        }
    );

    // Find the primary colors based on HSL and WCAG
    IEnumerable<MostUsedColor> primaryColors = (
        from color in mostUsedColors.Take(25)
        where color.Hsl.Saturation >= 0.15 && color.Wcag >= 4 && color.Wcag <= 10
        orderby color.Wcag descending
        select color
    );
}
With the code so far, primaryColors will contain a number of colors with the highest contrast to white. The first color is then used for the background color of the info box.
However since we're excluding some colors, you might end up with a no valid colors at all (eg. if you have a greyscale image). So you also need to specify a fallback color as well.
Improving performance
Like I wrote earlier in this article, looping through the pixels of large images can really affect performance. The trick here is to create a thumbnail of the source image, and then loop through the pixels of the thumbnail instead. This is a lot faster - so instead of several seconds, we're talking about milliseconds.
I wrote a little helper method for creating the thumbnail:
@using System.Drawing
@using System.Drawing.Drawing2D
@functions {

    public Bitmap GetThumbnail(Bitmap source, int width, int height) {

        // Generates a thumbnail in very bad quality (but very fast)
        //return (Bitmap) source.GetThumbnailImage(width, height, null, IntPtr.Zero);

        // Initialize the thumbnail image
        Bitmap thumbnail = new Bitmap(width, height);

        // Use Graphics for manipulating the image
        using (Graphics graphics = Graphics.FromImage(thumbnail)) {

            // Optimize the generation for speed
            graphics.CompositingQuality = CompositingQuality.HighSpeed;
            graphics.CompositingMode = CompositingMode.SourceCopy;

            // Copy the source image to the thumbnail image (in the correct size)
            graphics.DrawImage(source, 0, 0, width, height);

        }

        return thumbnail;
    }
}
A good thumbnail could have a width and/or height of 512 pixels. That should give an acceptable performance, and still keep enough quality in the thumbnail image.
Integrating with Umbraco
While this article so far only has been targeting .NET in general, we can also integrate this in Umbraco (again, there are multiple ways of handling something like this).
We have another project, where images are automatically analyzed on upload, and a combination of the most used colors and the primary colors of the image (found via the HSL/WCAG validation) are saved to a single property on the uploaded image.
Since we want to hook into media uploads, we first need to register an event with Umbraco. We can do this with creating a new class that inherits from Umbraco's ApplicationEventHandler class, and then override the ApplicationStarted method to hook into Umbraco's MediaService.Saving event:
protected override void ApplicationStarted(UmbracoApplicationBase umbraco, ApplicationContext context) {

    // Used for extracting primary colors from media on save
    MediaService.Saving += MediaServiceOnSaving;

}
And the implementation of the MediaServiceOnSaving method could look like:
private void MediaServiceOnSaving(IMediaService sender, SaveEventArgs<IMedia> e) {

    // Loop through each media being saved (eg. if being uploaded)
    foreach (IMedia media in e.SavedEntities) {

        // Ignore non-images
        if (media.ContentType.Alias != "Image") continue;

        try {
            SkybrudMediaUtils.CalculatePrimaryColors(media);
        } catch (Exception ex) {
            LogHelper.Error<Startup>("MediaServiceOnSaving", ex);
        }
    }
}
In this method, we're looking at media when they are being saved in Umbraco. Technically this event can be called for multiple media at once, so we need to iterate over them. Since we also only want to look at images, and not other types of media, we can check against the alias of the media type.
Finally, we're calling the CalculatePrimaryColors in our SkybrudMediaUtils class. This method will run the steps as described earlier in this article, and then save a list of both the most used colors and primary colors to a single property on the image.
How about a property editor?
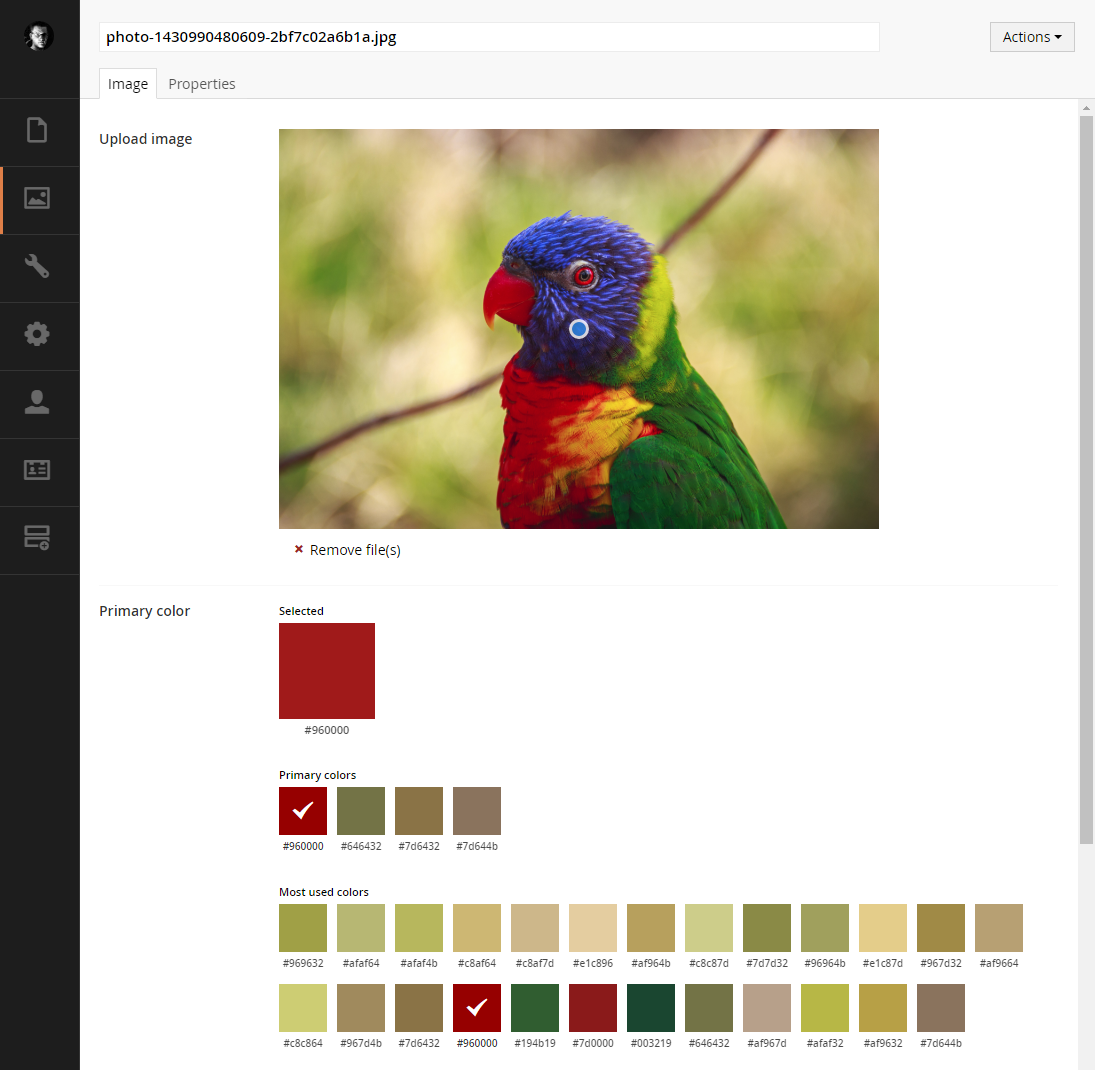
To let editors see (or change) the primary color, we've also created a property editor that looks like as illustrated in the screenshots below.
So with an image of a colorful bird, our code will find a list of most used colors - which are mostly lighter colors, and probably comes from the background of the image. With the elimination "algorithm", the first valid color is the red color from the bird itself.
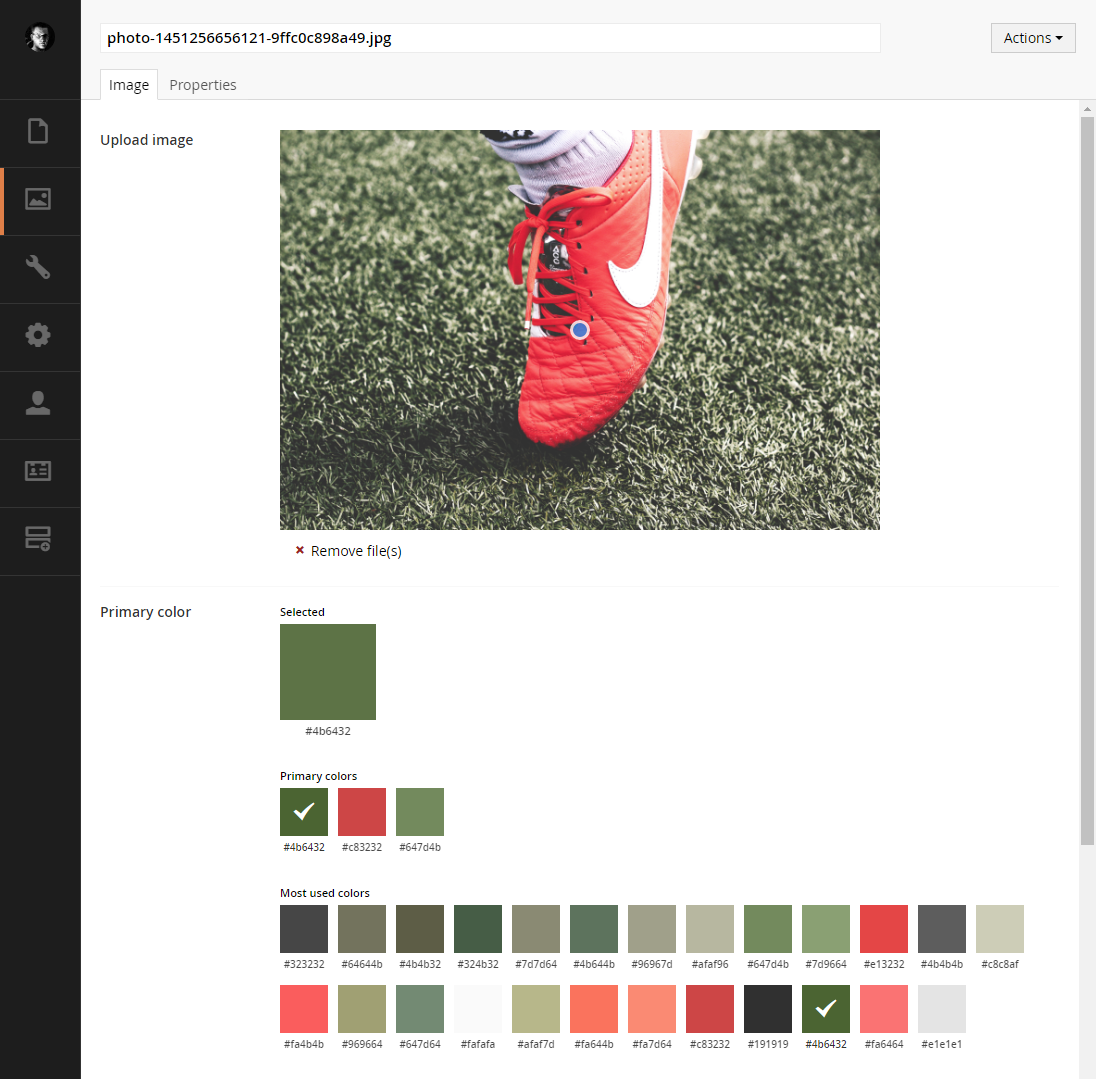
However the color with the highest contrast isn't always the one you would expect from looking at the image. Eg. if you see the image below, the green from the grass is the first color according to our primary color algorithm, while the red from the shoe is only the second color.
While the algorithm could probably be tuned some more, the property editor could instead just allow users to select one of the other colors.
The property editor shown above is available for download via the Skybrud.Umbraco.PrimaryColors package. However keep in mind that the package itself doesn't update the property value with the colors - you'll have to setup this part manually (eg. by using the examples from this article).
Is that all?
Examples are good, but they might not always show the full picture. So I have also created a demo solution that you can play around with, see how things works etc.
You can find the demo solution in this GitHub repository. The username and password for Umbraco are skrift and skrift1234 respectively. Just open the solution, build and then press F5 ;)
The solution includes a few pages showing how the value of the property editor can be used, all integrated into the Fanoe starter kit.

The stock photos used for the property editor screenshots and also available in the demo solution have all been downloaded from Unsplash.com.