
If you need to do a survey and already use Umbraco, Umbraco Forms is a natural solution to build upon. However, out-of-the-box, you can only collect data using forms on the web. Luckily, there are multiple ways to extend and integrate with Umbraco Forms, so you can collect data through different mediums.
In this tutorial, you'll use an SMS survey pre-built using Twilio Studio, and integrate Twilio Studio with Umbraco Forms, so that the submissions are recorded as Umbraco Form entries.
Prerequisites
Here’s what you will need to follow along:
- .NET 7 SDK (because you'll use an Umbraco 11 website)
- git (to clone the Umbraco 11 website to start with)
- A code editor or IDE. I recommend JetBrains Rider, Visual Studio, or VS Code with the C# plugin.
- A Twilio account. Register for a Twilio account for free and receive $20 trial credit to try out Twilio products.
- A Twilio Phone Number
- The ngrok CLI and, optionally, a free ngrok account
- A phone to send and receive SMS for testing
You can find the source code for this tutorial on GitHub. Use it if you run into any issues, or submit an issue, if you run into problems.
Create an SMS survey using Twilio Studio
What is Twilio and Twilio Studio?
If this is your first time working with Twilio, you may be wondering, what is a Twilio? Developers know Twilio best as the API to SMS, call, and email (SendGrid), but Twilio has a lot more products to communicate and engage with your customers. Now that you have an idea of what Twilio offers, make sure you have a Twilio account and a Twilio Phone Number as you'll need those to send and receive SMS.
While you could use code to develop your own SMS survey with C# and ASP.NET Core, in this tutorial, you'll use a low-code platform called Twilio Studio. With Twilio Studio, you can build stateful messaging and interactive voice applications (IVR). Instead of building the SMS survey by hand, which you certainly could, you'll import a pre-built workflow which I have built for you.
Import the Twilio Studio SMS Survey Flow
Open a browser, navigate to the Twilio Console, and click on Explore Products in the left navigation bar. Now, look for the Studio product, click on the Studio link, then in the left navigation bar on the new page, click Flows. Here you can find your existing Studio Flows and create new Flows. Click on the "Create new Flow" button, give the Flow a name, click Next, select the "Import from JSON" option, and click Next, copy the JSON of the Studio Flow I exported and paste it into the text area, and then finally, click Next. Your Studio Flow has been imported, and you can now see it in the Flow canvas. The Flow canvas is where you can add, update, and remove widgets, and connect those widgets together to build a workflow.
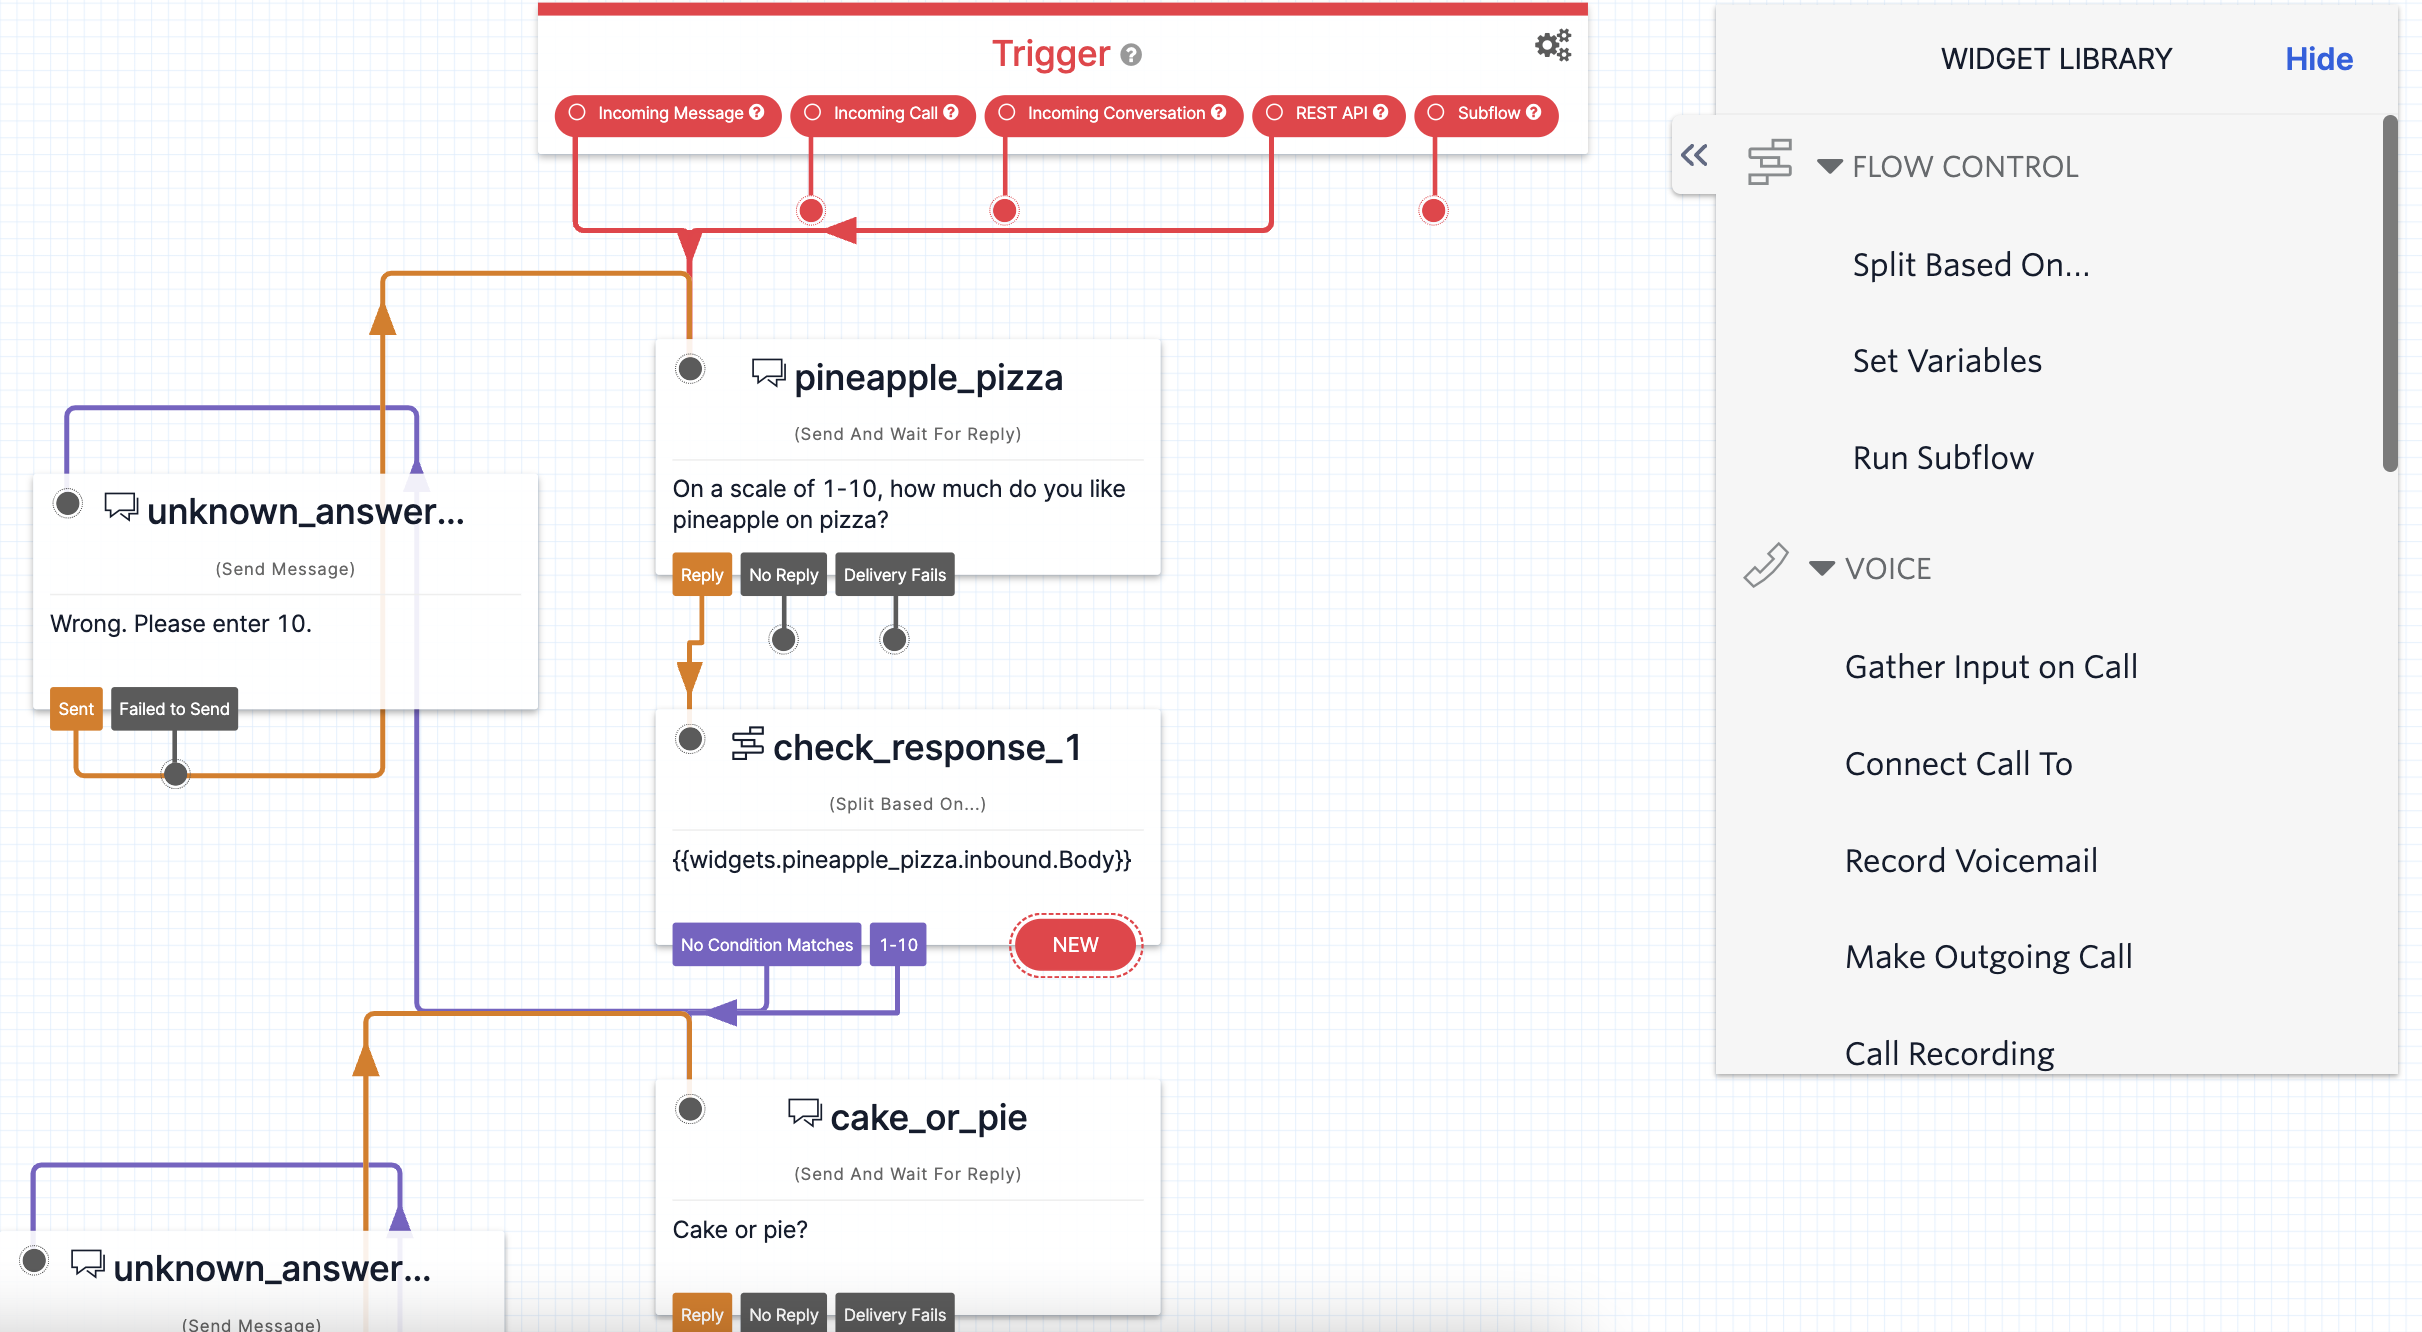
The Flow canvas showing the imported SMS Survey Flow. You can see different widgets connected to send SMS and receive response and more.
The Flow currently has an error in it, which is why you can't publish it yet. Move the canvas down and locate the send_results_to_server widget. This widget will send the survey data to your Umbraco website, but you don't have any URL to send it to yet. For now, you'll use a webhook service called webhook.site for testing purposes. Leave the Flow canvas open in your browser, open a new browser tab or window, and browse to https://webhook.site/. This service automatically creates a new webhook URL for you, that you can find under "Your unique URL". Copy this URL and paste it into the "REQUEST URL" field for the send_results_to_server widget. Click Save on the widget, and then click Publish.
Great job! You created your first flow. I encourage you to play around with the Flow you created to understand how it works.
Configure your Twilio Phone Number to use Twilio Studio
You just created your first Studio Flow, but nothing is connected to your Flow. Next, you'll configure your Twilio Phone Number to trigger your Flow.
Open a new browser tab or window. Browse to the Twilio Active Phone Numbers page, and click on the phone number you want to use. On the phone number configuration page, scroll down to the Messaging section, and find the A MESSAGE COMES IN label. Here, you can configure what should happen when a text message is received by your Twilio Phone Number. In the first dropdown, select "Studio Flow", and in the next dropdown, select the Flow you just created, then click Save.
Test your Twilio Studio Flow
To test out your flow, grab your phone and text your Twilio Phone Number any message. This will trigger the Studio Flow. Respond to the survey as you wish and once you finish, switch back to the webhook.site tab to see the HTTP request that was sent from your Flow.
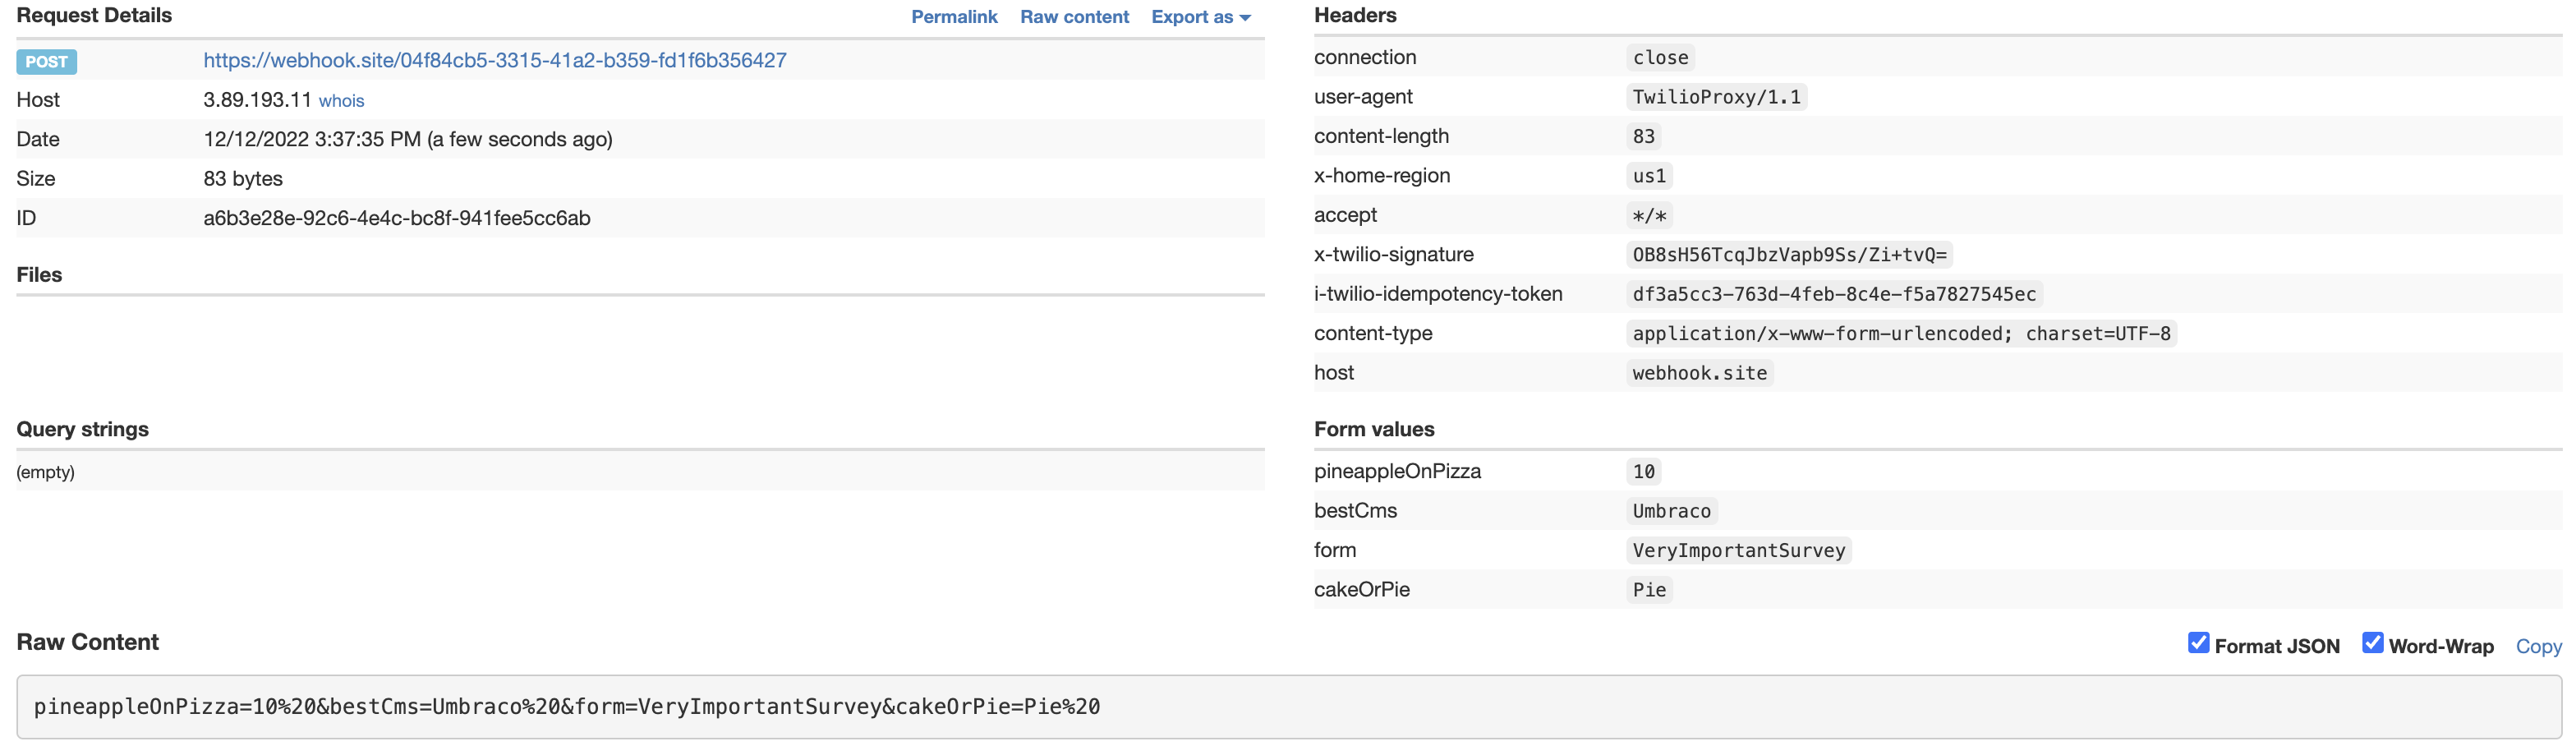
HTTP request data sent to the webhook.site URL showing headers and form encoded parameters in the request body.
There are a couple of notable things on the HTTP request:
- The
x-twilio-signatureheader which is used to validate the HTTP request originated from Twilio. You'll need this to secure your webhooks. - The
formform parameter that is set toVeryImportantSurvey. The value of this parameter will be used to match with the name of the Umbraco Forms form. - The other form parameters which contain the values that you responded with via SMS.
Later on, you'll configure the Flow to send the HTTP request to your Umbraco site, and you'll develop an endpoint to receive the data and submit it to an Umbraco Forms form.
Clone the Umbraco Site
I have already created an Umbraco 11 site and checked in the SQLite database for your convenience. Open a shell and clone the site using the command below:
git clone -b start https://github.com/Swimburger/TwilioFlowToUmbracoForms.git
cd TwilioFlowToUmbracoForms
Now, run the site using the .NET CLI:
dotnet runOnce the Umbraco site is ready, the URLs will be printed into your console. Navigate to the URL in a new tab and add the /umbraco path to navigate to the backoffice. Log in using niels@localhost as the username and niels@localhost as the password. From the backoffice, click on the Forms tab in the top navigation bar, then click on Forms in the left navigation bar, and finally, click on VeryImportantSurvey. This is the form I already created for your convenience. Take note of how the name of the form matches the form parameter that the Studio Flow submits. Feel free to look around to see how the form is configured.
Now that you have the Studio Flow and the Umbraco site with a form, it's time to integrate the two using some code.
Integrate Twilio Studio with Umbraco Forms
You have many options to extend Umbraco Forms and also multiple options on how to submit form entries programmatically. One way is to use the Forms Web API as documented here. However, if your code runs from within the Umbraco website, you can also use the undocumented .NET APIs that are already installed into your site.
In this tutorial, you'll add a new endpoint to receive the HTTP request and use the undocumented Umbraco Forms .NET APIs to submit the data as a form entry. Add a new file called TwilioEndpoints.cs and add the following code:
using Microsoft.Extensions.Primitives;
using Umbraco.Cms.Web.Common.ApplicationBuilder;
using Umbraco.Forms.Core.Enums;
using Umbraco.Forms.Core.Persistence.Dtos;
using Umbraco.Forms.Core.Services;
namespace TwilioFlowToUmbracoForms;
public static class TwilioEndpoints
{
public static IUmbracoEndpointBuilderContext UseTwilioEndpoints(this IUmbracoEndpointBuilderContext builderContext)
{
var builder = builderContext.EndpointRouteBuilder;
builder.MapPost("/twilio/flow-to-form", OnFlowToFormPost);
return builderContext;
}
private static async Task OnFlowToFormPost(
HttpRequest request,
IFormService formService,
IRecordService recordService
)
{
var form = await request.ReadFormAsync();
var formName = form["form"];
if (formName == StringValues.Empty) throw new Exception($"'form' parameter missing from form.");
var umbracoForm = formService.Get(formName);
if (umbracoForm == null) throw new Exception($"Umbraco Form '{formName}' not found.");
var umbracoFormFields = new Dictionary<Guid, RecordField>();
foreach (var key in form.Keys)
{
if (key == "form") continue;
var formField = umbracoForm.AllFields.FirstOrDefault(f => f.Alias == key);
if (formField == null) continue;
umbracoFormFields.Add(formField.Id, new RecordField(formField)
{
// .Values expects ListThe UseTwilioEndpoints extension method maps a new endpoint at path /twilio/flow-to-form which is handled by the OnFlowToFormPost method. The HttpRequest is the incoming HTTP request sent from the Twilio Studio Flow and will be passed into the OnFlowToFormPost handler. The IFormService and IRecordService are injected by ASP.NET Core's built-in dependency injection container. These two services are configured by the Umbraco.Forms NuGet package that has already been installed in the Umbraco project.
The OnFlowToFormPost fetches the form parameters from the HTTP request and stores the form parameter in the formName variable. The formName is then used to find a form with that name using formService.Get.
Now that the Umbraco Form has been retrieved, the HTTP request form parameters are being matched with the Umbraco Form fields. The parameters and fields are being matched by their names. Once the HTTP request form data is converted into an Umbraco Form Record, the record is submitted using recordService.Submit.
Note The HTTP request form parameters and the Umbraco Form fields have been configured so that they match by their names. This makes the solution more flexible so it can support multiple Umbraco Forms and multiple Studio Flows.
Now, update the Startup.cs file so the UseTwilioEndpoints method is invoked inside the WithEndpoints lambda in the Configure method.
public void Configure(IApplicationBuilder app, IWebHostEnvironment env)
{
    if (env.IsDevelopment())
    {
        app.UseDeveloperExceptionPage();
    }

    app.UseUmbraco()
        .WithMiddleware(u =>
        {
            u.UseBackOffice();
            u.UseWebsite();
        })
        .WithEndpoints(u =>
        {
            u.UseInstallerEndpoints();
            u.UseBackOfficeEndpoints();
            u.UseWebsiteEndpoints();
            u.UseTwilioEndpoints();
        });
}
If you'd like to quickly test this endpoint, start your website and run the following cURL command or PowerShell cmdlet:
cURL:
curl -X POST https://localhost:44316/twilio/flow-to-form \
   -H "Content-Type: application/x-www-form-urlencoded"  \
   -d "form=VeryImportantSurvey&pineappleOnPizza=10&bestCms=Umbraco&cakeOrPie=Pie"
PowerShell:
Invoke-WebRequest https://localhost:44316/twilio/flow-to-form `
   -Method Post `
   -Body "form=VeryImportantSurvey&pineappleOnPizza=10&bestCms=Umbraco&cakeOrPie=Pie" `
   -ContentType "application/x-www-form-urlencoded"
When you navigate back to the form in the backoffice, you'll see that there's a new form entry.
Warning Anyone can now submit HTTP requests to this new endpoint and create form entries, which could be abused. To avoid this, you can validate whether the incoming HTTP request originates from Twilio. The easiest way to do this is to use the Twilio helper library for ASP.NET. Follow these instructions on how to configure request validation for ASP.NET Core and specifically how to apply the request validation on endpoints.
Now you need to update the Studio Flow to send the HTTP request to your Umbraco site instead of the webhook.site service. But before you can do that, you'll need to make your Umbraco site publicly accessible. You can quickly do this using ngrok. ngrok can create a free and secure tunnel between your localhost and the internet, so you can test out integrations like this.
First, make sure your Umbraco site is running (dotnet run).
Then, create a tunnel using the following ngrok command:
ngrok http [YOUR_LOCALHOST_URL]The ngrok CLI will output information about your tunnel to your shell, most importantly, the Forwarding URL. The Forwarding URL is the public URL to access your locally running Umbraco site. Copy the Forwarding URL and go back to the browser tab that has the Studio Flow canvas open. Locate the send_results_to_server widget again and update the REQUEST URL field with the ngrok Forwarding URL followed by the /twilio/flow-to-form path. Click Save and then click Publish.
To fully test your integration, text your Twilio Phone Number and go through the survey again. Once finished, you should see the results as an entry in your Umbraco Form.
Summary
In this tutorial, you didn't build the Twilio Studio Flow yourself, but you learned how Twilio Studio can help you built communication workflows using the low-code Flow editor. If you're curious about Twilio Studio, I recommend you try out Twilio Studio yourself to build an interactive voice application (IVR), an SMS app or a WhatsApp app. More importantly, you learned how to integrate Umbraco Forms with Twilio Studio, or really any application that can submit HTTP requests to your Umbraco website.
However, before putting this into production, I recommend you secure your Twilio endpoints using the request validation filter provided by the Twilio helper library for ASP.NET Core.
Want to see other ways to integrate Umbraco with Twilio? Check out this tutorial on 24days.in on how to send SMS/MMS from Umbraco Forms, and we also have a ton of content about C# and .NET on the Twilio Blog.