
Hello Skriftie's 👋
With the new Umbraco V14+ WebComponent extensible backoffice codenamed Belissima, there are lots of ways we can build and extend the Umbraco backoffice to suit our clients needs.
As before the previous backoffice written in AngularJS codenamed Belle that has served us well, but it had its flaws where the Umbraco community became very creative on what and how they could extend the Umbraco backoffice.
With the introduction of this new era of the backoffice we are given lots of opporunties to extend the backoffice in an 'official' way and one of those extension points are the Umbraco User Permissions.
So what is an Umbraco User Permission?
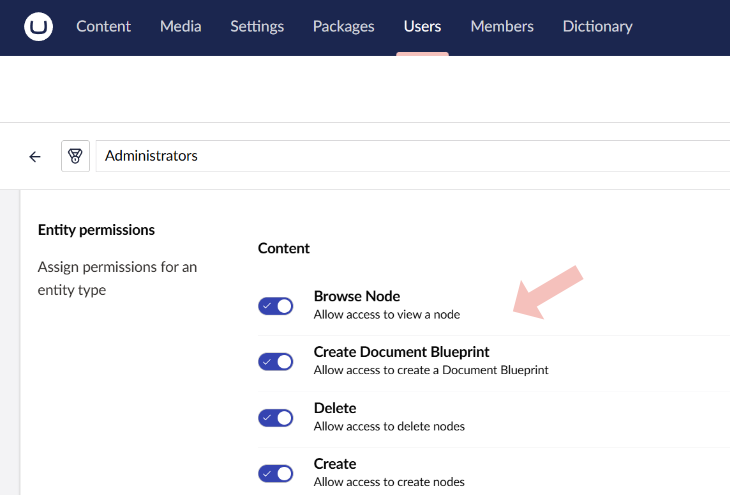
Well Umbraco ships with many default permissions out of the box such as Browse Node, Publish, Delete, Rollback and many more, which can be found inside a User group in the Users section of Umbraco, allowing us to configure users permissions on what actions they can or cannot perform inside the backoffice of the CMS.
How do I make a permission in Belissima (aka V14+)
As with Umbraco V14+ there are two ways to register things, directly inside an umbraco-package.json file that contains one or more manifests or alternatively you can use TypeScript/Javascript to register the manifest from an entrypoint file.
Below is a sample on how you would do it using the JSON approach of using an umbraco-package.json file placed at /App_Plugins/BossMode/umbraco-package.json
{
    "$schema": "../../umbraco-package-schema.json",
    "name": "Boss Mode",
    "allowTelemetry": true,
    "version": "1.0.0",
    "extensions": [
        {
            "type": "entityUserPermission",
            "alias": "bossmode.permission",
            "name": "[Boss Mode] Permission",
            "forEntityTypes": ["document"],
            "meta": {
                "group": "Boss Mode",
                "label": "Super Boss Mode",
                "description": "Gives the user access to the Boss Mode feature",
                "verbs": ["BossMode"]
            }
        }
    ]
}
Alternatively you may be using TypeScript and want to register the manifest using the approach of having an entry point file, which then registers all manifests inside your package.
Note: For the scope of this article I won't talk about setting up TypeScript, Vite and other tooling. The Umbraco documentation contains articles on this approach to get you up to speed
// src/entrypoint.ts

import { UmbEntryPointOnInit } from '@umbraco-cms/backoffice/extension-api';
import { manifest as permissionManifests } from './permissions/manifest';

export const onInit: UmbEntryPointOnInit = (_host, _extensionRegistry) => {

    console.log('Hello from Boss Mode Permission Tutorial');

    // We can register many manifests at once via code
    // as opposed to a long umbraco-package.json file
    _extensionRegistry.registerMany([
        ...permissionManifests,
    ]);
};
// src/permissions/manifest.ts
import { UMB_DOCUMENT_ENTITY_TYPE } from "@umbraco-cms/backoffice/document";
import { ManifestEntityUserPermission } from "@umbraco-cms/backoffice/extension-registry";
export const manifest: Array = [
{
type: "entityUserPermission",
alias: "bossmode.permission",
name: "[Boss Mode] Permission",
forEntityTypes: [UMB_DOCUMENT_ENTITY_TYPE], // 👀 Friendly constant for 'XXXX'
meta: {
group: "Boss Mode",
label: "Super Boss Mode",
description: "Gives the user access to the Boss Mode feature",
verbs: ["BossMode"] // 👀 The string we want to store on the user if enabled
}
},
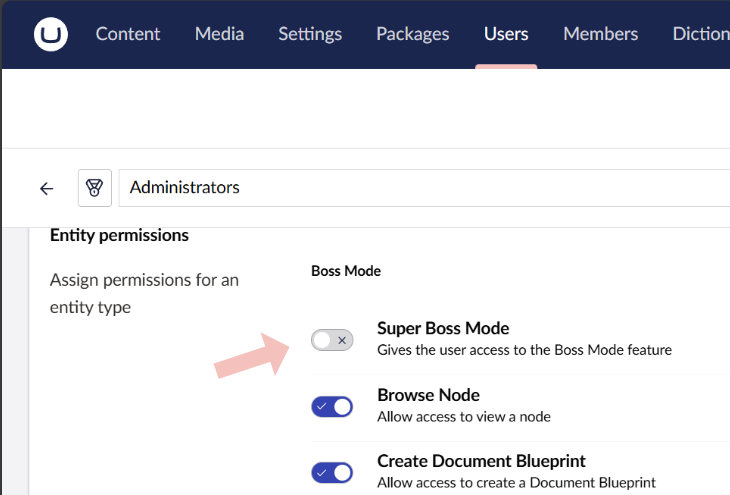
];Now we have registered our permission either via code or using the umbraco-package.json file approach we should now be able to browse to the Users section of Umbraco and see our new custom permission alongside the built in ones from Umbraco such as:
- Browse Node
- Create
- Culture and Hostnames
- And others...
Lets verify our permission works
Lets test our new permission works, for this turn on the permission in an existing User group or perhaps create a brand new user group that only has this permission enabled and assign it to one or more Umbraco backoffice users.
With that done we need to test if our permission has been set and actively working, one way for now is to use the Umbraco Backoffice Management API to get information about a user.
Browse to the Swagger API endpoint which is only enabled when in development mode /umbraco/swagger and from the dropdown in the top right we can select the Umbraco Management API.
From this very long list of APIs that makes up the Umbraco backoffice we need to find the one called /umbraco/management/api/v1/user/current
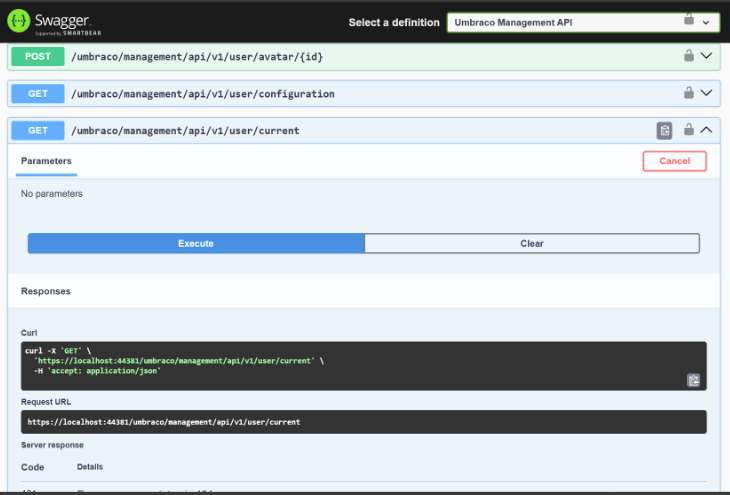
When we make the test request to the API endpoint we can look at the JSON response and see if our new permission verb BossMode can be found, if so we know that everything is working as expected. 🎉
Below is an example JSON payload with some it removed from brevity:
{
  "id": "1e70f841-c261-413b-abb2-2d68cdb96094",
  "email": "warren@hackmakedo.com",
  "userName": "warren@hackmakedo.com",
  "name": "Warren Buckley",
  ... // ✂️ Removed some properties for briefty
  "fallbackPermissions": [
    "Umb.Document.Create",
    "Umb.Document.Update",
    "Umb.Document.Delete",
    "Umb.Document.Move",
    "Umb.Document.Duplicate",
    "Umb.Document.Sort",
    "Umb.Document.Rollback",
    "Umb.Document.PublicAccess",
    "Umb.Document.CultureAndHostnames",
    "Umb.Document.Publish",
    "Umb.Document.Permissions",
    "Umb.Document.Unpublish",
    "Umb.Document.Read",
    "Umb.Document.CreateBlueprint",
    "Umb.Document.Notifications",
    ":",
    "5",
    "7",
    "T",
    "BossMode" // 👀 YAY - our new  permission
  ],
  ... // ✂️ Removed some properties for briefty
}
So now what?
Well we can take this tutorial one step further and create a simple extension that uses a condition that will show only if the user has the Boss Mode permission enabled.
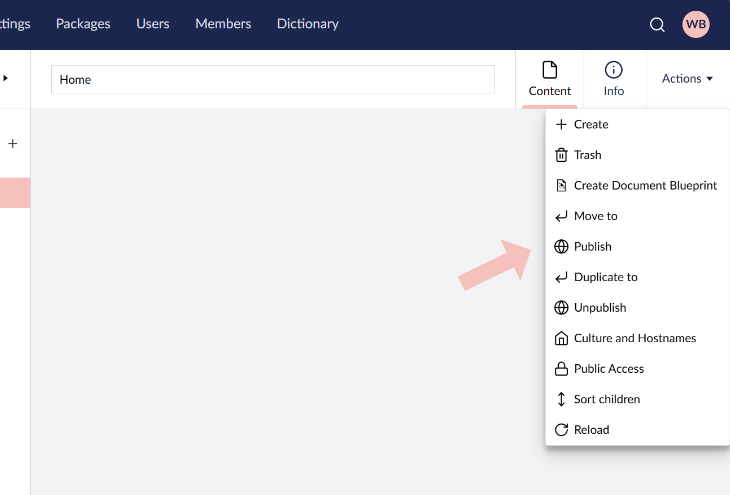
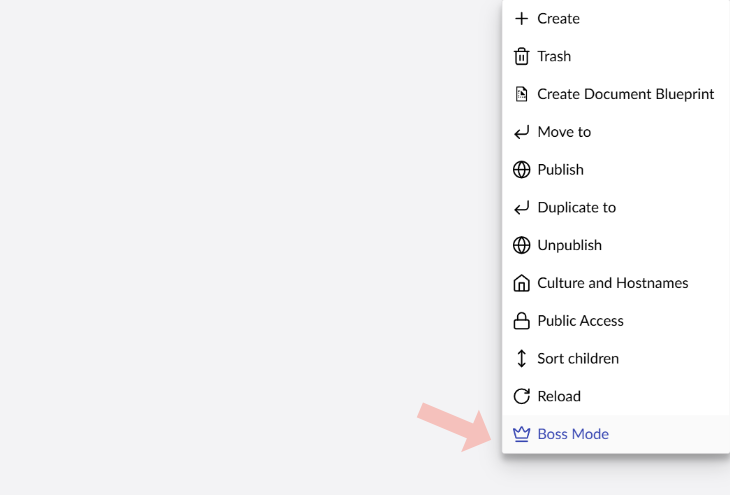
We will continue with the approach of using TypeScript to write our extension and manifest, but first lets define a simple Entity Action, which are the actions found under the Actions top right on a content node as shown in this screenshot.
Lets add the manifest in a new file like so:
// src/EntityAction/manifest.ts

import { UMB_DOCUMENT_ENTITY_TYPE } from "@umbraco-cms/backoffice/document";
import { ManifestEntityAction } from "@umbraco-cms/backoffice/extension-registry";

export const manifest: Array = [
	{
		type: 'entityAction',
		kind: 'default',
		alias: 'bossmode.entityAction',
		name: '[Boss Mode] Entity Action',
		api: () => import('./bossmode.entityaction'), // 🩹 The glue to the code we want to run/register for the manifest
		forEntityTypes: [UMB_DOCUMENT_ENTITY_TYPE], // 👀 Friendly constant for 'document'
    	weight: 0,
		meta: {
            label: 'Boss Mode',
            icon: 'icon-crown', // 👑 The same icon strings we use for document types
		},
	},
];
And now we need to create the typescript file for the bossmode.entityaction where when the user clicks the action it will run the code inside the method named execute() which plays a silly sound effect and opens up a modal by reusing the confirm modal and passing in custom markup to display an animated gif.
// src/EntityAction/bossmode.entityaction.ts

import { UmbControllerHost } from "@umbraco-cms/backoffice/controller-api";
import { UmbEntityActionArgs, UmbEntityActionBase } from "@umbraco-cms/backoffice/entity-action";
import { html } from "@umbraco-cms/backoffice/external/lit";
import { UMB_CONFIRM_MODAL, UMB_MODAL_MANAGER_CONTEXT, UmbModalManagerContext } from "@umbraco-cms/backoffice/modal";

export class BossModeEntityAction extends UmbEntityActionBase {
    private _modalManagerContext?: UmbModalManagerContext;

    constructor(host: UmbControllerHost, args: UmbEntityActionArgs) {
        super(host, args);

        // Fetch/consume the contexts & assign to the private fields
        this.consumeContext(UMB_MODAL_MANAGER_CONTEXT, (instance) => {
            this._modalManagerContext = instance;
        });
    }

    async execute() {

        // 🎺 Play a sound
        const audio = new Audio("https://tinyurl.com/likeaboss-sfx");
        audio.play();

        // 🖼️ Reuse the confirm modal to put a GIF inside
        this._modalManagerContext?.open(this, UMB_CONFIRM_MODAL, {
            data: {
                headline: "Boss Mode Activated",
                content: html`<img src="https://tinyurl.com/likeaboss-gif" alt="" />`,
                color: "positive",
                confirmLabel: "I'm a Boss",
                cancelLabel: "I'm not a Boss",
            },
        });
    }
}

export { BossModeEntityAction as api };
Lets register our manifest in our entrypoint file, like so and update it by adding in a new import at the top of the file and adding in the entityActionManifests into the extensionManifest.registerMany() call.
// src/entrypoint.ts

import { UmbEntryPointOnInit } from '@umbraco-cms/backoffice/extension-api';
import { manifest as permissionManifests } from './permissions/manifest';
import { manifest as entityActionManifests } from './EntityAction/manifest'; // 👀 Added import

export const onInit: UmbEntryPointOnInit = (_host, _extensionRegistry) => {

    console.log('Hello from Boss Mode Permission Tutorial');

    // We can register many manifests at once via code
    // as opposed to a long umbraco-package.json file
    _extensionRegistry.registerMany([
        ...permissionManifests,
        ...entityActionManifests // 👀 Added our entityaction manifest
    ]);
};
With these files in place we should have our Boss Made Entity Action working and displaying for any content node like so:
But how do we use our permission?
So we now have our boss mode entity action however it is showing up for all users regardless if they have the boss mode permission enabled or not.
So lets make some adjistments to our manifest that is registering the EntityAction, below we add a new property to the manifest called conditons. This takes in an array of conditions that all must pass/validate in order for the extension to be loaded, the topic of permissions is perhaps best suited for a follow up post one time.
But for now we just need to know that we are using the permission called 'Umb.Condition.UserPermission.Document' which gets the current user's permissions and then checks the values in the array of the allOf property and ensures that the user has all of the permissions definied.
// src/EntityAction/manifest.ts

import { UMB_DOCUMENT_ENTITY_TYPE } from "@umbraco-cms/backoffice/document";
import { ManifestEntityAction } from "@umbraco-cms/backoffice/extension-registry";

export const manifest: Array = [
	{
		type: 'entityAction',
		kind: 'default',
		alias: 'bossmode.entityAction',
		name: '[Boss Mode] Entity Action',
		api: () => import('./bossmode.entityaction'),
		forEntityTypes: [UMB_DOCUMENT_ENTITY_TYPE],
        weight: 0,
		meta: {
			label: 'Boss Mode',
            icon: 'icon-crown',
		},
		conditions: [
			{
				alias: 'Umb.Condition.UserPermission.Document', // 🔒 Checks the current user's permissions
				allOf: ['BossMode'] // 👀 Checks that the current user has all of the permissions in the array
			}
		]
	},
];
Tada 🎉
We have sucessfully added a custom permission into Umbraco Belissima and then consumed it to enable or disable a custom extension from working and with these concepts I hope you are able to take this away and apply it to your own extensions or packages you build for Umbraco Bellisima.
Any problems or questions with this tutorial, feel free to reach out where I will happily try to advise you with your Bellisima questions.
Happy hacking and have fun.
Until next time.
Peace out ✌️
Warren