
The purpose of this tutorial is to setup Umbraco 13 with Umbraco Commerce as the primary gateway for Ecommerce related activities by adding products and related properties.
An ecommerce website offers customers the convenience of browsing and purchasing products from anywhere, at any time. With intuitive navigation, clear product categories, and responsive design, users can easily find what they’re looking for, whether it's a specific item or inspiration for their next purchase.
Follow the tutorial below to explore the tools and features available to developers, while also gaining insight into the customer journey and how to design a smoother, more intuitive shopping experience.
This tutorial is aimed at developers who want to get to know the basics of running Umbraco Commerce.
Please visit https://github.com/MrEssCee/UmbracoCommerceGetStarted to obtain the code that accompanies this tutorial.
Goal
By the end of this tutorial, you’ll have created a foundational Umbraco site integrated with Umbraco Commerce. You’ll walk through key steps including listing and showcasing fictional products, updating your shopping basket, and reaching the checkout process.
Project setup
After installing Umbraco 13, continue to install Umbraco Commerce (latest version 13). You can install Umbraco Commerce via the NuGet Package Manger GUI or CLI by pasting in:
dotnet add package Umbraco.Commerce --version 13
Note: Running the site now most likely would give you an exception:
ApplicationException: Unable to run migrations as no upgrade engine found for the configured provider: Microsoft.Data.Sqlite"—is due to Umbraco Commerce not automatically supporting SQLite out of the box for migrations.
Here's how to fix it:
Umbraco Commerce is designed primarily for SQL Server, but you can configure it to work with SQLite for testing and prototyping. Here's what you need to do:
-
Install the
SQLite Persistence Layer(version 13) Run this command in your project to add the necessary NuGet package:dotnet add package Umbraco.Commerce.Persistence.Sqlite. You can also use Nuget Package manager. -
Register SQLite Support in
Program.cs
Update your Program.cs to include the SQLite configuration:
    builder.CreateUmbracoBuilder()
    .AddBackOffice()
    .AddWebsite()
    .AddUmbracoCommerce(comBuilder =>
    {
        comBuilder.AddSQLite();
    })
    .AddDeliveryApi()
    .AddComposers()
    .Build();
Configure Connection Strings in appsettings.json
Ensure your connection strings are correctly set for both Umbraco CMS and Umbraco Commerce:
"ConnectionStrings": {
  "umbracoDbDSN": "Data Source=|DataDirectory|/Umbraco.sqlite.db;Cache=Private;Foreign Keys=True;Pooling=True",
  "umbracoDbDSN_ProviderName": "Microsoft.Data.Sqlite",
  "umbracoCommerceDbDSN": "Data Source=|DataDirectory|/Umbraco.Commerce.sqlite.db;Mode=ReadWrite;Foreign Keys=True;Pooling=True;Cache=Private",
  "umbracoCommerceDbDSN_ProviderName": "Microsoft.Data.Sqlite"
}
Note: Most settings would have been setup by Umbraco Commerce by default when clicking Create. For this tutorial the default settings are acceptable.
Create a store
The basic Umbraco configuration is complete. The next step is to set up the Umbraco Commerce side of the site so that Umbraco can integrate and communicate with it.
Go to Settings > Commerce > Stores > click the ellipsis > Create.
Ensure your store is like the below setup.
Note: Most settings would have been setup by Umbraco Commerce by default when clicking Create. For this tutorial the default settings are acceptable.

The configuration under the Settings tab is used to set up Commerce and typically should only be accessible to users with the appropriate privileges. To restrict access, we’ll assign permissions specifically to the logged-in user. Click Permission next to the store, then enable the checkbox for the intended user to be granted access to the Commerce section. Finally, click Save.

For some users, additional configuration maybe required.
Navigate to your logged in user, click on Add and then look for the Sections option. Tick Commerce (under Select sections) and save your changes.

The configuration for both Umbraco Commerce is now complete at the minimal level. Let’s look at creating the Document Types for setting up content for the site.
Create Document types
Navigate to Settings > Document Types > Create. Refer to the image below for a basic setup. Most importantly, review the table that follows for the additional Document Types that need to be created, along with key details for each.
Primary setup for the Home Document Type:
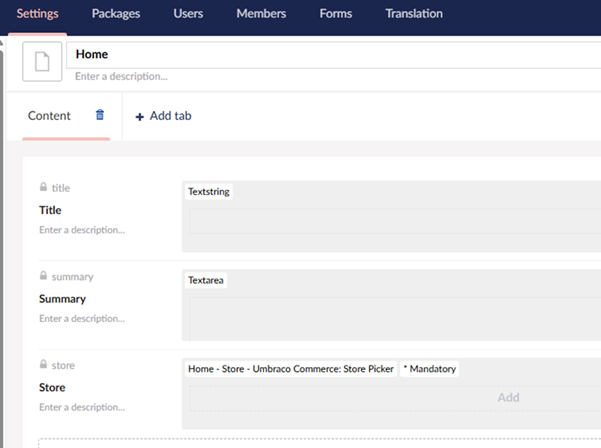
Content section setup:
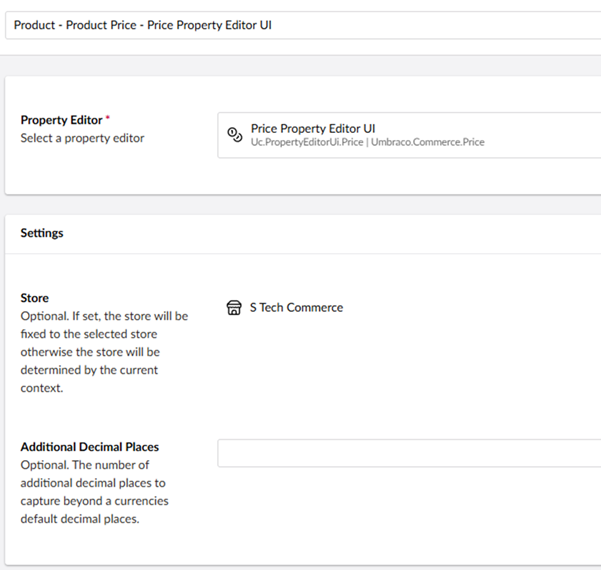
Price property editor configuration:
Document Types
Italic properties all are mandatory
Reserved alias: Do not change the alias. The alias listed is required for integration with Umbraco Commerce.
| Document Type | Property | Type | Alias | Note |
|---|---|---|---|---|
| Home | Title | TextString | title | |
| Summary | TextArea | summary | ||
| Store | Umbraco Commerce (UC) Store Picker | store | Reserved alias | |
| Products | Holder for displaying a list of products. | |||
| Product | Title | TextString | productTitle | |
| Product | Description | Richtext Editor | productDescription | |
| Image | MediaPicker | productImage | ||
| Stock | UC Stock | stock | Reserved alias | |
| Price | UC Price | price | Reserved alias | |
| Basket | Holder for the basket | |||
Document type specifics
| Document Type | Permissions | Templates |
|---|---|---|
| Home | Allow at root = true | Products, Basket |
| Products | Allow at root = true | Product |
Basic Frontend design
While this tutorial doesn't focus on CSS, incorporating some simple styling can help our site look more polished and professional. To achieve this, we'll use basic CSS along with Bootstrap to set up a clean and minimal layout.
Add a new folder called css under wwwroot then add a new css file named site.css (you can also do this via Umbraco if you prefer by navigating to the Settings section then creating the site.css file under Stylesheets). Paste the following CSS code to apply a simple layout that enhances the site's visual structure and readability:
/* Base font and layout */
body {
    font-family: 'Segoe UI', sans-serif;
    margin: 0;
    padding: 0;
}

/* Logo image inside header */
header img {
    max-height: 60px;
    vertical-align: middle;
}

/* Apply Exo 2 font to headings */
header h1,
.exo-heading {
    font-family: 'Exo 2', sans-serif;
}

/* Welcome message styling */
.welcome {
    font-size: 1.2em;
    color: #555;
}

/* Grid layout for product listings (used in older layout) */
.product-grid {
    display: grid;
    grid-template-columns: repeat(2, 1fr);
    gap: 20px;
    margin-top: 20px;
}

/* Individual product card styling */
.product-item {
    padding: 15px;
    border: 1px solid #ddd;
    border-radius: 5px;
    background-color: #fafafa;
    text-align: center;
    color: #333;
    transition: box-shadow 0.3s ease;
}

    /* Hover effect for product cards */
    .product-item:hover {
        box-shadow: 0 2px 8px rgba(0, 0, 0, 0.1);
    }

/* Product detail container layout */
.product-detail {
    display: flex;
    flex-wrap: wrap;
    gap: 40px;
    box-shadow: 0 2px 8px rgba(0, 0, 0, 0.05);
    max-width: 1000px;
    margin: 0 auto;
    padding: 40px;
    background-color: #fff;
    border: 1px solid #ddd;
    border-radius: 8px;
}

/* Product image styling */
.product-image img {
    max-width: 100%;
    height: auto;
    border-radius: 6px;
    border: 1px solid #ccc;
}

/* Product info section layout */
.product-info {
    flex: 1;
    min-width: 300px;
}

/* Product description text */
.product-description {
    font-size: 1.2em;
    color: #666;
    margin-top: 10px;
}

/* Price display styling */
.product-price {
    font-size: 1.1em;
    margin: 20px 0;
    color: #333;
}

/* Red text for out-of-stock, remove links, and validation messages */
.out-of-stock,
.remove-link,
.validation-message {
    color: #c00;
}

/* Bold out-of-stock message */
.out-of-stock {
    font-weight: bold;
}

/* Remove link styling */
.remove-link {
    text-decoration: none;
    font-size: 0.9em;
}

    /* Underline on hover for remove link */
    .remove-link:hover {
        text-decoration: underline;
    }

/* Success message box styling */
.success-message {
    background-color: #e6f4ea;
    color: #2e7d32;
    border: 1px solid #c8e6c9;
    padding: 15px 20px;
    border-radius: 5px;
    margin: 20px 0;
    font-size: 1em;
}

/* Basket item list container */
.basket-items {
    display: flex;
    flex-direction: column;
    gap: 15px;
    margin-bottom: 20px;
}

/* Individual basket item styling */
.basket-item {
    justify-content: space-between;
    align-items: center;
    background-color: #f9f9f9;
    padding: 12px 20px;
    border: 1px solid #eee;
}

/* Product name in basket */
.item-name {
    font-weight: 600;
    color: #333;
}

/* Quantity text in basket */
.item-quantity {
    color: #666;
    font-size: 0.95em;
}

/* Centered layout for checkout actions */
.checkout-actions {
    text-align: center;
}
We also need a _layout file to contain the basic design. Create a cshtml file named _layout under Views then add the below code:
<!DOCTYPE html>
<html lang="en">
<head>
<meta charset="utf-8" />
<title>Ess Tech - Your Ecom Hub</title>
<meta name="viewport" content="width=device-width, initial-scale=1.0" />
<!-- Bootstrap CSS -->
<link href="https://cdn.jsdelivr.net/npm/bootstrap@5.3.2/dist/css/bootstrap.min.css" rel="stylesheet" />
<!-- Custom Styles -->
<link rel="stylesheet" href="~/css/site.css" />
<!-- Google Fonts -->
<link href="https://fonts.googleapis.com/css2?family=Exo+2:wght@400;700&display=swap" rel="stylesheet">
</head>
<body>
<header class="bg-light py-4 mb-4 border-bottom">
<div class="container text-center">
<img src="~/images/logo.png" alt="Ess Tech" class="img-fluid mb-2" style="max-height: 80px;" />
<h1 class="display-5 fw-bold">Ess Tech</h1>
<div class="welcome">Welcome to your one-stop shop for everything!</div>
</div>
</header>
<main class="container mb-5">
@RenderBody()
</main>
<footer class="bg-dark text-white text-center py-3">
© @DateTime.Now.Year Ess Tech. All rights reserved.
</footer>
<!-- Bootstrap JS Bundle -->
<script src="https://cdn.jsdelivr.net/npm/bootstrap@5.3.2/dist/js/bootstrap.bundle.min.js"></script>
</body>
</html>
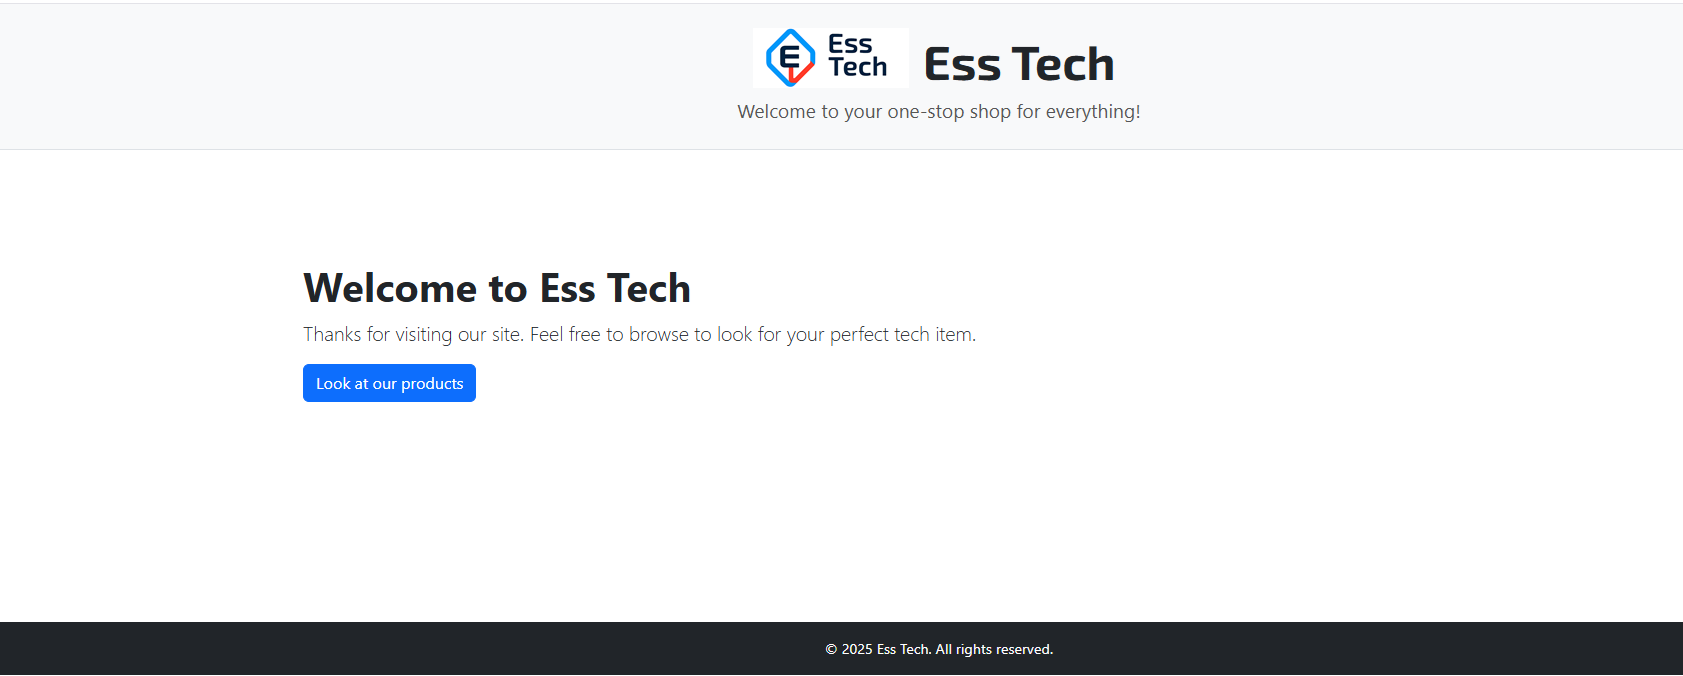
We need to have a way for the user to reach our products, so for now we will add a new file with the following code to the home.cshtml file:
@{
    Layout = "_Layout.cshtml";
}

<div class="container my-5">
    <h1 class="fw-bold">@Model.Title</h1>
    <p class="lead">@Model.Summary</p>
    <a href="/products" class="btn btn-primary">Look at our products</a>
</div>
Next add a new file named products.cshtml adding the below code:
<h1 class="exo-heading">@Model.Title</h1>
<p>@Model.Summary</p>
<a href="/products">Look at our products</a>
This will lead us to the products list page where all our products are displayed. Under the products.cshtml add:
<h1 class="exo-heading">List of products</h1>

<div class="product-grid">
    @foreach (var i in Model.Children)
    {
        if (i is Product product)
        {
            <div class="product-item">
                <img src="@product.ProductImage!.Url()" width="100" height="100"/>
                <a href="@i.Url()">@product.ProductTitle</a>
            </div>
        }
    }
</div>
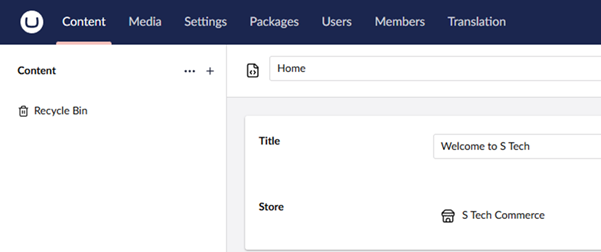
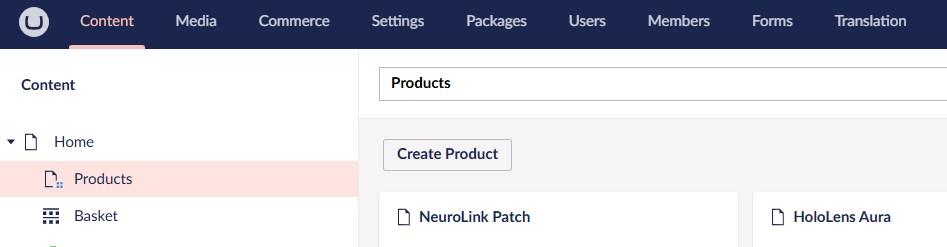
Your Content section would look similar to:
Now when you run the site you will see:
Creating the service
Next, implement functionality that allows the customer to manage their shopping basket. This includes adding items to track selections, removing individual items, clearing the entire basket, and adjusting item quantities. To support this, create a folder named Interface and define an interface called IStoreServices. Then, add the following code:
void AddToBasket(IPublishedContent currentPage, string reference, decimal quantity);
void RemoveFromBasket(IPublishedContent currentPage, BasketItemRemove removeItemId);
void UpdateBasket(IPublishedContent currentPage, BasketUpdate basketUpdateModel);
Next, create a class called StoreServices to implement the interface. We need access to the commerce API and to log important information by using a logger:
public class StoreServices(IUmbracoCommerceApi commerceApi, ILogger<IStoreService> logger) : IStoreServices
Adding an Item to the Basket
public void AddToBasket(IPublishedContent currentPage, string reference, decimal quantity)
{
    commerceApi.Uow.Execute(uow =>
    {
        var store = GetStore(currentPage!);

        if (store == null) return;

        try
        {
            var order = commerceApi.GetOrCreateCurrentOrder(store.Id)
                .AsWritable(uow)
                .AddProduct(reference, 1);

            commerceApi.SaveOrder(order);

            uow.Complete();
        }

        catch (ValidationException ve)
        {
            throw new ValidationException(ve.Errors);
        }
        catch (Exception ex)
        {
            logger.LogError(ex, "An error occurred. Object was null.");
        }
    });
}
What the code does
Here's a summary of what the code above accomplishes:
- currentPage: Represents the current content page.
- The store variable is used to access the store and retrieve its unique ID.
- A
try-catchblock is implemented to handle any errors that might occur during the "Add to Basket" process, including validation issues. - The order object retrieves the current order if one exists, or creates a new one linked to the identified store.
- Since the Commerce API is read-only by default for performance reasons, it must be made writable to allow product additions.
- The
AddProductmethod is invoked, passing in theproductReferenceand the desired quantity. - The
SaveOrdermethod is then called to persist the updated order. - A message is stored in
TempDatato notify the user that the product has been successfully added to their cart. - reference: A unique identifier for the product.
Remove from basket
To provide a smooth shopping experience, your site will need functionality that allows customers to view the contents of their basket, update item quantities, and remove products as needed. These features give users full visibility into their selections, helping them review, adjust, or finalise their order with confidence before proceeding to checkout. Add the below code:
public void RemoveFromBasket(IPublishedContent currentPage, BasketItemRemove removeItemId)
{
    commerceApi.Uow.Execute(uow =>
    {
        var store = GetStore(currentPage!);

        if (store == null) return;

        try
        {
            var order = commerceApi.GetOrCreateCurrentOrder(store.Id)
                            .AsWritable(uow)
                            .RemoveOrderLine(removeItemId.OrderLineId);

            commerceApi.SaveOrder(order);

            uow.Complete();
        }
        catch (ArgumentNullException ane)
        {
            throw new ArgumentNullException(ane.Message);
        }
        catch (Exception ex)
        {
            logger.LogError(ex, "An error occurred. Object was null.");
        }
    });
}
What the code does
Here's a breakdown of the key variables and what each part of the code is designed to do:
removeItemId: Contains the ID of the order line (basket item) to be removed.
commerceApi.GetOrCreateCurrentOrder(store.Id)
.AsWritable(uow)
.RemoveOrderLine(removeItemId.OrderLineId);
- Retrieves or creates the current order for the store.
- Makes the order writable within the unit of work.
- Removes the specified item from the order using its OrderLineId
commerceApi.SaveOrder(order);
uow.Complete();
- Saves the updated order.
- Commits the transaction to persist changes.
Update the basket
The following code enables customers to modify their shopping basket, allowing updates to individual items or multiple products. After making the desired changes, customers can click the Update button to apply and confirm them.
public void UpdateBasket(IPublishedContent currentPage, BasketUpdate basketUpdateModel)
{
    commerceApi.Uow.Execute(uow =>
    {
        var store = GetStore(currentPage!);

        if (store == null) return;
        try
        {
            var order = commerceApi.GetOrCreateCurrentOrder(store.Id)
                .AsWritable(uow);

            foreach (var orderLine in basketUpdateModel.OrderLines)
            {
                order.WithOrderLine(orderLine.OrderId)
                    .SetQuantity(orderLine.Quantity);
            }

            commerceApi.SaveOrder(order);
            uow.Complete();
        }
        catch (ArgumentNullException ane)
        {
            throw new ArgumentNullException(ane.Message);
        }
        catch (ValidationException ve)
        {
            throw new ValidationException(ve.Errors);
        }
        catch (Exception ex)
        {
            logger.LogError(ex, "An error occurred. Object was null.");
        }
    });
}
What the code does
Here's a breakdown of the key variables and what each part of the code is designed to do:
- Gets the current order for the store using its Id.
- Makes the order writable within the current unit of work (uow), allowing modifications.
- Iterates through each item in
basketUpdateModel.OrderLines, which contains updated quantities. - For each item: Finds the corresponding order line using OrderId. Updates its quantity using SetQuantity.
Creating the Controller
Now that the essential service methods are now in place, we’ll continue following the Separation of Concerns principle by creating a new folder named Controllers and adding a BasketSurfaceController. This controller will handle all actions by invoking the previously created service. To leverage Umbraco’s built-in variables and methods, the controller should inherit from SurfaceController. Additionally, inject the StoreService to access the newly implemented methods:.
    [HttpPost]
    public IActionResult AddToBasket(Basket basketModel)
    {
        if (!ModelState.IsValid)
            return CurrentUmbracoPage();

        try
        {
            storeService.AddToBasket(CurrentPage!, basketModel.ProductReference, 1);
            TempData["SuccessMessage"] = "Item added to basket";
        }
        catch (ValidationException ve)
        {
            ModelState.AddModelError("ItemOutOfStock", "Sorry this product is out of stock");
            logger.LogError(ve, "An error occurred. Please see the error log for more info [AddToBasket]");
            return CurrentUmbracoPage();
        }
        catch (Exception ex)
        {
            logger.LogError(ex, "An error occurred. Please see the error log for more info [AddToBasket]");
            TempData["SuccessMessage"] = "Item could not be added to basket, please try again later.";
            return CurrentUmbracoPage();
        }

        return RedirectToCurrentUmbracoPage();
    }

    [HttpPost]
    public IActionResult UpdateBasket(BasketUpdate basketUpdateModel)
    {
        if (!ModelState.IsValid)
            return CurrentUmbracoPage();

        try
        {
            storeService.UpdateBasket(CurrentPage!, basketUpdateModel);
        }
        catch (ValidationException)
        {
            ModelState.AddModelError("UpdateBasket", "Sorry, stock is low, please try reducing the amount");

            return CurrentUmbracoPage();
        }
        catch (Exception ex)
        {
            logger.LogError(ex, "An error occurred. Please see the error log for more info [UpdateBasket]");
        }

        TempData["SuccessMessage"] = "Basket updated";

        return RedirectToCurrentUmbracoPage();
    }

    [HttpGet]
    public IActionResult RemoveFromBasket(BasketItemRemove removeItemId)
    {
        if (!ModelState.IsValid)
            return CurrentUmbracoPage();

        try
        {
            storeService.RemoveFromBasket(CurrentPage!, removeItemId);
        }
        catch (ValidationException)
        {
            ModelState.AddModelError("Item in Basket", "Could not remove item from basket.");

            return CurrentUmbracoPage();
        }
        catch (Exception ex)
        {
            logger.LogError(ex, "An error occurred. Please see the error log for more info [RemoveFromBasket]");
        }

        TempData["SuccessMessage"] = "Item removed from basket";

        return RedirectToCurrentUmbracoPage();
    }
Adding the missing models (DTOs)
In order for the code to run in its entirety, you will need to add the required models as below:
public class Basket
{
	public string? ProductReference { get; set; }
}
public class BasketItemRemove
{
    public Guid OrderLineId { get; set; }
}
public class BasketUpdate
{
    public required OrderLineQuantitVM[] OrderLines { get; set; }
}
public class OrderLineQuantity
{
    public Guid OrderId { get; set; }
    public decimal Quantity { get; set; }
}
Register the Service
Registering a service in C# means telling your app how to create and manage an object so it can be automatically provided wherever it's needed.
To do this create a new folder named Composers and add a new C# class file called Custom Services. Add the below code:
using Umbraco.Cms.Core.Composing;
using UmbracoCommerceGetStarted.Interfaces;
using UmbracoCommerceGetStarted.Services;

namespace UmbracoCommerceGetStarted.Composers
{
    public class CustomServices : IComposer
    {
        public void Compose(IUmbracoBuilder builder)
        {
            builder.Services.AddTransient<IStoreServices, StoreServices>();
        }
    }
}
Setting up the frontend
Considering we already have the basic site layout already set, we will now create the product page for actions to be taken against a product.
When reaching an individual product page, we want to display more information about the product itself so the customer can decide if they want to purchase.
Under Settings click Templates and copy the below code into product.cshtml:
@using Umbraco.Commerce.Extensions
@inherits Umbraco.Cms.Web.Common.Views.UmbracoViewPage<ContentModels.Product>
@using ContentModels = Umbraco.Cms.Web.Common.PublishedModels;
@{
    Layout = "_Layout.cshtml";
    var store = Model.Value<StoreReadOnly>("store", fallback: Fallback.ToAncestors);
    var prod = CommerceApi.Instance.GetProduct(store!.Id, Model.Key.ToString(), "en-GB");
    var price = prod.TryCalculatePrice();
}

@using (Html.BeginUmbracoForm("AddToBasket", "BasketSurface"))
{
    @Html.Hidden("productReference", Model.Key.ToString())

    <div class="container my-5">
        <div class="row g-4 align-items-center">
            <div class="col-md-5 text-center">
                <img src="@Model.ProductImage!.Url()" alt="@Model.ProductTitle" class="img-fluid rounded" />
            </div>
            <div class="col-md-7">
                <h1 class="fw-bold">@Model.ProductTitle</h1>
                <h2 class="h5 text-muted mb-3">@Model.ProductDescription</h2>
                <p class="fs-5">
                    Our price excluding VAT: <strong>@price.Result?.WithoutTax.ToString("C0")</strong>
                </p>

                @if (Model.Stock == 0)
                {
                    <p class="text-danger fw-semibold">Sorry, out of stock</p>
                }
                else
                {
                    <button type="submit" class="btn btn-success">Add to Basket</button>
                }
            </div>
        </div>

        <div class="mt-4">
            @await Html.PartialAsync("~/Views/Partials/shop/Notifications.cshtml")
        </div>
    </div>
}
What the Code Does
The code performs the following steps:
- It accesses the store to retrieve key product properties, such as price.
- If the store isn't directly available, a fallback mechanism allows traversal through the content tree to locate it.
- Using the store and a product reference (provided by the model representing a single product), it fetches the product data.
- The product is returned as a
ProductSnapshot, which is Umbraco Commerce's way of capturing the page ID and executing the necessary logic to prepare the product data for further use. - The price is then calculated and displayed excluding VAT. You can optionally include VAT in the display as well.
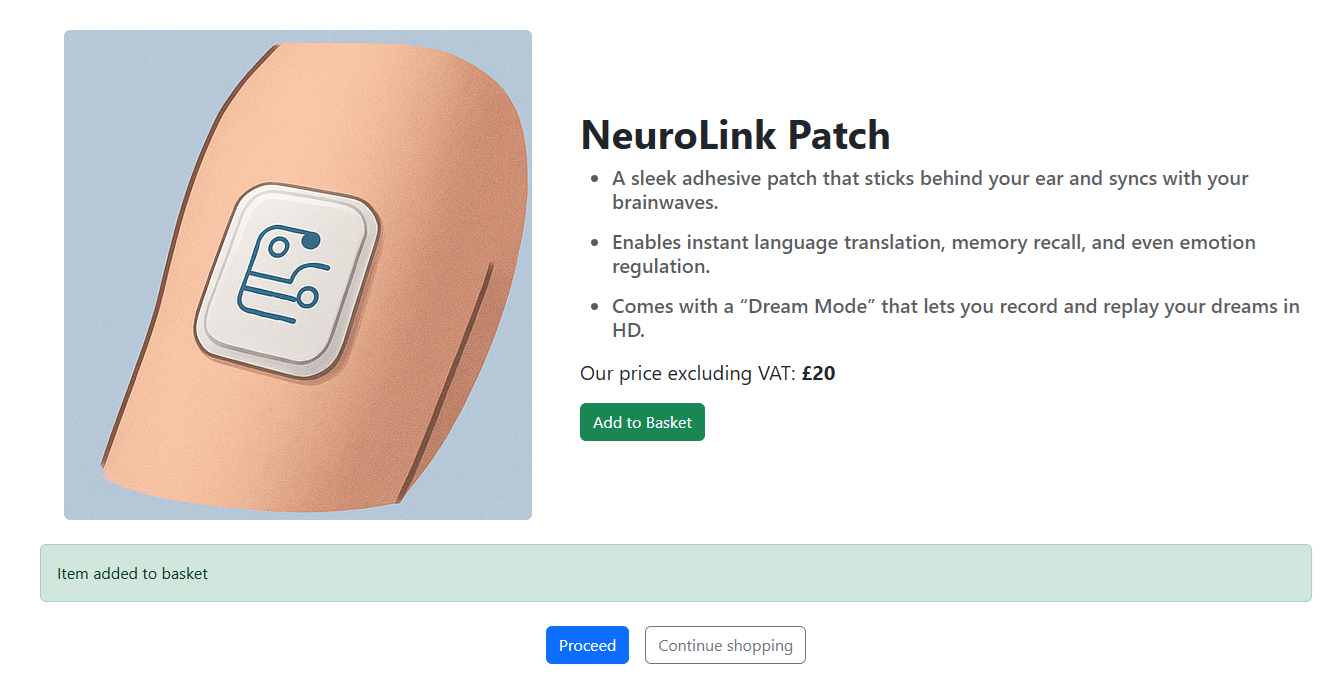
When clicking Add to Basket you will notice the page postback but nothing else. To confirm the product has been added, you will need to open the database table umbracoCommerceOrderLine and verify that the product is listed.

Note: To view the database table you will need to install the appropriate software to open and view Sqlite databases, such as DB Browser. If using Visual Studio you would be able to install an extension SQLite/SQL Server Compact Toolbox or for Visual Code SQLite Viewer would be available as a plugin.
In order for your customer to receive confirmation that a product has been added , create a new partial under views/partials/shop named Notifications.cshtml. Add the below code:
@Html.ValidationSummary(true, "", new { @class = "text-danger" })

@{
    var success = TempData["SuccessMessage"]?.ToString();

    if (!string.IsNullOrWhiteSpace(success))
    {
        <!-- Success message box -->
        <div class="alert alert-success">@success</div>
    }

    <!-- Action buttons for basket and shopping -->
    <div class="d-flex justify-content-center gap-3 mt-4">
        <a href="/basket" class="btn btn-primary">Proceed</a>
        <a href="/products" class="btn btn-outline-secondary">Continue shopping</a>
    </div>
}
@await Html.PartialAsync("~/Views/Partials/shop/Notifications.cshtml")
This would allow the notification to appear when a product is added to the basket.
Add the final basket step
After the customer advances to the next step, we should display the contents of their basket to confirm what they’re about to purchase. This view should include each item, its quantity, and options to either remove the item or update the quantity. To implement this, create a new Razor view named Basket.cshtml if not already available, under the Views folder, and insert the following code:
@inherits Umbraco.Cms.Web.Common.Views.UmbracoViewPage<ContentModels.Basket>
@using ContentModels = Umbraco.Cms.Web.Common.PublishedModels;
@{
    var store = Model.Value<StoreReadOnly>("store", fallback: Fallback.ToAncestors);
    var currentOrder = CommerceApi.Instance.GetCurrentOrder(store.Id);
    if (currentOrder == null)
    {
        // If there's no current order, redirect to products page
        // or handle it in the Controller.
        <script>
            window.location.href = "/products";
        </script>

        return;
    }
    ;
}

@using (Html.BeginUmbracoForm("UpdateBasket", "BasketSurface"))
{
    <div class="container my-5">
        <h2 class="fw-bold mb-4">Your Basket</h2>

        <div class="list-group mb-4">
            @foreach (var item in currentOrder.OrderLines.Select((ol, i) => new
            {
                OrderLine = ol,
                Index = i
            }))
            {
                <div class="list-group-item p-4 border rounded shadow-sm">
                    @Html.Hidden($"orderLines[{item.Index}].OrderId", item.OrderLine.Id)
                    @Html.Hidden($"orderLines[{item.Index}].Quantity", (int)item.OrderLine.Quantity, new { @type = "number" })
                    @Html.Hidden($"orderLines[{item.Index}].ProductReference", item.OrderLine.ProductReference)

                    <div class="row align-items-center">
                        <div class="col-md-8">
                            <h5 class="mb-1 fw-bold">@item.OrderLine.Name</h5>
                            <p class="mb-1 text-muted">Price: @item.OrderLine.BasePrice.Value.WithoutTax.ToString("C0")</p>
                            <p class="mb-0 text-secondary">Quantity: @Convert.ToInt32(@item.OrderLine.Quantity)</p>
                        </div>
                        <div class="col-md-4 text-md-end mt-3 mt-md-0">
                            <a href="@Url.SurfaceAction("RemoveFromBasket", "BasketSurface", new { OrderLineId = item.OrderLine.Id })" class="btn btn-outline-danger">
                                <i class="bi bi-trash"></i> Remove
                            </a>
                        </div>
                    </div>
                </div>

            }
        </div>

        <button type="submit" class="btn btn-primary mb-3">Update Basket</button>

        @{
            var success = TempData["SuccessMessage"]?.ToString();
        }

        @if (!string.IsNullOrWhiteSpace(success))
        {
            <div class="alert alert-success">@success</div>
        }

        @Html.ValidationMessage("UpdateBasket", "", new { @class = "text-danger" })

        <div class="mt-4">
            <a href="/checkout" class="btn btn-success">Proceed to checkout</a>
        </div>
    </div>

}
What the code does
The final stage before the customer commences to the checkout:
- Iterates over each OrderLine in the currentOrder.
- Uses
.Select((ol, i) => ...)to also capture the index (i) for use in form field naming. - The hidden fields are used to preserve item data when the form is submitted.
- The javascript ensures if there is no order, then to redirect the user to the products page (for the scope of this article javascript would suffice however doing this from the service level is preferable).
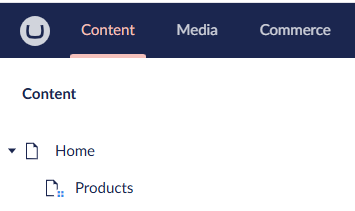
Your complete Content section:
Finally, the checkout
While you could create your own checkout process, a free plugin available allows you to get the basics setup pretty swiftly.
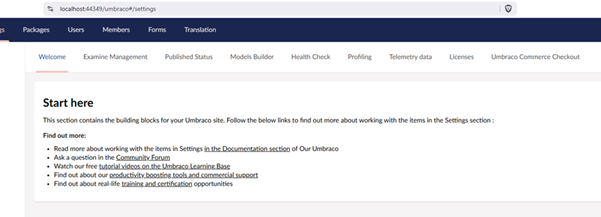
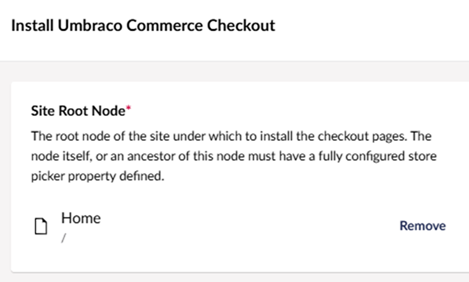
Install Umbraco.Commerce.Checkout (version 13). Once installed you may need to refresh/log off and back on. Head over to the Settings section and select Umbraco Commerce Checkout:
Click Install and select the home page root, which is where we want the checkout to be installed:
Once installed your content section should resemble the below image:
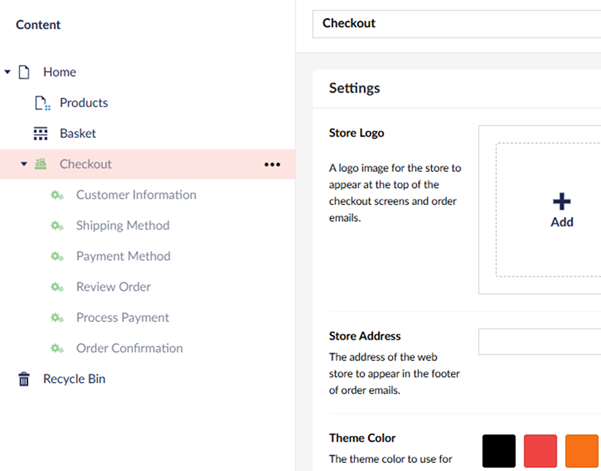
Review the settings available on the checkout page. After making any necessary changes, such as adding your logo or Store Address, Theme colour etc, ensure to Save and Publish the pages.
While there are many configuration options to explore, they fall outside the scope of this introductory tutorial. The Basket.cshtml file already includes a link to the checkout page, as referenced earlier. Clicking this link will take the user to the checkout flow, where you can collect the customer's address, proceed to the payment screen, and complete any other required steps.
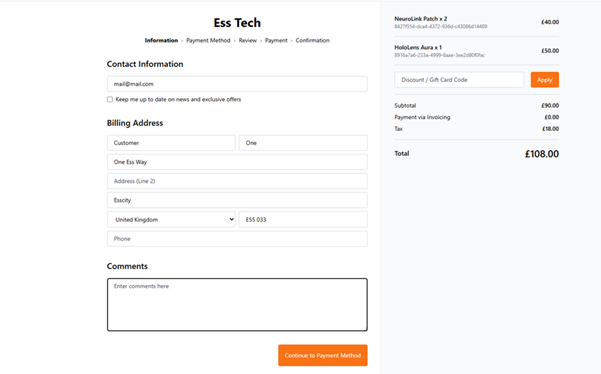
Customer infomation
The first step is to capture the customer’s contact information:
Payment method
Click to continue to the payment method set (this is configured under Settings > Commerce > Stores > Ess Tech > Payment Methods, more information can be found at https://github.com/umbraco/Umbraco.Commerce.Checkout).
Considering we have not setup a payment method, the system is set with a Zero Value payment method:

This setup allows you to continue without processing a payment. While this is acceptable for demonstration purposes, there are plugins available to integrate your system with a fully functional payment gateway.
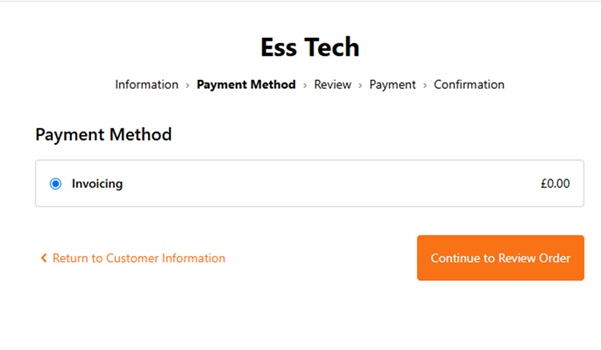
Click to Continue to Review Order.

Review your order and click Continue to Process Payment and finally you will have a thank you page.
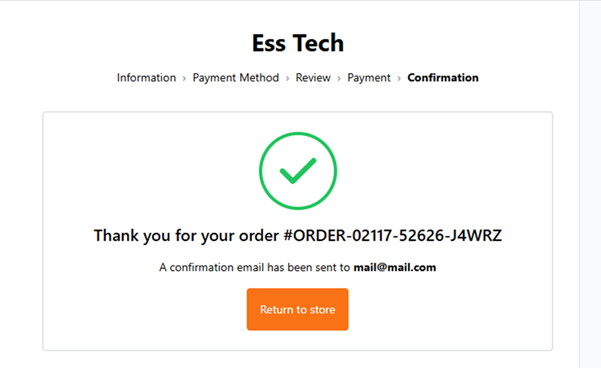
Note: Thank you page is part of the checkout package installed earlier. You may need to set this up under your Payment Methods for the payment method type.
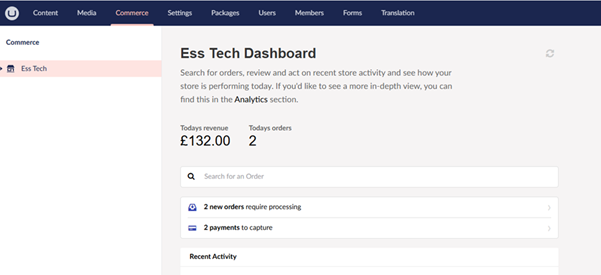
To view and manage orders within the CMS, go to the Commerce section. This menu item was enabled during the initial setup steps. If it's not visible, please revisit the earlier instructions for configuring Umbraco Commerce.
Summary
In this tutorial, you've learned how to set up and configure a basic e-commerce website using Umbraco 13 and Umbraco Commerce 13. Key concepts and skills covered include:
- Installing and integrating Umbraco Commerce into a fresh Umbraco CMS project.
- Creating products via Umbraco Document Types.
- Setting up a shopping basket with functionality to add, update, and remove items.
- Configuring checkout workflows, including customer details, shipping options, and order confirmation.
- Managing orders and inventory through the back-office interface.
- Customising storefront behaviour using Razor views and Controllers
- Exploring payment gateway options for future integration