
Efficiency and simplicity - for me, these are two key characteristics of an effective content management system. Content management systems exist to allow non-technical users to create rich content on the websites they maintain without involving technical help. For a CMS to be useful, editors must be able to manage content quickly and easily. The ease with which content editors can use a content management system is partially determined by the out of the box features of the CMS. However, the organization of the content within the system along with the way editors go about placing that content on pages can have as much, if not more of an impact, on the editor’s ability to navigate and use a CMS.
One of the best ways to achieve efficiency using a CMS is to eliminate duplicate content entry. By allowing editors to update content in a single location and reference it in multiple locations throughout the site, we eliminate the potential for error while reducing the time necessary to update the site. Breaking content into small, logical blocks is a great way to achieve both reusability, which results in efficiency, and simplicity in a CMS. Just as the world around us is full of complex systems composed of smaller building blocks – from the human body with its cells, organs and organ systems to buildings constructed of lumber, rooms, and floors - content management systems, including Umbraco, work well when following a similar pattern. Content can be broken into content items, content blocks and pages.
Content Organization
So, how can we break down and organize content in Umbraco? When deciding how to break content into its respective parts, it is important to identify and separate content which can and should be reused from that which is page specific.
Content Library
There are various ways to do this, but one clear and concise way is to create a section in the content tree specifically for reusable content. For purposes of this article, I will refer to this area of the content tree as the “content library.” The content items stored in this area of the tree each represent a unit of content with all related attributes and properties. In most cases, these will technically align almost one to one with element type document types.
Content Blocks
Once we have somewhere to store reusable content, we can assemble it in different ways for display throughout the site. The containers used to hold reusable content are referred to in a variety of ways within various content management systems – widgets, components, content blocks, etc. We will use “content blocks” to refer to reusable content features which encapsulate one or more content items along with the means to display and style the referenced content. This type of content is also typically built using element type document types.
Content Placement
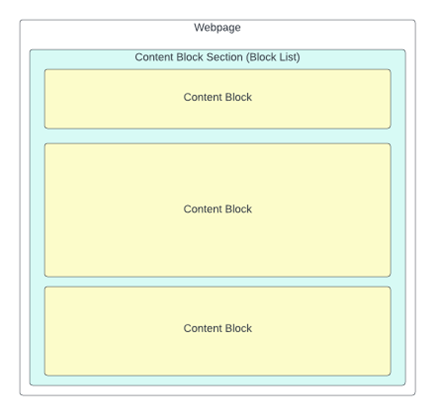
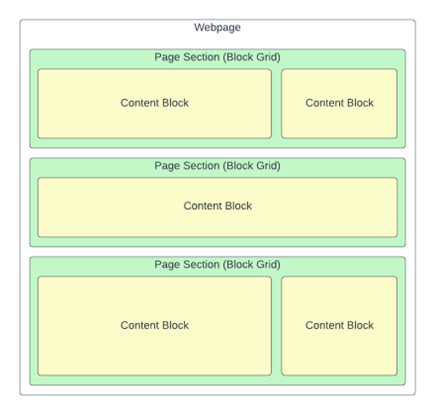
To display content on a website, we need to reference it on a page within the site. As always, there are multiple ways to do this but two of the options available in Umbraco are the Block List and the Block Grid. Using a block list, we can create a simple page layout which nests blocks of content inside a Block List. For a more flexible layout, we can use the Block Grid to create one or more sections within a page, each with its own layout, which again allows for nesting content blocks inside it but now with multiple areas within each section allowing content editors to arrange content more fluidly. At a high level, these two approaches look like this:
| Laying out a page using a Block List | Laying out a page using a Block Grid |
 |
 |
| In the arrangement above, content blocks are nested inside a single content area defined by a block list. |
In the arrangement above, content blocks are nested inside content areas defined by multiple block grids each with its own layout. |
Using a Block List to Create a Content Block Section
Most websites include at least one page layout or template on which the content on the entire page spans the full-page width. This page layout is a perfect candidate for using a block list to create one or more content block sections with the page.
This can be done using the steps below.
In the Code:
Create a partial view called “default.cshtml” in a \views\Partials\blocklist folder using the following code snippet:
@inherits Umbraco.Cms.Web.Common.Views.UmbracoViewPage<Umbraco.Cms.Core.Models.Blocks.BlockListModel>

@{
    if (Model?.Any() != true) { return; }
}
<div class="umb-block-list">
    @foreach (var block in Model)
    {
        if (block?.ContentUdi == null) { continue; }
        var data = block.Content;
        @await Html.PartialAsync("blocklist/Components/" + data.ContentType.Alias, block)
    }
</div>
In the Backoffice:
- Navigate to the Settings section.
- Right click on the Data Types folder and create a new data type.
- Enter a name for the data type such as “Content Block List.”
- Click to select a property editor and choose “Block List” from the options.
- Add blocks, such as accordions, CTAs, etc. that you wish to make available within the block list.
- Leave all other properties set to their defaults and save.
- Next, create a new document type with template and enter a descriptive name such as “Content Page – Full Width.”
- Add a property and enter a name such as “Content Block Section.”
- Click to select an editor and choose the “Content Block List” created above.
- Change the page permissions and enable “Allow as root.”
- Save the document type.
To use the Content Block Section on the Page:
- Navigate to the Content section.
- Create a page using the new “Content Page – Full Width” type created above.
- Click to “Add content” in the “Content Block Section” field.
- Select one or more blocks and configure any block specific properties.
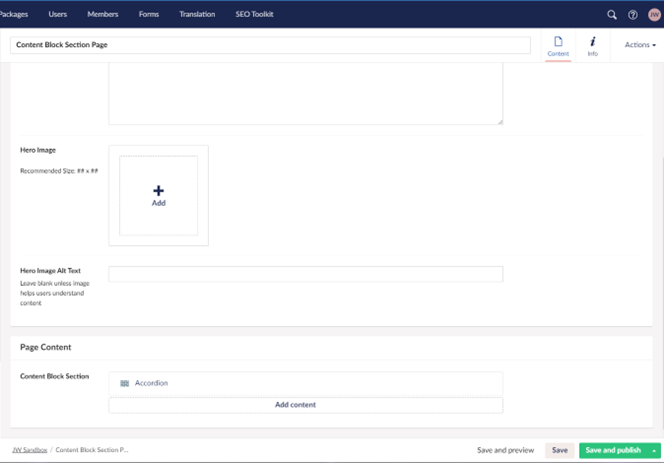
- Save and preview the page.
 |
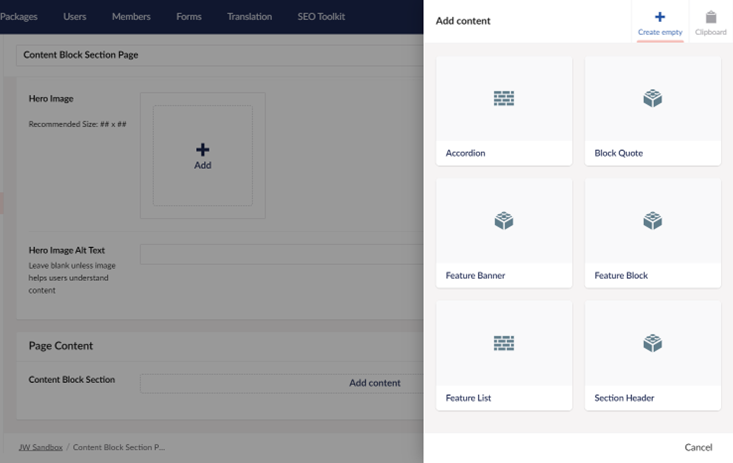 |
| Above we see the block list driven “Content Block Section” field which is now available on the page. | Here we see that the content editor is able to select the content blocks to nest in the content block section. |
Using a Block Grid to Create Page Sections
For page layouts which arrange content into multiple columns, a block grid can be used. This includes the ability to use multiple layouts within a single page. Before diving into using the block grid to lay out a page, it is worth reviewing the key differences between the block grid and the previous grid editor and their implications.
Two major differences between the grid editor and block grid can be found in the types of content that can be placed inside each and the way in which the content is stored and referenced. With the out of the box the grid editor, only macros and a few built in types can be placed in the grid and is stored as unstructured content. As such, the content is retrieved and referenced using generic methods requiring the use of magic strings to access specific content properties. On the other hand, the block grid allows document types to be contained within and retrieved as strongly typed objects. This distinction makes the retrieval and subsequent usage of content from block grids more straightforward than with the grid editor.
While the block grid could be used to create a grid for the entire page similar to the previous grid editor, this may not be the most effective use of the block grid. Having a grid which spans the page is highly flexible for content editors, it can be challenging to build out the front-end styling since it results in an almost unlimited number of configurations which must be accounted for, which is especially challenging when it comes to handling responsive sizing. That much flexibility can also be overwhelming to editors as it again provides an almost limitless number of ways to utilize apply styling making it difficult to adhere to the style guide and maintain consistency across the site. An alternative is to create modular page sections with predetermined layouts and allow content editors to place one or more of these on a page. This gives editors flexibility and allows them to utilize different layouts throughout the site, even mix and matching layouts on a single page, while limiting the available options thus maintaining a consistent look and feel on the site and making it easier for content editors to decide on a page layout.
To create page sections with different layouts which can be used in together on a single page, the steps below can be used.
In the Code:
Create the following a partial views in the \Views\Partials\blockgrid folder:
area.cshtml
@using Umbraco.Extensions
@inherits Umbraco.Cms.Web.Common.Views.UmbracoViewPage<Umbraco.Cms.Core.Models.Blocks.BlockGridArea>

<div class="umb-block-grid__area" data-area-col-span="@Model.ColumnSpan" data-area-row-span="@Model.RowSpan" data-area-alias="@Model.Alias" style="--umb-block-grid--grid-columns: @Model.ColumnSpan;--umb-block-grid--area-column-span: @Model.ColumnSpan; --umb-block-grid--area-row-span: @Model.RowSpan;">
    @await Html.GetBlockGridItemsHtmlAsync(Model)
</div>
areas.cshtml
@inherits Umbraco.Cms.Web.Common.Views.UmbracoViewPage<Umbraco.Cms.Core.Models.Blocks.BlockGridItem>

@{
    if (Model?.Areas.Any() != true) { return; }
}

<div class="umb-block-grid__area-container" style="--umb-block-grid--area-grid-columns: @(Model.AreaGridColumns?.ToString() ?? Model.GridColumns?.ToString() ?? "12");">
    @foreach (var area in Model.Areas)
    {
        @await Html.GetBlockGridItemAreaHtmlAsync(area)
    }
</div>
default.cshtml
@inherits Umbraco.Cms.Web.Common.Views.UmbracoViewPage<Umbraco.Cms.Core.Models.Blocks.BlockListModel>

@{
    if (Model?.Any() != true) { return; }
}

<div class="umb-block-list">
    @foreach (var block in Model)
    {
        if (block?.ContentUdi == null) { continue; }
        var data = block.Content;
        @await Html.PartialAsync("blocklist/Components/" + data.ContentType.Alias, block)
    }
</div>
items.cshtml
@using Umbraco.Cms.Core.Models.Blocks
@inherits Umbraco.Cms.Web.Common.Views.UmbracoViewPage<IEnumerable<BlockGridItem>>

@{
    if (Model?.Any() != true) { return; }
}

<div class="umb-block-grid__layout-container">
    @foreach (var item in Model)
    {
        <div class="umb-block-grid__layout-item" data-content-element-type-alias="@item.Content.ContentType.Alias" data-content-element-type-key="@item.Content.ContentType.Key" data-element-udi="@item.ContentUdi" data-col-span="@item.ColumnSpan" data-row-span="@item.RowSpan" style=" --umb-block-grid--item-column-span: @item.ColumnSpan; --umb-block-grid--item-row-span: @item.RowSpan; ">

            @{
                var partialViewName = "blockgrid/Components/" + item.Content.ContentType.Alias;
                try
                {
                    @await Html.PartialAsync(partialViewName, item)
                }
                catch (InvalidOperationException)
                {
                    <p>
                        <strong>Could not render component of type: @(item.Content.ContentType.Alias)</strong>
                        <br/>
                        This likely happened because the partial view <em>@partialViewName</em> could not be found.
                    </p>
                }
            }
        </div>
    }
</div>
Create a subfolder under \Views\ Partials\blockgrid called “Components” and create the following partial views:
fullWidthSection.cshtml
@inherits Umbraco.Cms.Web.Common.Views.UmbracoViewPage<Umbraco.Cms.Core.Models.Blocks.BlockGridItem>

<div>
    @await Html.GetBlockGridItemAreasHtmlAsync(Model)
</div>
rightRailSection.cshtml
@inherits Umbraco.Cms.Web.Common.Views.UmbracoViewPage<Umbraco.Cms.Core.Models.Blocks.BlockGridItem>

<div>
    @await Html.GetBlockGridItemAreasHtmlAsync(Model)
</div>
You will notice that the contents of these two files are identical. Feel free to refactor to prevent duplicated code!
In the Backoffice:
- Navigate to the Settings section.
- Right click on “Document types” and create a folder called “Page Sections.”
- Right click to create a new document type in the Page Sections folder.
- Select “Element Type” and name the new document type “Full Width Section.”
- Save the new type without entering any groups or properties. This type will serve as a container for other content types/blocks.
- Create another new element type identical to Full Width Section named “Right Rail Section” in the Page Sections folder.
- Right click on “Data Types” and create a new type called “Content Block Grid.”
- Select the Block Grid property editor.
- Enter “Add Section” in the “Create Button Label” field.
- In the blocks field, click “Add Block” and select the “Full Width Section” document type.
- Under “Permissions,” set the “Allow in root” permission and disable “Allow in areas.”
- Switch to the “Areas” tab and click the “Add” button in the Areas to create a new area.
- Resize the area to span the full width by dragging the right border.
- Submit and close.
- Repeat steps 9 and 10 to add the “Right Rail Section” block.
- Switch to the “Areas” tab and add a content block which is 8 columns wide.
- Add another area next to the existing one which is 4 columns wide and submit.
- Submit and close.
- Add blocks, such as accordions, CTAs, etc. that you wish to make available within the areas.
- For each of these blocks, disable the “Allow in root” option and enable “Allow in areas.”
- Additionally, if there are blocks which should not appear in certain areas, you can return to the areas and further configure each area to set the allowed block types.
- Next, create a new document type with template and enter a descriptive name such as “Content Page with Sections.”
- Add a property and enter a name such as “Page Sections.”
- Click to select an editor and choose the “Content Block Grid” created above.
- Change the page permissions and enable “Allow as root.”
- Save the document type.
To use Page Sections on the Page:
The steps above will result in a field on pages of type “Content Page with Sections” which allows the content editor to place both full width and right rail sections on the page and then place content blocks within the layout areas of those sections as follows:
- Navigate to the “Content” section.
- Create a page using the new “Content Page with Sections” type created above.
- Click to “Add Section” in the “Page Sections” field.
- Select either a full width section or right rail section.
- Click to “Add content” within an area of the section.
- Select a content block from the available options and configure any block specific properties.
- Add additional content to the section as desired.
- Add additional sections, and embedded content, to the page as desired.
- Save and preview your page!
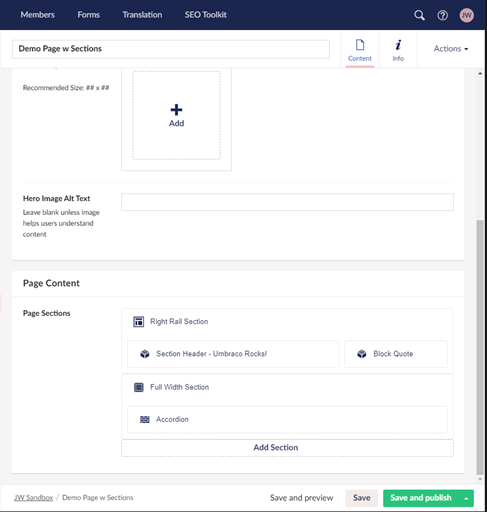
Above we see the block grid based “Page Sections” field along with a visual representation of the areas within each.
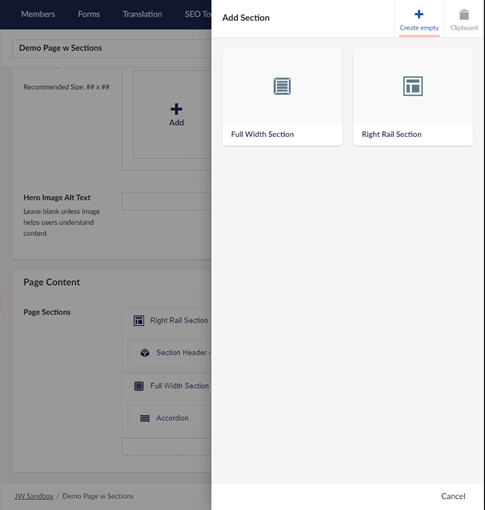
Next, we see that the content editor is able to choose either a full width or right rail section to add to the page.
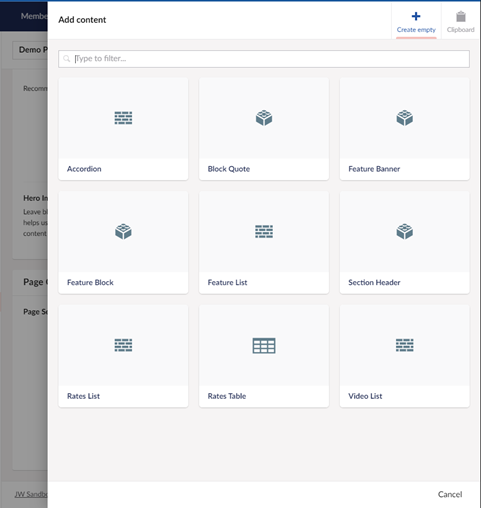
Finally, we see how content editors select content blocks for embedding in areas of each section.
Now that we’ve built the framework for page sections, we can go crazy and create as many page section layouts as we want. Well, maybe don’t go too crazy - we’re developers after all. Also, we don’t want to overwhelm content editors with too many choices or incur the wrath of the front-end magicians (who might be us!) who have to make all the layouts work at every viewing size imaginable.
So, what have we discovered?
- Blocks can be simple or complex - from small blocks of basic content to grids composed of multiple types and sizes of blocks.
- Blocks can be combined to foster reusability and efficiency when entering content.
- Blocks can be used to create a flexible, yet consistent website look and feel.
- Blocks are powerful! But… with great power, say it with me – comes great responsibility - and as the stewards of the content editing experience, we must use this power to create a quick and easy content editing experience.
- Blocks are awesome!