As Umbraco developers, we all love the power and simplicity Umbraco brings to our lives, providing us with an instant UI and a suite of in built and third party property editors in order to manage website content.
The problem comes when we need to step outside of the standard “website content” and start managing custom content, be that for user reviews, a products database, or anything else our clients wish to imagine. At this point, the “Umbraco way” is to develop a custom section / tree and build the editor UI yourself from scratch. Suddenly, our comfortable world of reusable components and instant user interfaces has disappeared and we are back in the land of “bespoke development”. A land of inconsistent UI (probably Bootstrap), buggy editors and no community support. All the reasons we left bespoke development in the first place.
Thankfully, there is hope in the form of a flexible little package called UI-O-Matic, originally developed by Tim Geyssens, which aims to bring the same automatic UI building we love about Umbraco to our custom database tables.
In the beginning
Originally released in 2015, UI-O-Matic allows you take PetaPoco based models (PetaPoco which already comes shipped with Umbraco and forms the foundation of all Umbraco CRUD operations), add a few custom attributes to your properties and instantly create a CRUD UI layer without a hint of custom code in sight.
In other words, it can take this…
[UIOMatic("people","People","Person", FolderIcon = "icon-users", ItemIcon = "icon-user")]
[TableName("People")]
public class Person
{
    [PrimaryKeyColumn(AutoIncrement = true)]
    public int Id { get; set; }


    [Required]
    [UIOMaticField(Name = "First name", Description = "Enter the persons first name")]
    public string FirstName { get; set; }


    [Required]
    [UIOMaticField(Name = "Last name",Description = "Enter the persons last name")]
    public string LastName { get; set; }


    [UIOMaticField(Name = "Picture",Description = "Select a picture", View = UIOMatic.Constants.FieldEditors.File)]
    public string Picture { get; set; }


    public override string ToString()
    {
        return FirstName + " " + LastName;
    }
}
…and turn it into this…
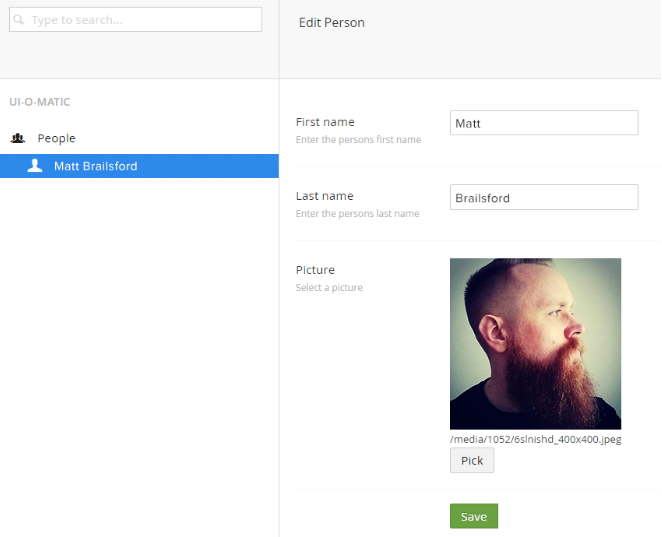
UI-O-Matic circa 2015
Fast Forward
Fast forward to today, and thanks to a concerted team effort between Tim and myself, UI-O-Matic has just gone through it’s biggest overhaul since original development and has now reached the version 2.0 milestone.
The codebase has been cleaned up, concepts standardised and a whole heap of new features have been added making it the most flexible and feature rich it has ever been.
The Fundamentals
Before we look at some of the new v2 features though, let's take a closer look at the fundamentals of how UI-O-Matic actually works. I’ll assume you have UI-O-Matic already installed and that your User account has access to the UI-O-Matic section (this should automatically be set on install, but if you don’t see it, give your browser window a refresh).
The starting point for any UI-O-Matic model will be your database table. How you create this is up to you, you can do it manually, or use migrations and the built in database schema helper, but either way, make sure you’ve got the database table for your model setup in the database ready to go.
For our example we will do it manually using:
CREATE TABLE [People] (
  [Id] int IDENTITY (1,1) NOT NULL,
  [FirstName] nvarchar(255) NOT NULL,
  [LastName] nvarchar(255) NOT NULL,
  [Picture] nvarchar(255) NOT NULL
);
With the database table created, we then define our matching model as a class like so:
public class Person
{
    public int Id { get; set; }


    public string FirstName { get; set; }


    public string LastName { get; set; }


    public string Picture { get; set; }
}
Next, we’ll add a bit of meta data via some attributes to help PetaPoco understand a little more about our model, specifically which database table the model is linked to, and that our Id property should be treated as an auto-incrementing primary key identifier.
[TableName("People")]
public class Person
{
    [PrimaryKeyColumn(AutoIncrement = true)]
    public int Id { get; set; }


    public string FirstName { get; set; }


    public string LastName { get; set; }


    public string Picture { get; set; }
}
Now we get into the UI-O-Matic part :)
To help UI-O-Matic understand how it should build the appropriate UI for our model, we employ a similar approach to PetaPoco, and use attributes to add extra metadata to our models. The first attribute we’ll encounter, is the class level UIOMatic attribute, which has the following signature:
[UIOMatic(“people”, “People”, “Person”)]
[TableName("People")]
public class Person
{
    …
}
The UIOMatic attribute has 3 required parameters, which are:
- Alias - A unique alias for your model
- NamePlural - A friendly name for your model in plural format
- NameSingular - A friendly name for your model in singular format
The alias parameter is used as a unique identifier for the model type and will be what UI-O-Matic passes around the UI to identify it. The plural and singular name parameters are used in various places to give a more meaningful UI experience when it needs to refer to your model in a friendly way such as in create dialogs, or notification bubbles.
In addition to these required parameters, there are host of optional parameters. We won’t go through all of them here, but a few you’ll likely want to know about are:
- FolderIcon - An icon class name for the containing folder in the UI-O-Matic tree
- ItemIcon - An icon class name for individual items show in the UI-O-Matic tree or list view
- RenderType - Determines whether to display list of items as a tree or a list view
- Order - Sets the order of where it should appear in the UI-O-Matic tree
If any of these don’t quite make sense yet, don’t worry, all will become clear when we start explore the UI side of UI-O-Matic, but with our model now decorated with the UIOMatic attribute, we should be able to take a look in the back office and see a “People” node in our UI-O-Matic sections tree.

"People" node in Ui-O-Matic sections tree
You can interact with this node in the same way as you can a regular Umbraco node, so right clicking will bring up an actions dialog. Clicking create will bring up the editor for the node, but right now it will all look a bit sparse as we haven’t yet told UI-O-Matic which fields are editable, so let's do that next.
To let UI-O-Matic know which properties are editable we’ll use the property level attribute UIOMaticField.
[UIOMatic(“people”, “People”, “Person”)]
[TableName("People")]
public class Person
{
    …
    [UIOMaticField]
    public string FirstName { get; set; }
    ...
}
Simply adding the attribute to a property lets UI-O-Matic know that that property should be editable. If we just leave the attribute declaration like this, then UI-O-Matic will generate a text field input with a label of “FirstName”, but it would probably be a bit nicer if we could give it a more friendly name and a nice description so to do this we can use some optional parameters like so:
[UIOMatic(“people”, “People”, “Person”)]
[TableName("People")]
public class Person
{
    …
    [UIOMaticField(Name = “First Name”, Description = “Enter the persons first name”)]
    public string FirstName { get; set; }
    ...
}
In addition to the Name and Description parameters, there are additional optional parameters available on the UIOMaticField which are:
- IsNameField - Used by the primary text field and moves the text editor into the header like the name field on a doc type
- Tab - Sets the name of the Tab this property should display on
- TabOrder - Sets the order of the Tab this property is displayed on
- Order - Sets the order of the property in relation to the other properties
The final 2 UIOMaticField parameters are View and Config and these are used to allow you to control which editor view should be used to edit your property and to pass through any config required by the editor. Think of these like property editors and pre values, just a little bit more lightweight.
Out of the box, UI-O-Matic ships with the following editors:
- checkbox
- checkboxlist (needs config)
- date
- datetime
- datetimeoffset
- datetimeutc
- dropdown (needs config)
- file
- list (needs config)
- label
- map (needs config)
- number
- password
- pickers.content
- pickers.media
- pickers.member
- pickers.user
- pickers.users
- radiobuttonlist (needs config)
- rte
- textarea
- textfield
As you can see, this should cover most situations, but if not, you can absolutely provide a URL to your own Angular view should you need something a bit more custom.
Now that we know more about UIOMaticField, lets go back and decorate the rest of our properties with the relevant configuration:
[UIOMatic("people","People","Person", FolderIcon = "icon-users", ItemIcon = "icon-user")]
[TableName("People")]
public class Person
{
    [PrimaryKeyColumn(AutoIncrement = true)]
    public int Id { get; set; }


    [UIOMaticField(Name = "First name", Description = "Enter the persons first name")]
    public string FirstName { get; set; }


    [UIOMaticField(Name = "Last name",Description = "Enter the persons last name")]
    public string LastName { get; set; }


    [UIOMaticField(Name = "Picture",Description = "Select a picture", View = UIOMatic.Constants.FieldEditors.File)]
    public string Picture { get; set; }
}
The last couple of things we will do on our model are to add some validation, and also override the ToString method. Validation of your UIOMatic models uses the standard Data Annotations validation attributes, so this is as simple as adding a few more attributes to your model. For the ToString method, UI-O-Matic uses this as the value for the node name in the UI-O-Matic tree, so have this return what you would want this to display, in our case we’ll show the person's full name by concatenating the first and last names together.
[UIOMatic("people","People","Person", FolderIcon = "icon-users", ItemIcon = "icon-user")]
[TableName("People")]
public class Person
{
    [PrimaryKeyColumn(AutoIncrement = true)]
    public int Id { get; set; }


    [Required]
    [UIOMaticField(Name = "First name", Description = "Enter the persons first name")]
    public string FirstName { get; set; }


    [Required]
    [UIOMaticField(Name = "Last name",Description = "Enter the persons last name")]
    public string LastName { get; set; }


    [UIOMaticField(Name = "Picture",Description = "Select a picture", View = UIOMatic.Constants.FieldEditors.File)]
    public string Picture { get; set; }


    public override string ToString()
    {
        return FirstName + " " + LastName;
    }
}
If we go back to the UI now, we should find UI-O-Matic has now happily created our editor UI for us, and is fully able to create, edit, update and delete records. All this without the need for a single line of custom code :)
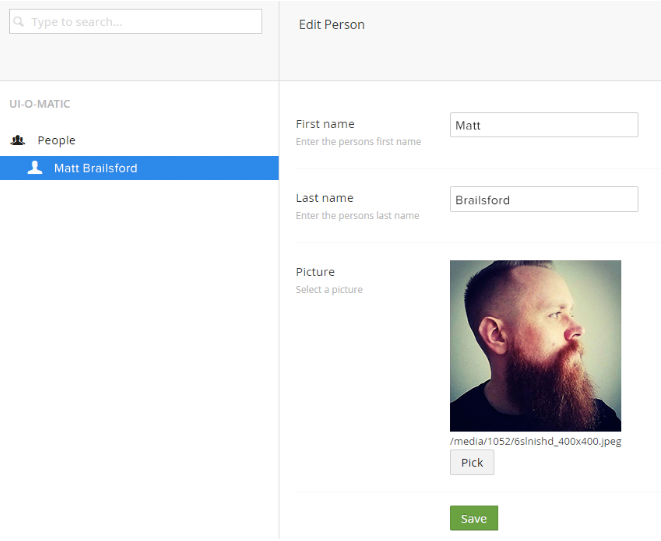
Editable UI interface
List Views
Right now, we are displaying each record item in the tree, but as with Umbraco, when you start to get a lot of entries, the tree interface may not be the best fit, so at this point you might want to consider using the list view.
As you might expect, this is all controlled via attributes on our model.
To enable list view, we’ll set the RenderType parameter on our UIOMatic attribute to List:
[UIOMatic("people","People","Person", FolderIcon = "icon-users", ItemIcon = "icon-user",
    RenderType = UIOMaticRenderType.List)]
And then let UI-O-Matic know which fields to display in the list view by using the UIOMaticListViewField attribute.
[UIOMatic("people","People","Person", FolderIcon = "icon-users", ItemIcon = "icon-user",
    RenderType = UIOMaticRenderType.List)]
[TableName("People")]
public class Person
{
    [PrimaryKeyColumn(AutoIncrement = true)]
    public int Id { get; set; }


    [Required]
    [UIOMaticField(Name = "First name", Description = "Enter the persons first name")]
    [UIOMaticListViewField(Name = "First name")]
    public string FirstName { get; set; }


    [Required]
    [UIOMaticField(Name = "Last name", Description = "Enter the persons last name")]
    [UIOMaticListViewField(Name = "Last name")]
    public string LastName { get; set; }


    [UIOMaticField(Name = "Picture",Description = "Select a picture", View = UIOMatic.Constants.FieldEditors.File)]
    public string Picture { get; set; }


    public override string ToString()
    {
        return FirstName + " " + LastName;
    }
}
And now when we go back to the UI-O-Matic UI we should no longer see our items listed in the tree, but instead in a list view by selecting the container “People” node.

List view on the "People" Node instead of in the tree
New in v2.0
Now that we have an understanding of the fundamentals of UI-O-Matic, let's take a look at some of the cool new features in v2.0.
We have actually already seen a couple of new features in v2 such as the use of Data Annotations for validation and changes to some of the attributes (should you be familiar with version 1), but here are just some of the new features you may not be aware of yet.
Tree Folders
In v2 we now have the ability to define tree folders to allow you to organise your models into logical groupings, rather than just having them all sat at the root of the UI-O-Matic tree.
You define a folder by creating a placeholder class and decorating it with the UIOMaticFolder attribute like so:
[UIOMaticFolder("myfolder", "My Folder")]
public class MyFolder
{ }
The two required attributes being:
- Alias - A unique alias for the folder
- Name - A friendly name for the folder in plural format
To place our model in the folder we then set the ParentAlias parameter of the UIOMatic attribute like so:
[UIOMatic("people","People","Person", FolderIcon = "icon-users", ItemIcon = "icon-user",
    ParentAlias = “myfolder”)]
[TableName("People")]
public class Person
{
    ...
}
Which all translates into the following UI:
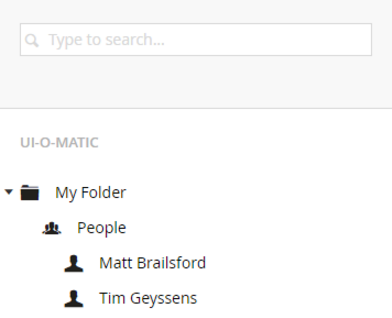
Organization by tree folders
List View Field Views
In v1, all list view fields were simple text based fields, however in v2, much as in the same way you can choose an editor view for your property, you can now choose an alternative view for how to render your property in the list view.
Out of the box, UI-O-Matic currently ships with just 2, “label” and “image”, but more will be added in future.
To update our Person model then to display the persons image in the list view, we can decorate the Picture property like so:
[UIOMatic("people","People","Person", FolderIcon = "icon-users", ItemIcon = "icon-user",
    RenderType = UIOMaticRenderType.List)]
[TableName("People")]
public class Person
{
    …
    [UIOMaticField(Name = "Picture",Description = "Select a picture", View = UIOMatic.Constants.FieldEditors.File)]
[UIOMaticListViewField(Name = "Picture", View = UIOMatic.Constants.FieldViews.Image)]
    public string Picture { get; set; }
    ...
}
Which translates into the following UI:
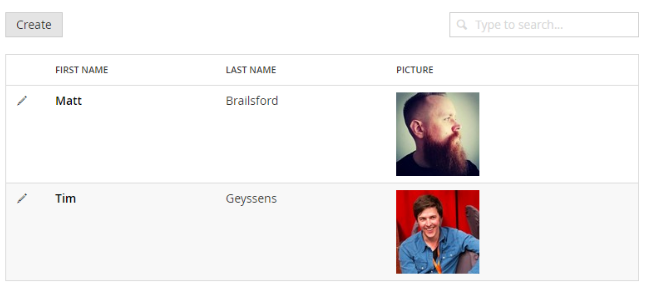
v2 gives you the option to add additional properties to your list view such as an image
List View Filters
As per v1, list views still support sorting and searching within the list, but in v2 we’ve also added support for filtering the results by a specific column.
To do this, add the new UIOMaticListViewFilter attribute to the property you wish to filter by, like so:
[UIOMatic("people","People","Person", FolderIcon = "icon-users", ItemIcon = "icon-user",
    RenderType = UIOMaticRenderType.List)]
[TableName("People")]
public class Person
{
    …
    [UIOMaticField(Name = "Last name", Description = "Enter the persons last name")]
    [UIOMaticListViewField(Name = "Last name")]
    [UIOMaticListViewFilter]
    public string LastName { get; set; }
    ...
}
And UI-O-Matic will automatically add a filter dropdown with all the distinct values of that property at the top of the list view, and will automatically filter the list view results whenever a selection is made.

Filter dropdown with distinct values
List Actions
In v1, whilst we provided a way to handle the CRUD of a model, we didn’t really have a way of people able to do any custom actions with them, for example, importing from XML or exporting to CSV, so with v2 we added support for list actions, utilizing the actions menu button pattern already present in the Umbraco content editor.
To define an action you create a placeholder class and decorate it with the UIOMaticAction attribute like so:
[UIOMaticAction("import", "Import", "~/path/to/import.dialog.html")]
public class ImportAction { }
The required attributes being:
- Alias - A unique alias for the action
- Name - A friendly name for the action
- View - The path to an angular view to open in a dialog
And then associate the action with your model by setting the ListViewActions parameter of the UIOMatic attribute like so:
[UIOMatic("people","People","Person", FolderIcon = "icon-users", ItemIcon = "icon-user",
    RenderType = UIOMaticRenderType.List, ListViewActions = new[]{ typeof(ImportAction) })]
[TableName("People")]
public class Person
{
    …
}
Which translates into the following UI:
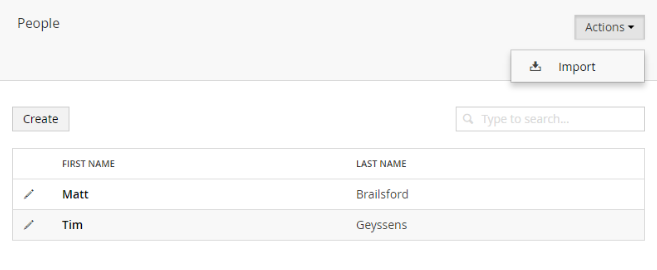
A custom import action defined
Summary Dashboard
In v1, the dashboard area for the UI-O-Matic section was a little bit uninspiring, so in v2 we thought we’d add a simple summary dashboard to show how many records in a repository there were. To display a model in the summary dashboard we set the ShowInSummaryDashboard parameter of the UIOMatic attribute to true like so:
[UIOMatic("people","People","Person", FolderIcon = "icon-users", ItemIcon = "icon-user",
    ShowInSummaryDashboard = true)]
[TableName("People")]
public class Person
{
    …
}
And this creates a summary panel like so:
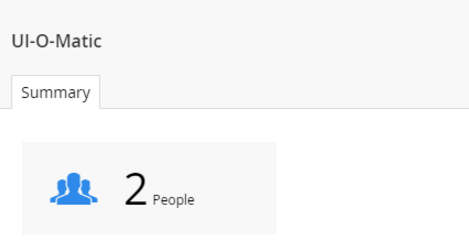
Summary dashboard
IUIOMaticRepository / AbstractUIOMaticRepository
One of the more advanced additions to v2 is the new IUIOMaticRepository interface which allows you define your own custom repository to use to perform the UI-O-Matic CRUD operations.
Out of the box, UI-O-Matic will handle CRUD operations for you, but if you already have a repository, or need to expose your repository via an API and don’t want to duplicate any custom logic, then implementing the IUIOMaticRepository interface to encapsulate all of this might be the way to go.
You can implement the IUIOMaticRepository interface in one of two way, either by directly implementing it like so:
public class PeopleRepository : IUIOMaticRepository
{
    public IEnumerable GetAll(string sortColumn = "", string sortOrder = "")
    {...}


    public UIOMaticPagedResult GetPaged(int pageNumber, int itemsPerPage,
        string searchTerm = "",
        IDictionary<string, string> filters = null,
        string sortColumn = "", string sortOrder = "")
    {...}


    public object Get(string id)
    {...}


    public object Create(object entity)
    {...}


    public object Update(object entity)
    {...}


    public void Delete(string[] id)
    {...}


    public long GetTotalRecordCount()
    {...}
}
Or, in a more strongly typed manner by inheriting from AbstractUIOMaticRepository like so:
public class PeopleRepository : AbstractUIOMaticRepository<Person, int>
{
    public IEnumerable GetAll(string sortColumn = "", string sortOrder = "")
    {...}


    public UIOMaticPagedResult GetPaged(int pageNumber, int itemsPerPage,
        string searchTerm = "",
        IDictionary<string, string> filters = null,
        string sortColumn = "", string sortOrder = "")
    {...}


    public Person Get(int id)
    {...}


    public Person Create(Person  entity)
    {...}


    public Person Update(Person  entity)
    {...}


    public void Delete(int[] id)
    {...}


    public long GetTotalRecordCount()
    {...}
}
Either way, once you have implemented your repository, it’s just a case of telling UI-O-Matic about it by setting the RepositoryType parameter of the UIOMatic attribute like so:
[UIOMatic("people","People","Person", FolderIcon = "icon-users", ItemIcon = "icon-user",
    RepositoryType = typeof(PeopleRepository))]
[TableName("People")]
public class Person
{
    …
}
And with that UI-O-Matic will automatically use your repository to perform all CRUD operations for that model.
Summary
In summary, UI-O-Matic has just got a whole lot more flexible, extendable and feature rich than ever before, giving you that same fuzzy comfort blanket you've come to know and love in Umbraco, but for your custom content. So, if you need a custom element in your next Umbraco project, why not give UI-O-Matic a try and save yourself a whole heap of headache going back to the land of "bespoke".
