When Umbraco 7 arrived back in 2013, along came a whole new paradigm for extending the back office and create custom editor experiences. Granted, this was always possible, it just wasn’t terribly easy nor applicable to your average project due to the complexity and time spent doing it.
Now here we are, six years and one major version later. And for some reason, extending the back office still isn’t incorporated as a basic tool in the toolbox when creating Umbraco sites.
With this article I'll make a brave attempt at reigniting the initial excitement over back office extensions that was so evident back when Umbraco 7 was released. Hopefully it’ll spark some inspiration in both Umbraco veterans and newcomers in our wonderful community.
Umbraco out of the box
I think we can all agree that Umbraco out of the box offers us an amazing foundation to build editor interfaces for our editors. Given the ability to blend simple input fields with complex editors like Nested Content and the Grid, there is hardly any editorial challenge we can’t solve one way or another.
Adding on top of that the super flexible and extendable Umbraco core, we can output content that suits virtually any need.
And so we spend a lot of time creating amazing end user experiences, extending and sometimes bending Umbraco backwards in order to accomplish our goals. But for some reason we hardly find time to customize the editing experience beyond what Umbraco offers us out of the box.
Why is that? I’m going to venture a guess that it’s one of two reasons.
It might be budget thing. We either forget to set aside hours to do the necessary customization, or we quite simply just prioritize to pour as much as possible of the entire budget into building the end user experience. This however might be rather short sighted. Building a simpler editor experience means less time spent editing content, happier editors, less mistakes made and ultimately better and more frequent content updates.
Or it might be a knowledge thing. Either we’re simply not aware of the possibilities, or we find them too daunting. Hopefully by the end of this article you’ll see that it’s neither time consuming nor ultra-complicated to create custom editor experiences in Umbraco.
Setting the scene
Let’s pretend we’re tasked with constructing a page builder with various blocks of content, and that this is the wireframe for one of these content blocks:
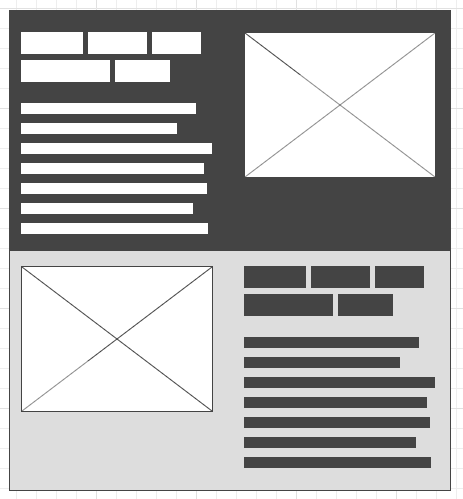
Wireframes are brilliant at conveying the basic requirements from design to implementation. From this we can immediately tell that the editors must be able to:
- Enter a headline and some text.
- Insert an image.
- Define the background and foreground colors.
- Choose a layout – either "text first" or "image first".
If we go ahead and construct this content block using Nested Content as our page builder, we’ll end up with something along these lines:
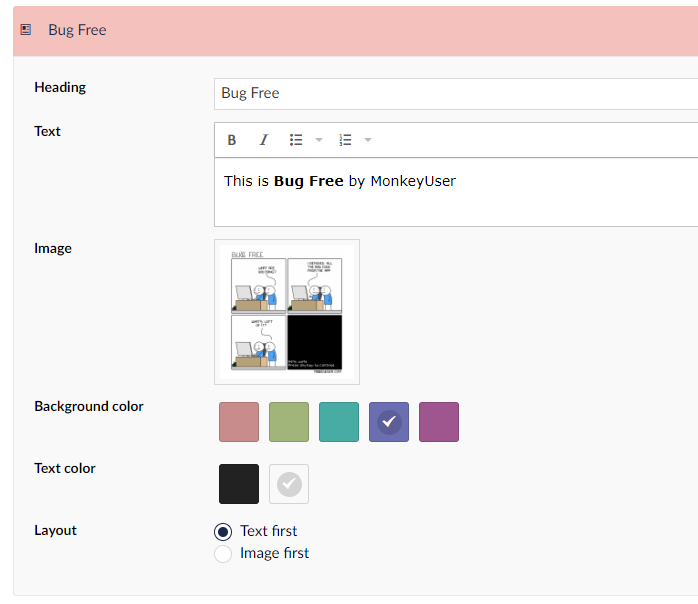
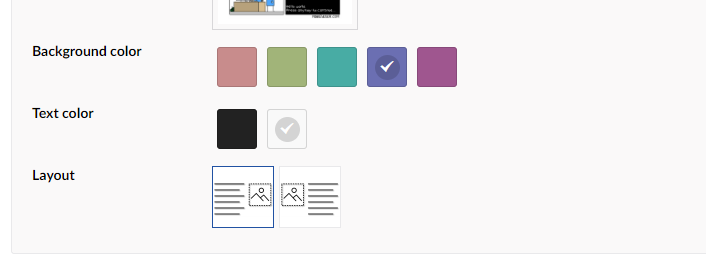
This is all fine – except the layout picker. That’s not terribly intuitive, now is it? In fact, going from the wireframe to the editing experience we have lost key information, namely how choosing a layout actually affects the end user experience.
Think about it for a moment. Would we ever use dropdowns and radio buttons to pick predefined colors, creating an editor experience like this?
Of course we wouldn’t, because we have a color picker that offers the editors much more context to their choices.
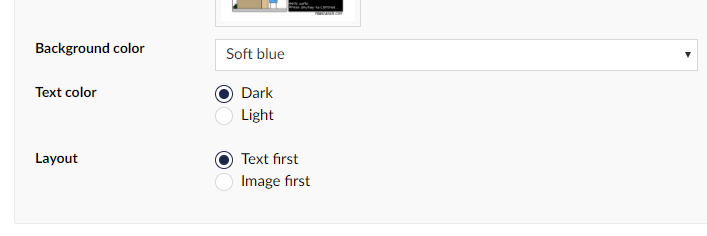
So, let’s revisit the layout picker. Let’s create a custom property editor that helps our editors make an informed choice:
If you’re a seasoned Umbraco developer with lots of experience building custom property editors, you probably know where this is going, and you need to read no further. For the rest of us, let's dive right into it!
The Custom Property editor
You’ll find ample documentation on how to create custom property editors on Our and I won’t be repeating it here. While the documentation at the time of writing is not yet verified against V8, the basics of it still applies to V8 just fine.
As promised earlier in this article, the layout property editor isn’t terribly complex. Here are the bits that comprise it.
The JS controller
propertyeditor.controller.js
function imageTextAlignmentEditorController($scope) {
  // these are the options available
  $scope.model.options = [
    {
      alias: "TextFirst",
      name: "Text first"
    },
    {
      alias: "ImageFirst",
      name: "Image first"
    }
  ];

  // initialize the model if it's empty
  $scope.model.value = $scope.model.value || $scope.model.options[0].alias;
}
angular.module("umbraco").controller("ImageTextAlignment.PropertyEditor.Controller", imageTextAlignmentEditorController);
The view
propertyeditor.html
<div ng-controller="ImageTextAlignment.PropertyEditor.Controller">
  <span class="image-text-alignment-item"
      ng-repeat="option in model.options"
      ng-class="{'image-text-alignment-item--selected': option.alias === model.value}"
      ng-click="model.value = option.alias"
      title="{{option.name}}">
    <img ng-src="/App_Plugins/ImageTextAlignment/img/{{option.alias}}.png" />
  </span>
</div>
The CSS
I present to you: CSS written by a backend developer 😊
propertyeditor.styles.css
.image-text-alignment-item {
  border: 2px solid white;
  display: inline-flex;
  align-items: center;
  justify-content: center;
  width: 60px;
  height: 60px;
  transition: all .15s ease-in-out;
  cursor: pointer;
  margin-right: 5px;
}

.image-text-alignment-item {
  border: 1px solid #e9e9eb;
}

.image-text-alignment-item:hover {
  border: 1px dashed #2152a3;
}

.image-text-alignment-item--selected {
  border: 1px solid #2152a3 !important;
}
The layout icons
TextFirst.png

ImageFirst.png

The manifest
package.manifest
{
  // array of JS files we want to load
  "javascript": [
    "~/App_Plugins/ImageTextAlignment/propertyeditor.controller.js"
  ],
  // array of CSS files we want to load
  "css": [
    "~/App_Plugins/ImageTextAlignment/propertyeditor.styles.css"
  ],
  // property editor definition
  "propertyEditors": [
    {
      "alias": "My.ImageTextAlignment",
      "name": "Image/text alignment",
      "editor": {
        "view": "~/App_Plugins/ImageTextAlignment/propertyeditor.html",
        "hideLabel": false,
        "valueType": "STRING"
      }
    }
  ]
}
Installing the property editor
To install the property editor:
- Create a folder named ImageTextAlignment within ~/App_Plugins/ and copy the controller, the view, the CSS and the manifest to it. Use the file names written in italic above each file.
- Create a folder named img within the ImageTextAlignment folder and save the layout icons in it. Again, use the file names written in italic above each icon.
- Restart the site.
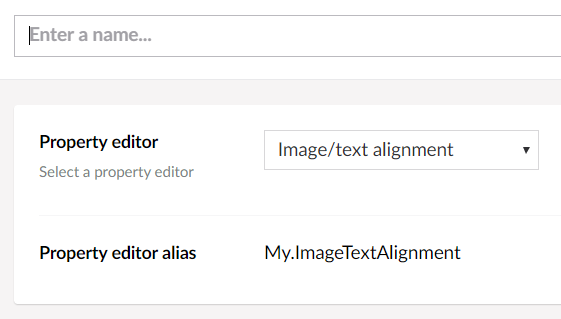
This makes our brand new layout property editor available as a data type for new properties:
Using the property editor values
At this point we can use the property editor values within our renderings. Since the manifest defines the property editor value as a string, we can grab the selected layout just like any other property in our view:
@{
  // returns the alias of the selected layout - either "TextFirst" or "ImageFirst"
  var blockLayout = Model.Value<string>("layout");
}
Wrapping things up
So, there you have it. By dumping a few lines of code in ~/App_Plugins/ and creating some custom icons, we have created a custom property editor that conveys the original design thoughts directly to our editors. And we didn’t spend countless hours doing it, nor did we have to apply astrophysics or voodoo magic to achieve it.
I sincerely hope this serves as inspiration in your projects. Intuitive editor experiences are indeed crucial to the success of our projects. Ultimately the editors become the wardens of the project. We should always aim at keeping them both happy and able to fulfil that responsibility.
Bonus: Type safe property values
So far, every bit of code has been exclusively client-side. That in its own is pretty amazing; we can extend Umbraco without being .Net developers. Talk about democratizing the development process!
Now for those of us that are fans of using ModelsBuilder to create models, we need to jump through another little hoop in order to create type safe property values in our models: We need to create a property value converter. And for this we must apply a bit of C#. Fortunately, as this property editor just returns a simple string, the property value converter code isn’t too complex:
using System;
using Umbraco.Core.Models.PublishedContent;
using Umbraco.Core.PropertyEditors;

namespace My.Site
{
  public class ImageTextAlignmentValueConverter : PropertyValueConverterBase
  {
    public override bool IsConverter(IPublishedPropertyType propertyType) => propertyType.EditorAlias == "My.ImageTextAlignment";

    public override Type GetPropertyValueType(IPublishedPropertyType propertyType) => typeof(string);

    public override PropertyCacheLevel GetPropertyCacheLevel(IPublishedPropertyType propertyType) => PropertyCacheLevel.Element;

    public override object ConvertIntermediateToObject(IPublishedElement owner, IPublishedPropertyType propertyType, PropertyCacheLevel referenceCacheLevel, object inter, bool preview) => inter?.ToString();
  }
}
Note that the code is V8 specific. It won’t work with V7.
This code can be included in one of your class libraries or dumped in ~/App_Code/. ModelsBuilder automatically picks it up and uses it when generating the models, so you don’t have to do any additional wiring up.
Further inspiration
To round this article off, and in the hope of inspiring you to start building custom editor experiences, I’ll share a few property editors from a recent project here. Some of these editors do require a bit more work to implement, and some even a fair amount of knowledge of how the Umbraco back office works.
As always, I highly recommend you dig through the Umbraco source code and learn how things work (and maybe add some code contributions to the core while you're at it). Learning how the back office is constructed will greatly improve your ability to create more complex custom editor experiences.
Common to all these editors is that we could have accomplished the same things with the out of the box editors available in Umbraco. This however would have resulted in a decimated and/or much more cumbersome editor experience.
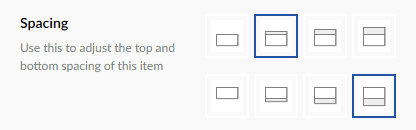
Spacing editor
A property editor that lets the editors configure top and bottom spacing of items in a page builder:
Availability editor
A property editor that gives the editors a fine-grained control of the availability of items within a page builder.

In this case the page builder is Nested Content. The availability editor is coupled with a custom directive to display the current item availability as an icon in the item title. This gives the editors a quick overview without having to expand every single item to view its current availability state.
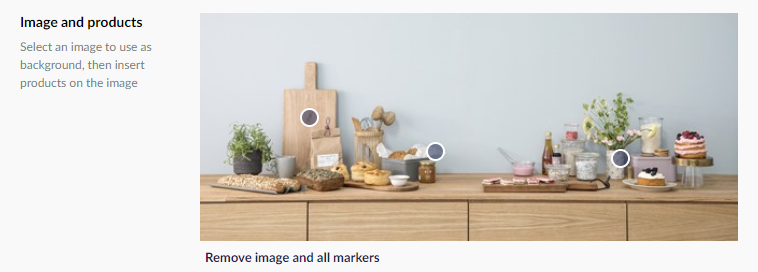
Featured products editor
At Vertica we only do e-commerce, so a product related property editor comes as no surprise. This property editor lets the editors pick an image from the Umbraco media library and create markers for the products contained within the image.