
Surprisingly, all the articles that describe setting up CI/CD using Azure DevOps end up at the deployed-somewhat-to-somewhere status. I mean, they take csproj or sln, build it using MSBuild, and transfer the artifact to the release pipeline, in which the artifact is deployed to the web app. But often, this is not the result that we really want to get.
Most likely, we are configuring the CI/CD to provide a unified build and delivery process for the application in several environments. Commonly, we have development, staging, and production versions. Most likely, the development is different from the production. In this case, we cannot rely on the manual that ends with deploying-something-somewhere.
Is there any value for the build numbers like #20210808.4 or release titles like Release 19, if we cannot understand which build went into this release after a short look? The same as with the app's version compiled in the build, which is unclear when you see the build's number.
I tried to make a CI/CD pipeline that would be free of these shortcomings. Also, I would like to consider the deployment procedure somewhere else, but not in a web app: for example, in the Umbraco cloud.
Requirements
The project should meet the following requirements:
-
There should be one CI pipeline, that provides a build for any environment from any chosen branch
-
Versioning should be informative, which means it displays what build is deployed at the current time
-
The developer requires binding the versioning to the git tag with an update of the assembly version in the code.
-
In addition to the deployment method provided by Umbraco cloud1, we have to be able to deploy staging and production directly (hotfixes).
Setup
Presets
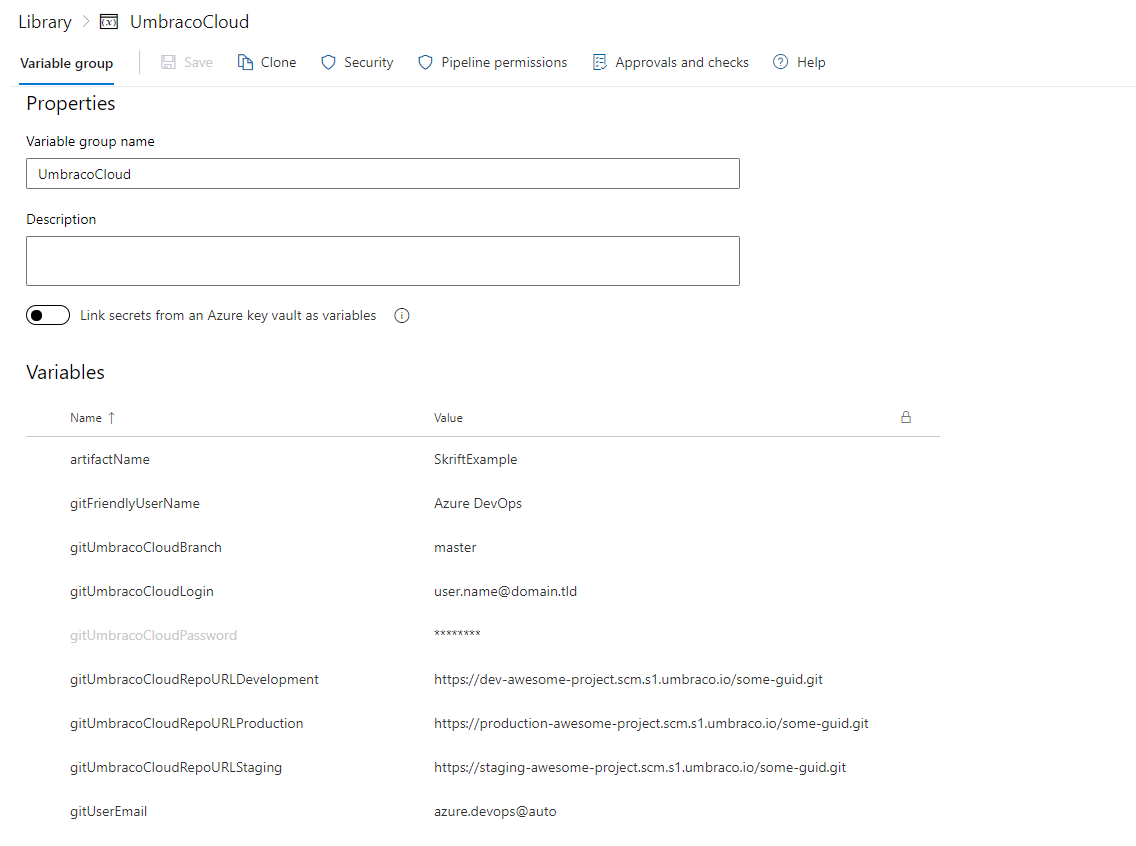
Let's start with the presets! The first thing to do, in this case, is to understand what variables should be available during the build and which ones — during the release. Some of them should be available in both scopes, due to the peculiarities of deployment in the Umbraco cloud. It is a git repository in which we have to push the artifact. Then a posthook is started on the Umbraco cloud side, but this does not bother us. The repository's credentials should be available for both build and release pipelines. To make it possible, we use the capabilities of the variable group (Pipelines - Library - Variable groups - Add Variable group).
We use variable groups, not release variables because the variables described in this step should be available both during the build and the release, while the release scope is not available from build pipelines.
There are three environments to be used: development, staging, and production. For each one, Umbraco cloud provides a separate git repository. According to this, there are three variables for each repository. We also have to create variables for the login and password. I also made a few variables for convenience, like git settings and artifact name, for example.
Now, it's time to start setting up the build pipeline. Since we provide a build for each environment, we add these environments as an input parameter:
parameters:
  - name: Environment
    displayName: Environment
    type: string
    default: 'Development'
    values:
    - Development
    - Staging
    - Production
Next, we describe all the internal parameters of the pipeline that’s used in the future and connect the variable group.
pool:
  vmImage: 'windows-latest'

variables:
  - group: UmbracoCloud
  - name: solution
    value: 'SkriftExample.sln'
  - name: webProjectPath
    value: 'SkriftExample.Web'
  - name: webFrontendPath
    value: ''
The webFrontendPath variable is empty, as there is no frontend in this project yet. Otherwise, this variable contains the path to the directory with frontend files. Thus, here emerge steps to install the frontend dependencies (npm ci) and build the frontend (for example, npm run build).
Environment detection and versioning
As the initial settings are complete, we go right to the build process. And the first thing to do here is to determine which environment we need to build the code for. Also, depending on the environment, we have to select the correct Umbraco cloud repository using a PowerShell runner and a switch-case construct. Finally, we got a gitUmbracoCloudRepoURL variable containing a repository of the selected environment.
stages:
- stage: build
  displayName: Build
  jobs:
  - job: build
    steps:
    - task: PowerShell@2
      name: "detect_environment"
      displayName: Detect environment
      inputs:
        targetType: 'inline'
        script: |
          switch ("${{ parameters.Environment }}") {
            {$_ -match 'Development'} { $gitUmbracoCloudRepoURL = "$(gitUmbracoCloudRepoURLDevelopment)"; break }
            {$_ -match 'Staging'} { $gitUmbracoCloudRepoURL = "$(gitUmbracoCloudRepoURLStaging)"; break }
            {$_ -match 'Production'} { $gitUmbracoCloudRepoURL = "$(gitUmbracoCloudRepoURLProduction)"; break }
            default { $gitUmbracoCloudRepoURL = "$(gitUmbracoCloudRepoURLDevelopment)" }
          }
          Write-Host "##vso[task.setvariable variable=gitUmbracoCloudRepoURL]$gitUmbracoCloudRepoURL"
The construction Write-Host "##vso[task.setvariable variable=var1]value" allows us to initialize a new variable "var1" with the value "value". This variable can be used in subsequent tasks of this build pipeline.
The next step is setting up git. No magic here: we set up line wrapping and git username.
    - task: PowerShell@2
      name: "setup_git"
      displayName: Setup git
      inputs:
        targetType: 'inline'
        script: |
          git config --global core.safecrlf false
          git config --global user.name $(gitFriendlyUserName)
          git config --global user.email $(gitUserEmail)
Since the versioning depends on the git tag, we have to read it and generate a version number, which contains the major, minor, and patch versions. Based on this version, the artifact is tagged, and then it will be decided in what environment to deploy it.
    - task: PowerShell@2
      name: "setup_versioning"
      displayName: Setup versioning
      inputs:
        targetType: 'inline'
        script: |
          $git_version = (git describe --tags --long --match *.*.* | Select-String -pattern '(?[0-9]+)\.(?[0-9]+).(?[0-9]+)-(?[0-9]+)-(?[a-z0-9]+)').Matches[0].Groups
          $majorVersion = $git_version['major']
          $minorVersion = $git_version['minor']
          $patchVersion = $git_version['patch']
          $commitCount = $git_version['commitCount']
          $commitCountWithLeadingZeros = "{0:D4}" -f [int]"$commitCount"
          $version = [string]::Join('.', @(
            $majorVersion,
            $minorVersion,
            $patchVersion
          ))
          $buildNumber = "$version-${{ parameters.Environment }}+$commitCountWithLeadingZeros"
          Write-Host "##vso[build.updatebuildnumber]$buildNumber"
          Write-Host "##vso[build.addbuildtag]${{ parameters.Environment }}"
          Write-Host "##vso[task.setvariable variable=majorVersion]$majorVersion"
          Write-Host "##vso[task.setvariable variable=minorVersion]$minorVersion"
          Write-Host "##vso[task.setvariable variable=patchVersion]$patchVersion"
          Write-Host "##vso[task.setvariable variable=commitCount]$commitCount"
There can be a lot of commits within a tag (but obviously not more than 9999), so a commit number is a four-character number with leading zeros. The Write-Host "##vso[build.updatebuildnumber]$buildNumber" construct sets the build number, replacing the default one that was generated. Write-Host "##vso[build.addbuildtag]${{parameters.Environment}}" adds a tag to the artifact.
The main source of changes is the development repository. So, we have to ensure that Umbraco files are located correctly, while files that take part in development should be copied from the development repository. Therefore, when we merge development files with Umbraco cloud repository files, priority is given to the development files. However, Umbraco cloud sometimes performs automatic updates. In this case, CI cannot automatically resolve conflicts and the developer has to sync changes manually.
    - task: PowerShell@2
      name: "get_umbraco_deps"
      displayName: Get umbraco dependencies
      inputs:
        targetType: 'inline'
        ignoreLASTEXITCODE: true
        script: |
          Add-Type -AssemblyName System.Web
          $UsernameEncoded = [System.Web.HttpUtility]::UrlEncode("$(gitUmbracoCloudLogin)")
          $PasswordEncoded = [System.Web.HttpUtility]::UrlEncode("$(gitUmbracoCloudPassword)")
          $currentRemoteUri = New-Object System.Uri $(gitUmbracoCloudRepoURL)
          $DeploymentURL = New-Object System.UriBuilder($currentRemoteUri)
          $DeploymentURL.UserName = $UsernameEncoded
          $DeploymentURL.Password = $PasswordEncoded
          New-Item -Type Directory "$(webProjectPath)Cloud"
          Push-Location "$(webProjectPath)Cloud"
          git clone $DeploymentURL.ToString() .
          robocopy ..\$(webProjectPath) . /DCOPY:T /E /XD ".git"
          if($LASTEXITCODE -gt 3){exit $LASTEXITCODE}
          Push-Location ..\
          Remove-Item $(webProjectPath) -Recurse -Force
          Move-Item "$(webProjectPath)Cloud" $(webProjectPath)
The version displayed on the site must match the build version, so we need to update the version number in the code.
    - task: PowerShell@2
      name: "update_assembly_version"
      displayName: Update assembly version
      inputs:
        targetType: 'inline'
        script: |
          function Update-SourceVersion {
              $assemblyVersion = 'AssemblyVersion("' + $(majorVersion) + "." + $(minorVersion) + "." + $(patchVersion) + "." + $(commitCount) + '")';
              $assemblyFileVersion = 'AssemblyFileVersion("' + $(majorVersion) + "." + $(minorVersion) + "." + $(patchVersion) + "." + $(commitCount) + '")';
              $assemblyInformationalVersion = 'AssemblyInformationalVersion("' + $(majorVersion) + "." + $(minorVersion) + "." + $(patchVersion) + '")';
              Write-Host $assemblyVersion
              Write-Host $assemblyFileVersion
              Write-Host $assemblyInformationalVersion
              foreach ($o in $input) {
                  Write-Host "Updating '$($o.FullName)'"
                  $assemblyVersionPattern = 'AssemblyVersion\("[0-9]+(\.([0-9]+|\*)){1,3}"\)'
                  $assemblyFileVersionPattern = 'AssemblyFileVersion\("[0-9]+(\.([0-9]+|\*)){1,3}"\)'
                  $assemblyInformationalVersionPattern = 'AssemblyInformationalVersion\("[0-9]+(\.([0-9]+|\*)){1,3}"\)'
                  (Get-Content $o.FullName) | ForEach-Object {
                      % {$_ -replace $assemblyVersionPattern, $assemblyVersion } |
                      % {$_ -replace $assemblyFileVersionPattern, $assemblyFileVersion } |
                      % {$_ -replace $assemblyInformationalVersionPattern, $assemblyInformationalVersion }
                  } | Out-File $o.FullName -encoding UTF8 -force
              }
          }
          function Update-AllAssemblyInfoFiles {
              Write-Host "Searching '$path'"
              foreach ($file in "AssemblyInfo.cs") {
                  Get-ChildItem $path -recurse |? {$_.Name -eq $file} | Update-SourceVersion;
              }
          }
          Update-AllAssemblyInfoFiles
Building source
Further steps are typical for building any project on ASP.NET. Restoring NuGet dependencies and build(solution or csproj).
    - task: NuGetCommand@2
      name: "nuget_restore"
      displayName: Restore NuGet packages
      inputs:
        command: 'restore'
        restoreSolution: '$(solution)'

    - task: MSBuild@1
      name: "build_soluton"
      displayName: Build solution
      inputs:
        solution: $(solution)
        configuration: 'Release'
        msbuildArchitecture: x64
If there is a frontend, at this stage would be several possible options for events: The frontend build is fully integrated into the project, nothing is needed to launch additionally. At first glance, it is convenient, but not the best option. The frontend is built after the backend, thus it's copied to the artifact directory as a separate step. In my opinion, it is the worst option since an additional copying step is added, in which something may go wrong. Frontend build result usage is integrated into the backend build. The best option, I think. It is transparent and formalized enough (all the stages of the build are clearly described in the pipeline), and does not contain additional useless actions. This option is to be described. Let's assume that the project has a React.js frontend. The frontend code is located in the Skriftexample.Frontend directory. Accordingly, in this directory, we have to run commands to install dependencies and build. For example:
npm ci
npm run build
As a result of executing these commands, a dist directory appears in the Skriftexample.Frontend/../Skriftexample.Web directory, which contains the result of building the frontend. Skriftexample.Web.csproj is configured to take the contents of the dist directory when building and integrate them into the artifact.
The final stage of the pipeline build is the creating and loading of the artifact.
    - task: PublishBuildArtifacts@1
      name: "upload_artifacts"
      displayName: Upload artifacts
      inputs:
        PathtoPublish: '$(webProjectPath)'
        ArtifactName: "$(artifactName)"
You can run the build, check that it runs without errors, and proceed to set up the release pipeline.
Setting up Release pipeline
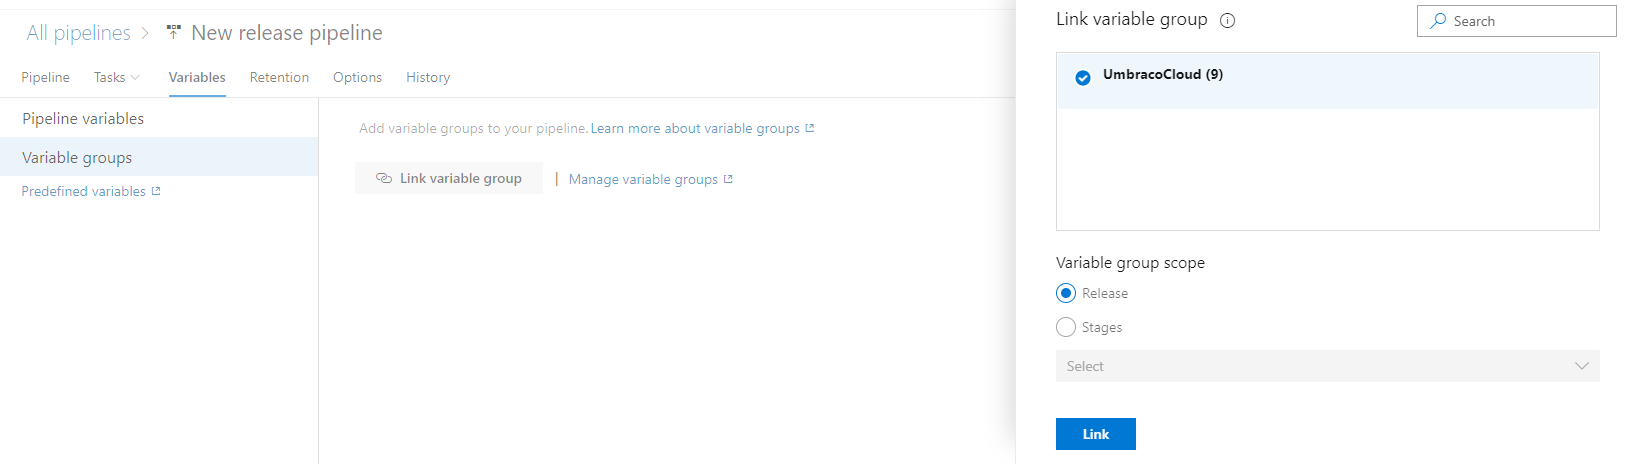
When creating a release, select 'Empty job' and on the Variables tab, add a variable group to be able to use the values of the described variables.
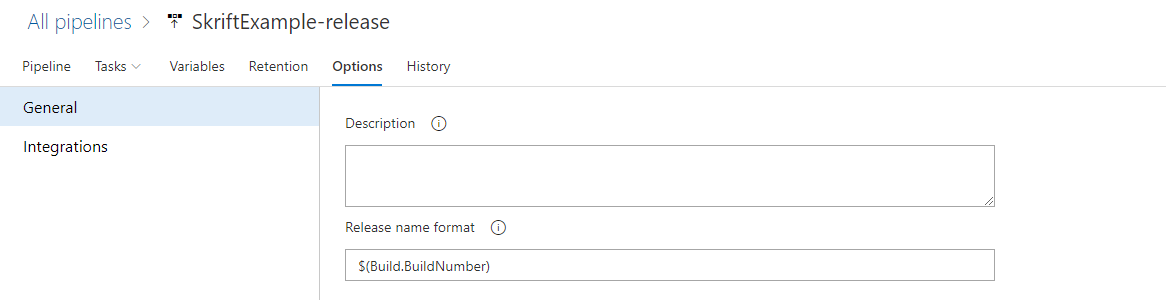
Also, we need to configure versioning on the Options tab. To use the build number as the version, enter $(Build.BuildNumber) in the Release name format field. The name of the current and other Azure DevOps system variables can be found in the Microsoft documentation.
Adding Artifact
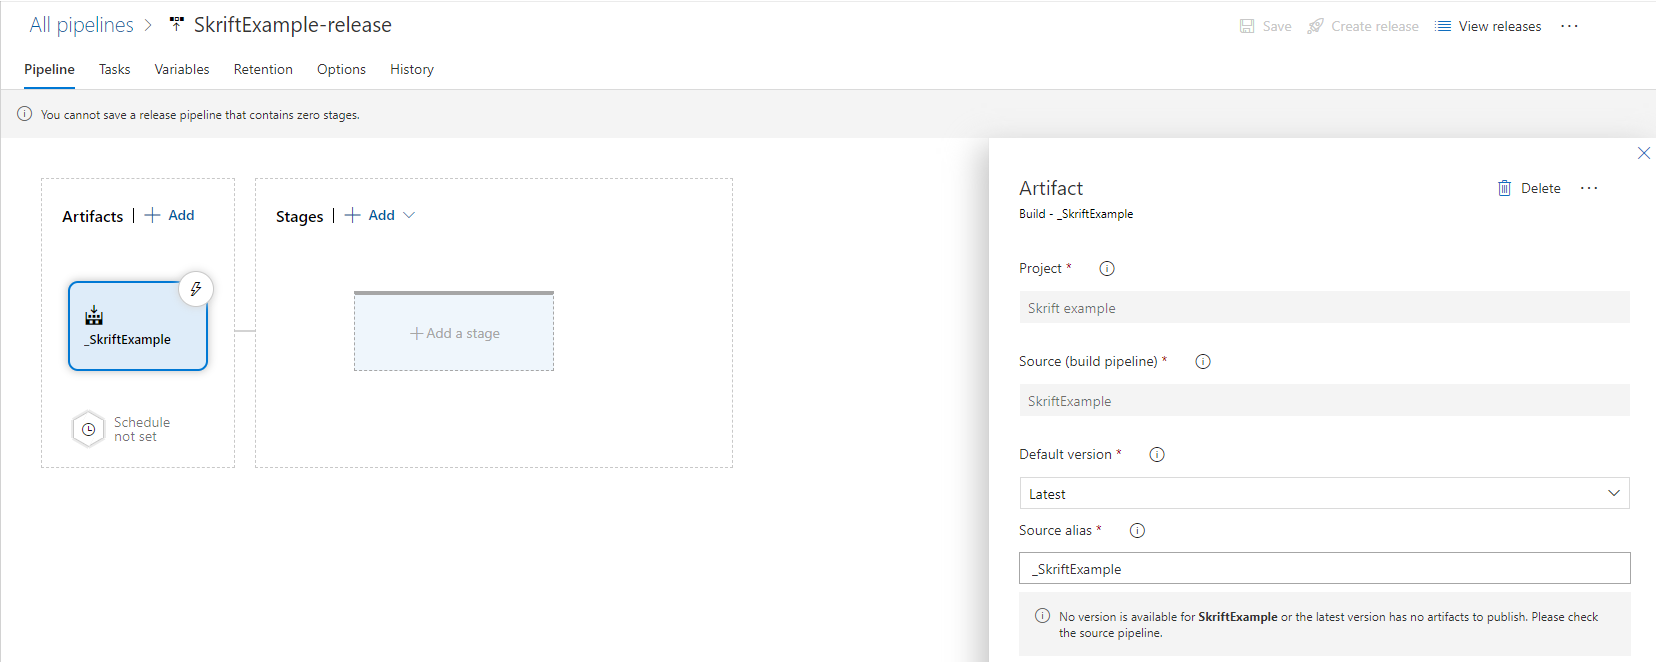
After the preparatory steps are completed, we can go directly to configuring the release pipeline behavior. First, we need to add an artifact from the corresponding build pipeline. Look at the value of the Source alias. It's needed in the future.
Setup Stages
In our case, independent deployment to environments based on a release tag is used. It means that after each build, the artifact gets into the release, but since the automatic trigger is disabled, the release doesn't start.
Three environments were used: development, staging, and production. Deployment steps to all three environments look the same. Let’s add deployment stages: Stages - Add - Empty job.
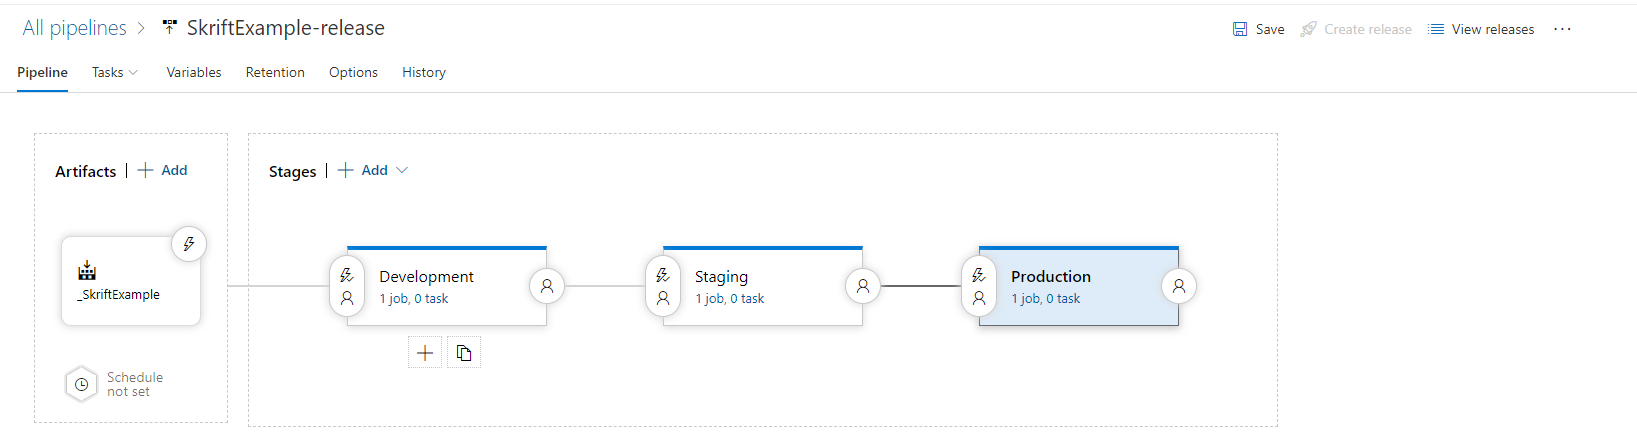
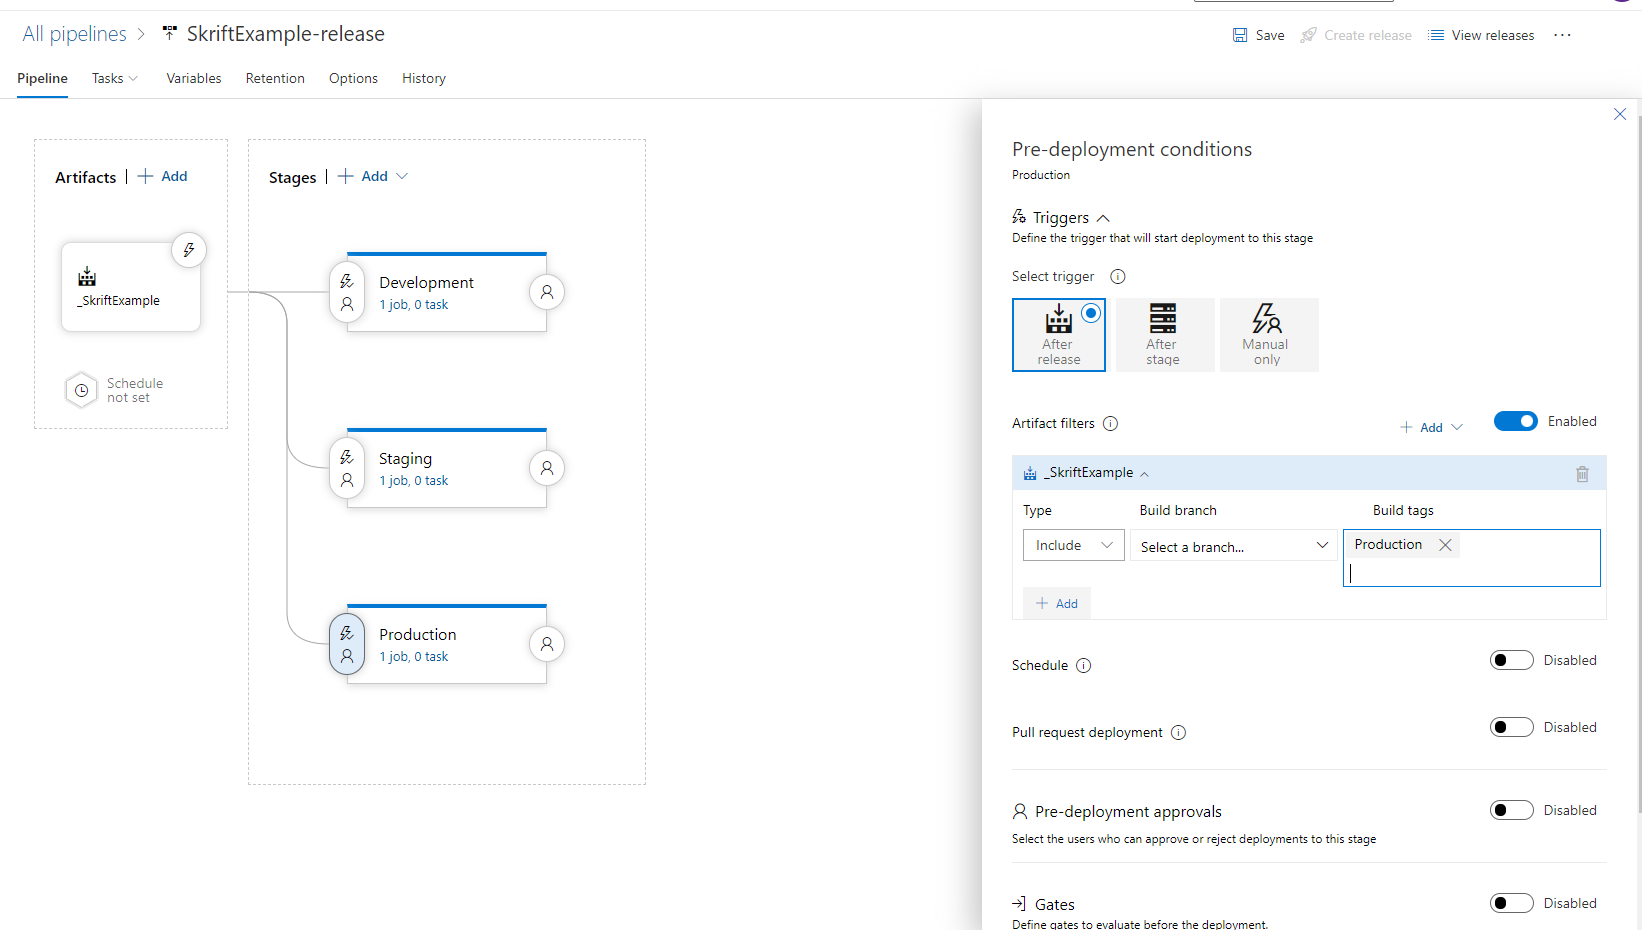
By default, the deployment stages are located sequentially and use a deployment strategy in which the artifact is deployed sequentially to each environment. To change the strategy to the independent deployment, set the 'After release' trigger value in the conditions of each deployment stage.
For getting the correct artifact into each environment, we have to configure the artifact filter by tag in the same settings menu.
Setup Jobs
Now we can customize the behavior for each stage of the deployment. To do this, add a PowerShell job with the following settings:
- Display name: Deploy
- Type: inline
- Script: see below.
- Advanced - Working Directory:
$(System.DefaultWorkingDirectory)\_SkriftExample\$(artifactName).
Instead of _SkriftExample, there should be a source alias. It's present in the release pipeline artifact settings.
Script value:
git config --global core.safecrlf false
git config --global user.name $(gitFriendlyUserName)
git config --global user.email $(gitUserEmail)
git add .
git commit -m "Version: $(Build.BuildNumber). Autodeploy."
git push -u origin $(gitUmbracoCloudBranch)
All settings will be the same for all environments.
In Conclusion
This completes the CI/CD pipeline. You can find a complete yaml by link.
Within this article, we discovered not so much the process of building an application as the approach to building it. It's impossible to create The One and The Only Perfect Pipeline, which flawlessly builds every single application, but this approach suits most cases. But don't forget: a devil is in the details.
The described method allows you to deploy hotfixes to any environment, but I highly recommend using the Umbraco Cloud as a common approach. It's not a big deal if your pipelines don't exactly replicate the example. The precision to details is more important because it makes building and supporting your pipelines easier!
[1] By default, only the dev environment of the application is deployed to the Umbraco cloud. Staging is deployed through the Umbraco cloud portal, by pushing the release from development. And production releases are promoted from the staging.