
This is a follow up from an article in the October 2017 issue of Skrift where Ryan Atkinson and I discuss using Team Development Workflow with Umbraco Cloud. This time I discuss an alternate Continuous Deployment (CD) configuration with Umbraco Cloud using Visual Studio Team Services (VSTS).
A Few Updates
In the last article I noted we used post-build events to allow us to keep all custom code in our .Core project separate from the Umbraco Cloud "managed" .Web project. While this works fine for local development we also maintained a separate Powershell script that was used by the TeamCity build server to accomplish the correct build asset structure so it could be deployed. We have since changed to use a gulp script, and related task, that watches for both build asset updates as well as changes in the (oh so important) /data/ folder from the .Web project. Since we use gulp to manage our static file minification already it made sense to add the “watch” task to the project’s gulp script. Our updates are available in the shared repo.
Automagic Upgrades
Since our October 2017 article there have been approximately 27 Umbraco core releases (27!). All of these have been applied to our Cloud sites automatically. That’s a lot of updates to a lot of sites we’ve never needed to deal with directly and remains one of our favorite Cloud features. Of course, Cloud only automatically upgrades the patch releases and offers the option to upgrade to the next minor version by manually starting the upgrade process. I won’t go into more detail but suffice it to say we think the approach that Cloud uses is a safe one and we have not yet run into upgrade related issues we were not already aware of.
With all this automatic upgrade goodness there’s got to be some downside, right? Well, yes there is. We have not, to date, found a seamless way to incorporate the (usually weekly) Cloud upgrades into our Team Workflow. We largely rely on a manual process that involves doing a git pull from the Cloud Dev site, merging any file changes applied by the Cloud upgrade process, updating the UmbracoCms nuget package to the same version as the Cloud Dev site, running the Umbraco upgrader locally, then committing these updates to our .Core repo. At the completion of this process, the local site’s build output should be equivalent to the Cloud project’s files. This is generally the case.
As you can imagine, there are occasions when the Cloud project and the local project deviate – even when targeting the master branch – and this is where the biggest downside we’ve discovered to date is. We are investigating various approaches to work with this scenario but have not settled on one that just works.
I think it is also important to note that, if your typical Team Development Workflow involves content editors or clients who may make updates to Umbraco schema (e.g., doc types, data types, templates, etc…), there is additional opportunity for the various environments to become out of sync. We experience this often when our team works alongside a client’s team with shared responsibilities for schema. At this point, my best advice is to clearly identify what can be edited in the local dev project (schema, code, Forms, etc…) and what can be edited in the Cloud project (content, media, members, etc…). Having a clear plan for which items are edited in each environment has gone a long way toward reducing the amount of manual syncing I have done in recent months.
Clearly identify what can be edited in the local dev project and what can be edited in the Cloud project . Having a clear plan for which items are edited in each environment has gone a long way toward reducing the amount of manual syncing I have done in recent months.
Enter Visual Studio Team Services
When I set out to investigate, work with, and document CD approaches with Umbraco Cloud the one I most wanted to try was VSTS. This is not necessarily a new approach. In fact, Morten Christensen had come up with the idea in June 2016. #H5YR Morten! If you were one of the lucky attendees at uDuf in Gold Coast, Australia what follows may sound familiar as it is similar to what I presented there.
This approach uses VSTS for the build and the deploy services rather than using discreet offerings for each of those. It makes for a more obvious configuration, perhaps at the expense of some flexibility. In any case, once you get the initial configuration completed it can be very quick to adjust and to add additional configurations for other projects. The VSTS configuration is well-documented at the GitHub repo for the VSTS task. Note that some of the following duplicates the documentation found there, but here I cover the complete setup and approach.
Getting Set Up
There are two parts to configure for this VSTS CD approach; 1) the VSTS Umbraco Cloud Deploy Task, and 2) the Visual Studio Web Application project. The VSTS Deploy Task needs to be configured just one time and then can be used across all your VSTS projects that target Umbraco Cloud. The Visual Studio project configuration is needed per project. However, you can leverage some of the Umbraco provided guidance on setting up a Visual Studio solution from the official documentation. Note that the Umbraco provided setup utility, UaaS.cmd, creates a Web Site project but that the VSTS approach assumes a Web Application project. You will need to make this change manually - see the Configuring the Visual Studio Project section below. Sorry 🙁
Building and Installing the VSTS Tas
In order to use this approach, you'll need to complete a one-time build and upload of a VSTS task as it is not available in the Visual Studio Marketplace. The steps are simple, but will require some tools if this is not something you’ve done before. The steps are:
- Clone the repository for the VSTS Deploy to Umbraco Cloud Task
- Open the solution, restore the nuget packages, and build the solution
You may want to edit the ToFileSys.pubxml file at this time (don't worry if it’s not familiar, I cover it in more detail later) - Install the TFS CLI client
npm install -g tfx-cli - Authenticate to your VSTS project using a personal access token
That's its own article, here's the best reference - Upload the task to your VSTS project
tfx build tasks upload --task-path C:\path\to\tasks\DeployUmbracoCloudRepository
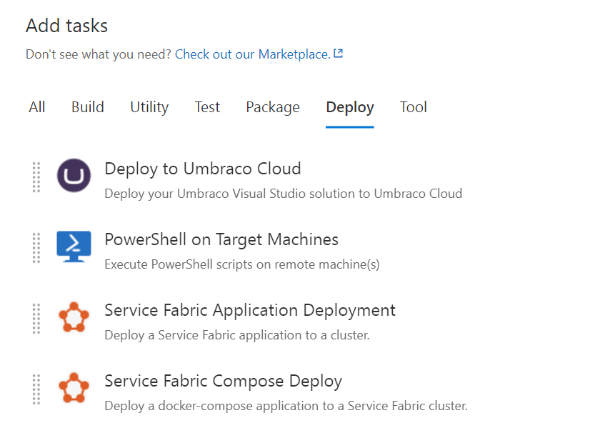
With that done you will see the “Deploy to Umbraco Cloud” task in your VSTS project’s tasks under the Deploy tab. You rock!
Configuring the Build and Deploy Task
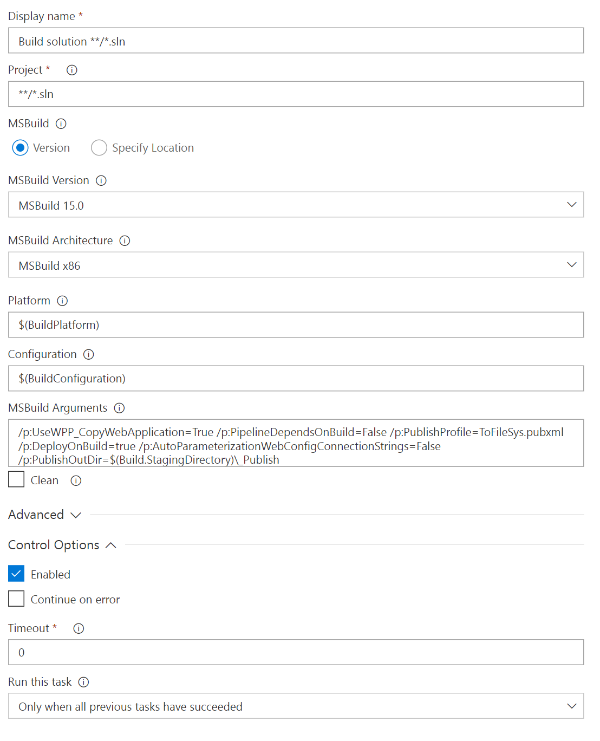
The idea with using the Deploy task from this repository is that we have a Visual Studio solution with Umbaco installed that is built in VSTS, and then use the build output for deploying the changes to Umbraco Cloud. In order to achieve this there is a minimal and recommended Build setup with the steps outlined below. The "Build solution" step uses the following parameters:
/p:UseWPP_CopyWebApplication=True
/p:PipelineDependsOnBuild=False
/p:PublishProfile=ToFileSys.pubxml
/p:DeployOnBuild=true
/p:AutoParameterizationWebConfigConnectionStrings=False
/p:PublishOutDir=$(Build.StagingDirectory)\_Publish
Notice that the build is published to $(Build.StagingDirectory)\_Publish and that it uses a publishing profile called ToFileSys.pubxml. This pubxml file should be placed in /Properties/PublishProfiles/ToFileSys.pubxml under the Web Application project where Umbraco is installed (more on that in the next section). The content of that xml file is as follows:
  <Project ToolsVersion="4.0" xmlns="http://schemas.microsoft.com/developer/msbuild/2003">
  <PropertyGroup>
    <WebPublishMethod>FileSystem</WebPublishMethod>
    <ExcludeApp_Data>True</ExcludeApp_Data>
    <publishUrl>$(PublishOutDir)</publishUrl>
    <DeleteExistingFiles>False</DeleteExistingFiles>
  </PropertyGroup>
</Project>
This is what the Build solution configuration looks like:
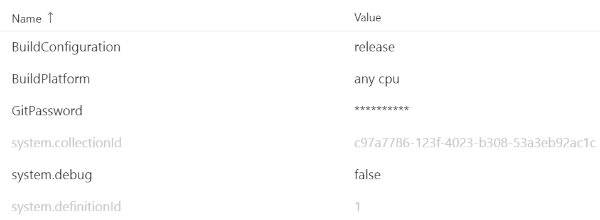
You will need to create the two variables and set their values:
- BuildConfiguration
- BuildPlatform
Note I have also created the GitPassword variable so that there is one level of obfuscation at least (talk to the hand).
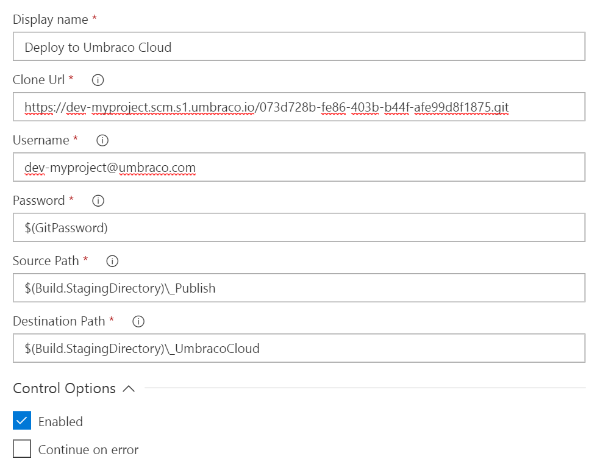
The Test Assemblies step is optional and only necessary if you have and want to run tests from the Visual Studio solution that is being built, but that’s a topic for a different article. Finally, the Deploy task needs to be configured to deploy to the Umbraco Cloud Project’s deployment repo.
The Clone Url (aka deployment repository) is the git repository url for either Development or Live (depending on the type of Project you created). Username and Password are the credentials you use to clone the repository.
The Source Path is where the build output is published to and the Destination Path is where this Deploy task will clone the Umbraco Cloud git repository to. This task will then handle copying the build output to the git repository, commit the changed files, and finally push it to Umbraco Cloud. It presents a relatively safe deployment approach as merge conflicts will show up at this point in the process and the deploy will not continue so that you can address the conflicts.
Configuring the Visual Studio Project
With the Build and Deploy task configured, we’ll create a Visual Studio solution with a Web Application and install the UmbracoCms using nuget – this is what will be deployed to the Umbraco Cloud Project. This is a departure from the approach used in the previous article and what is recommended by the official Umbraco Cloud documentation. Follow along and I’ll get you there.
In Visual Studio create a new and empty Web Application. Install the following nuget packages:
- Install-Package UmbracoCms
- Install-Package UmbracoForms
The package versions will correspond to the version of Umbraco and Forms that your Umbraco Cloud Project is using. Umbraco Deploy is currently not available as a nuget package, so you will need to download the release from
http://nightly.umbraco.org/?container=umbraco-deploy-release
Download the zip with the latest version called Umbraco.Deploy.vX.XX.X.zip. Unzip and copy the files to the root of the Web Application where Umbraco was installed (it's a good idea to copy the assemblies to a /lib/ folder for reference in the Web Application project).
We then copy some dependencies and settings from the Umbraco Cloud git repository - clone the repository to your local machine if you haven't already done so. From the cloned repository you’ll copy the following files to your Web Application project:
- /Config/UmbracoDeploy.config (contains settings for the environments/workspaces in your Project)
- /Config/Dashboard.config (copy the <tab caption="Your workspace">... section)
- /App_Plugins/UmbracoLicenses/umbracoForms.lic (to ensure that Forms works)
- /data/backoffice/* (your backoffice users from Umbraco Cloud)
- /data/Revision/* (schema from your Umbraco Cloud site)
FYI the /data/* folder doesn't need to be included in a Project in VS, as long as it is committed to your git repository it will be deployed to Umbraco Cloud as part of the build and deploy task) - .gitignore file (which is set to include/exclude the correct files)
Note, you may need to git add some files, i.e., folder level web.config if they are excluded by default)
Add or update the following AppSettings in web.config (the version should of course correspond to the one installed):
<add key="umbracoConfigurationStatus" value="7.10.4" /><add key="UmbracoLicensesDirectory" value="~/App_Plugins/UmbracoLicenses/" /><add key="umbracoVersionCheckPeriod" value="0" /><add key="umbracoDisableElectionForSingleServer" value="true" /><add key="Umbraco.Deploy.ApiKey" value="<the key from your cloned site>" />Set the connection string for umbracoDbDSN to:
<add name="umbracoDbDSN" connectionString="Data Source=|DataDirectory|\Umbraco.sdf" providerName="System.Data.SqlServerCe.4.0" />Now run from Visual Studio. Umbraco will create a LocalDb database and install the Umbraco database schema on startup. And with that you should be up and running locally and ready to write some code.
With the the configuration complete you commit the solution to your git repository and push to GitHub, Bitbucket, Gitlab, VSTS, or whatever flavor of git hosting you use. In the VSTS Build definition you configure this repository in the Get Source task and this will in turn be used to deploy your changes to Umbraco Cloud. The Get Source step will start the build and deploy process when a commit is made the specified branch in the configured git repository.
Wrap Up
In spite of the numerous steps to get the initial setup completed, I’ve found the actual usage of this approach to be very efficient. With the single drawback of needing to accommodate upgrades that have been applied to the Umbraco Cloud Project, I have experienced virtually none of the usual CD issues related to merge conflicts and file versions.
As with the previous article I have placed the supporting code, scripts, and documentation in a public repo for your use and comment https://bitbucket.org/proworks/clouddeploy. Most of the assets you’ll need to configure this CD process can be found at the VSTS Deploy Task repo maintained by Umbraco. As always, comments are welcome and pull requests are gold.