Admit it... how often have you have committed a password or API key to a git repository (even a private one)? Even if you recognise the mistake, reverting the change leaves the original password in the git history for ever, for all to find.
If you said “never”, then congratulations on your superhuman feat... But most of us are human and have succumbed at one point or another, and that’s dangerous. There are many tools and bots that scan public GitHub repositories looking for such secrets, and many a compromise can be traced back to these – poorly configured firewalls in combination with leaked secrets can lead to a complete database compromise.
So, in this article, we look at better ways to manage the bewildering array of secrets that modern web applications use through their lifecycle from development to production.
What's a secret?
We use the phrase ‘secret‘ to cover all manner of things that you wouldn’t want to fall into the wrong hands, where damage could be done if they did.
The most common secret that all of us working with Umbraco will use is a database connection string, but there are many others we might see — Azure blob storage connection strings, SMTP username/password, API keys for third-party integrations, and more.
In many larger or highly governed teams, those “wrong hands” might even include internal staff, so don’t assume that just because a git repository is private, that everyone that has access to it has the authority to see secrets within. It’s common for developers to not have access to production hosting environments, so nor should they have the database connection strings for them!
Keeping it local
As Umbraco developers (Umbraco Cloud aside) everything starts with a clean project on your local machine. The Umbraco install wizard asks for a database connection string, and writes this to the appsettings.json. Assuming you’re not using LocalDB then you’re probably using SQL Server’s password-based authentication — there’s your first secret just one commit away from git history:

The User Secret manager
.NET Core ships with a tool to securely store these types of secrets outside of your sourcecode folder, the User Secret manager, accessed via Visual Studio or the dotnet user-secrets CLI command. Before we can make use of it though, we must initialize the User Secret store so that it’s ready for use.
In Visual Studio, we do this by right-clicking the project and selecting Manage User Secrets:
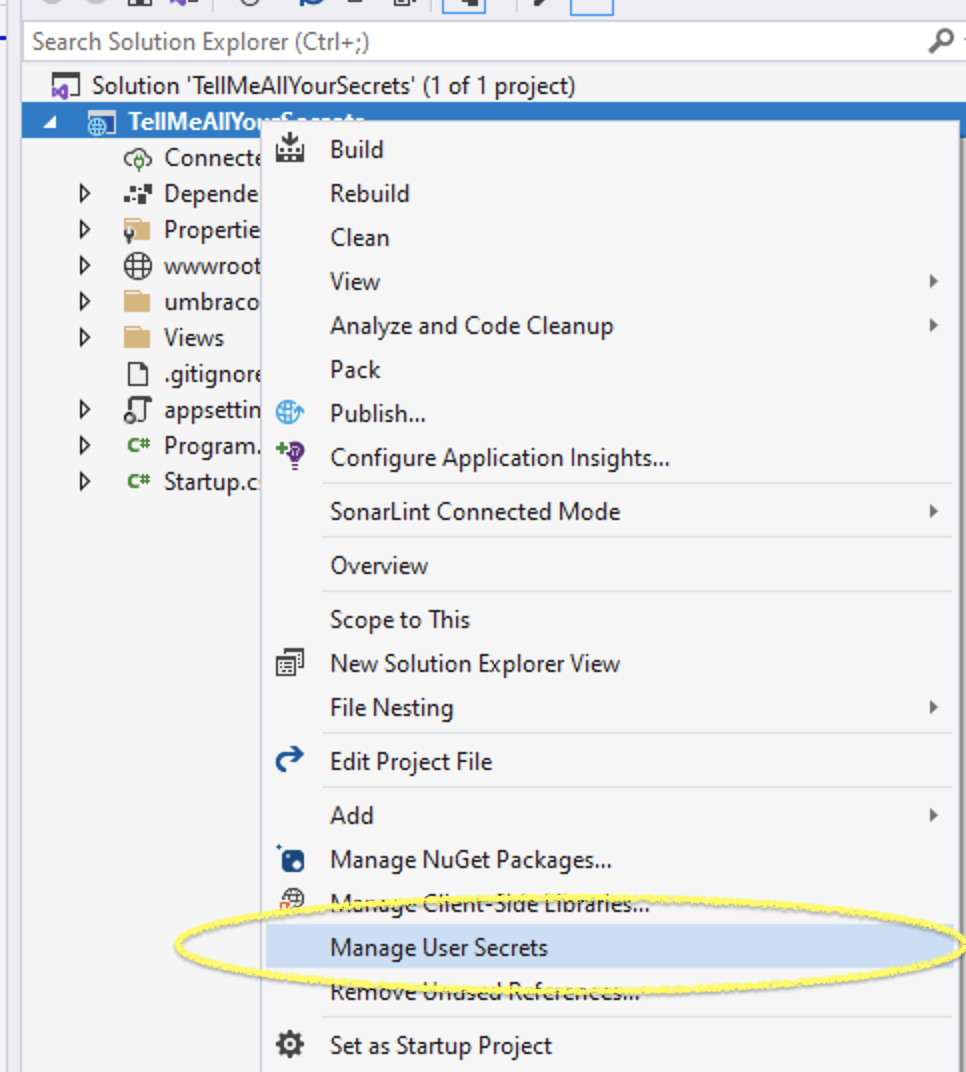
This creates and opens a secrets.json file which we’ll use shortly.
If you’re using the CLI (e.g. with Visual Studio Code), then simply run dotnet user-secrets init.
In both cases, a new GUID is added to your project file to connect the project to the User Secret manager’s store:

The store file is a JSON file stored tucked away elsewhere inside your user account’s home folder.
Adding secrets
To manage secrets, add them to the secrets.json file that Visual Studio will have opened for you;

Or, use the dotnet user-secrets set CLI command, for example:
❯ dotnet user-secrets set 'ConnectionStrings:umbracoDbDSN' 'server=myservername.database.windows.net;database=tellmeallyoursecrets;user id=phil;password=Pa55w0rd'

Successfully saved ConnectionStrings:umbracoDbDSN = server=myservername.database.windows.net;database=tellmeallyoursecrets;user id=phil;password=Pa55w0rd to the secret store.
Note how parts of the JSON structure are flattened with a colon separator — in large, complex projects this could be many layers deep, e.g.:
"Integrations": {
    "CustomAPIService": {
      "Authentication": {
        "APIKey": "Passw0rd!"
      }
    }
}
would translate to a secret named Integrations:CustomAPIService:Authentication:APIKey.
At this point you may be thinking “but how does the .NET runtime know how to load these secrets?”. The default Program.cs generated by the Umbraco templates includes a call to CreateDefaultBuilder, which automatically loads configuration from several sources including the appsettings JSON files, environment variables and secrets set in the User Secret manager, and makes all these available in the application’s IConfiguration.
Staying safe from git
Because the User Secret manager stores it’s data outside of your project’s folder, your secrets are safe from git, and you should now remove these secrets from your appsettings.json, just leaving empty placeholders.
When new developers clone your project, they won’t have the secrets — you’ll need to pass these to them via some other secure means. If you don’t have any record elsewhere of them, you can retrieve them from the User Secrets manager with the dotnet user-secrets list CLI command;
❯ dotnet user-secrets list
ConnectionStrings:umbracoDbDSN = server=myservername.database.windows.net;database=tellmeallyoursecrets;user id=phil;password=Pa55w0rd
or use Manage User Secrets again in Visual Studio to open the secrets.json file.
Of course, be sure to use a secure transfer mechanism to send these secrets to your colleagues too — don‘t send them by email!
Azure wants to know too
Before long, you’ll be wanting to deploy your Umbraco site, and Microsoft Azure is a popular choice. But how should you configure the secrets to remain secure?
Above, we covered that the default host builder loads environment variables, and application settings & connection strings that you set in the Azure Portal are automatically exposed as environment variables to the application:
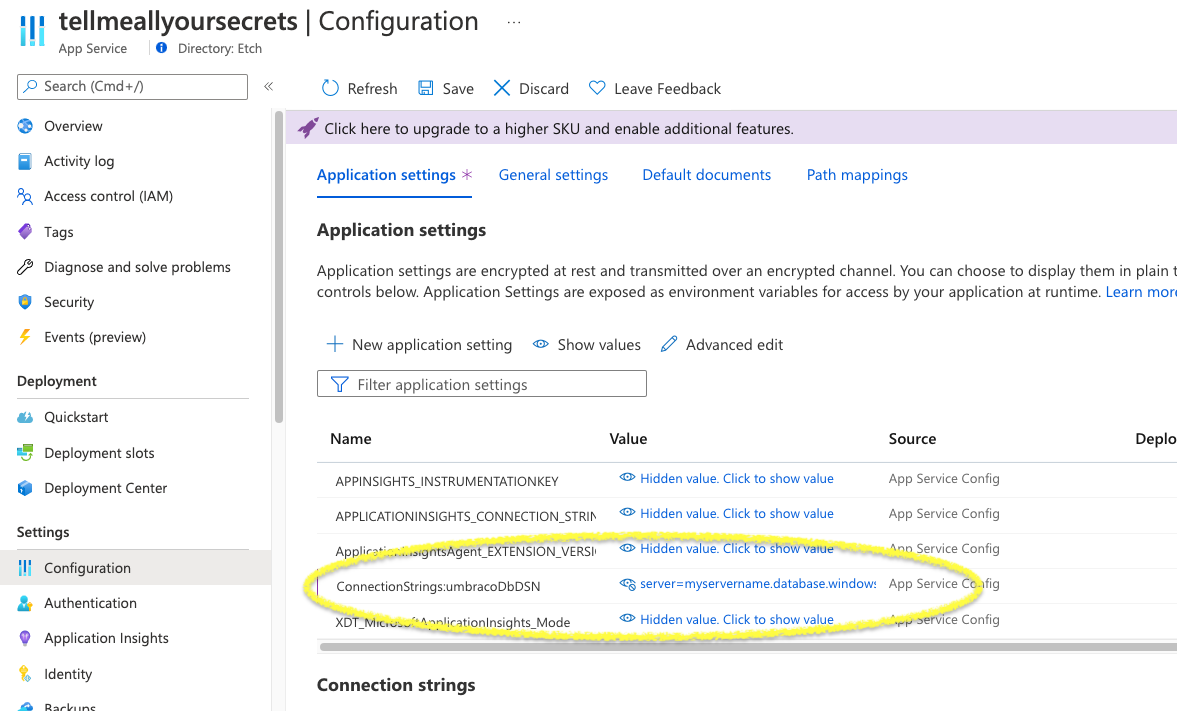
This approach works fine, and may often be sufficient, but it does mean that all developers with access to the Azure Web Application will be able to view the secrets, which may not be desirable.
How can we ensure that only the Web Application has access to read secrets? Enter the Azure Key Vault service…
Azure Key Vault
Azure Key Vault is an ultra-secure cloud service implemented as a core part of the Azure ecosystem. It’s a simple way to manage secrets and is supported and leveraged by many Azure services. It’s certified to government-approved FIPS standards, with hardware-based encryption options and designed so that even Microsoft cannot view secrets, backed up by rich access controls, auditing and high-availability, at a low-cost.
As well as secrets, which in Key Vault are arbitrary key:value pairs, Key Vault can also secure;
- Keys for cryptographic purposes, which Azure can import or generate in a variety of RSA or EC formats
- Certificates, typically used for SSL/TLS, which Azure can import or generate, either self-signed or issued by a recognised Certificate Authority, for use with several other Azure services
Creating a Key Vault
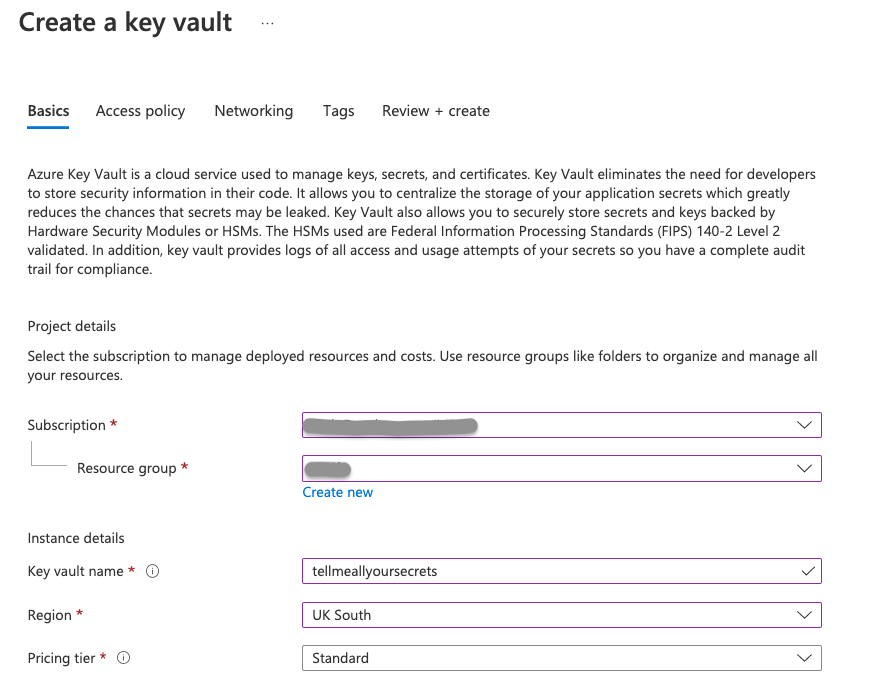
If you’re familiar with the Azure portal already, then creating a Key Vault is simple — select create a resource, search for Key Vault, and like all Azure resources give it a name and choose a region (which should be the same as your Web App for performance reasons):
Once created, which takes just a few moments, you’ll need to grant access to the secrets — unlike most Azure resources, this is managed separately from the normal Access control (IAM) blade, which controls access to manage the Key Vault, not the contents of it. For that, you need to use the Access policies blade:
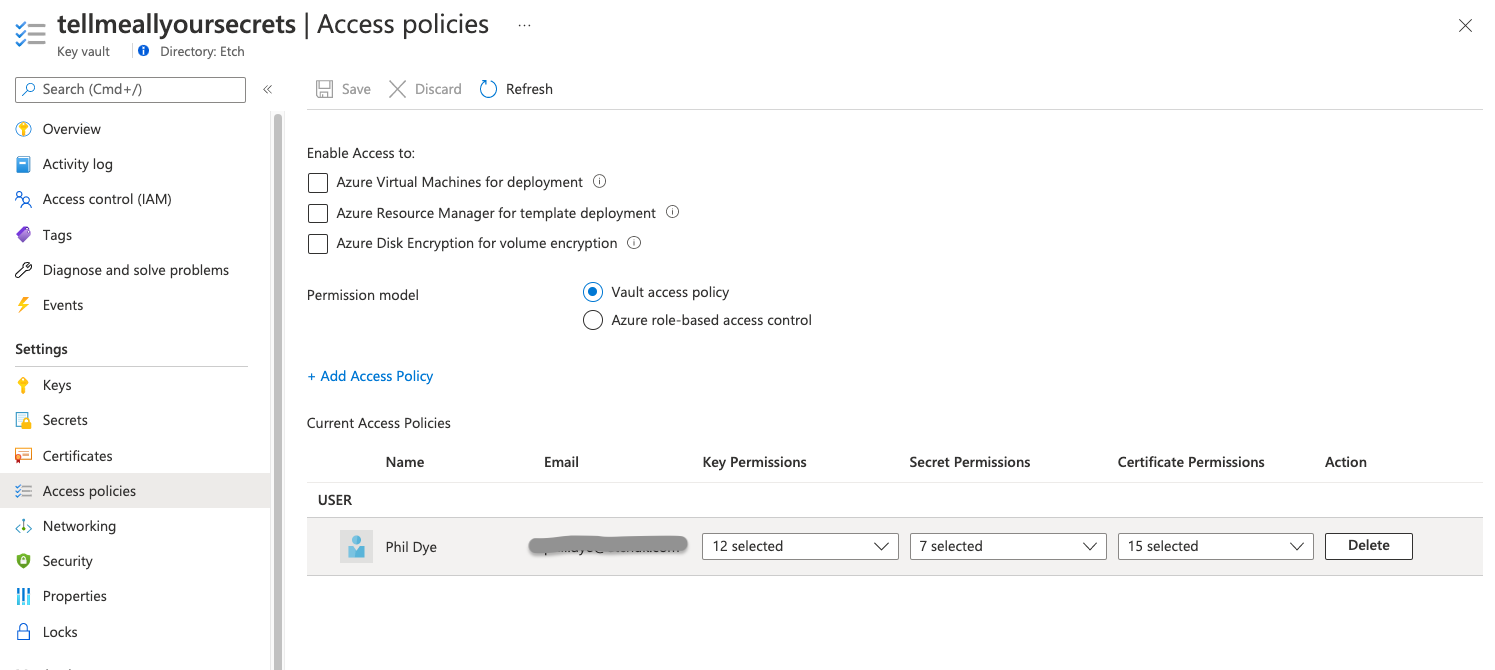
You’ll see that Azure has given you a complete set of permissions to manage everything already, and you can add additional members of your team using the ‘Add Access Policy’ link (tucked away in the middle!). Azure conveniently provides a number of preset templates for permissions, which you can further tweak to control exactly who can do what; for example, you may allow senior operations staff to Set secrets, but developers only Get them.
Managing secrets
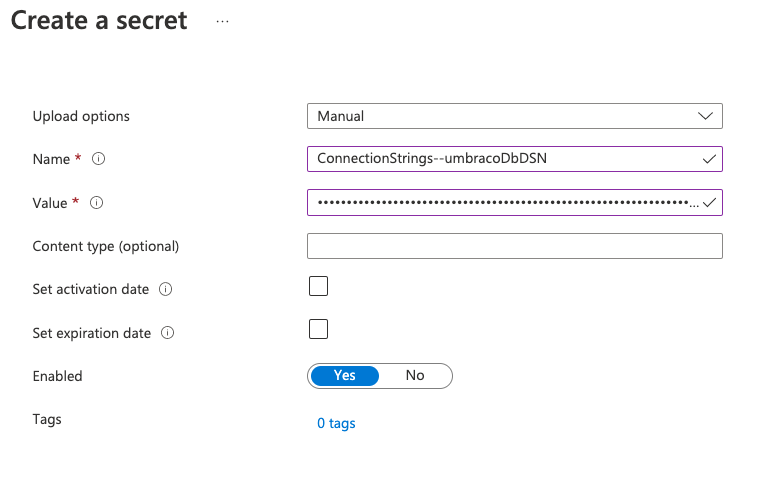
Adding secrets is straightforward, with one simple caveat – in Key Vault, the JSON structure for application settings is flattened with a double hyphen (--) instead of a colon as we used above in the User Secrets manager. So, instead of using ConnectionStrings:umbracoDbDSN, we must now add ConnectionStrings--umbracoDbDSN in Key Vault:
Secrets can also be managed via the Azure API, and this provides an even more secure means of programmatically managing them without human eyes ever seeing them, for example using tools such as Azure Bicep or terraform. In this scenario, you would probably remove all human users from any Access Policy ‘Get’ permissions — now no-one can ever view your secrets!
What about my Umbraco site?
At this point, we have an Umbraco application using User Secrets during local development, and our production secrets securely stored in a KeyVault. But how does Umbraco use those, once deployed to Azure?
Recall that the CreateDefaultBuilder loads configuration from a variety of sources above; however, this doesn’t include Azure Key Vault by default, so we need to make use of the “Azure Key Vault configuration provider” to load our secrets once deployed.
To do this, first add a couple of nuget packages, using Visual Studio‘s Manage Nuget Packages, or the CLI:
dotnet add package Azure.Security.KeyVault.Secrets
dotnet add package Azure.Identity
dotnet add package Azure.Extensions.AspNetCore.Configuration.Secrets
and add to the top of Program.cs:
using Azure.Security.KeyVault.Secrets;
using Azure.Identity;
using Azure.Extensions.AspNetCore.Configuration.Secrets;
using System;
and below, add the ConfigureAppConfiguration section below the Host.CreateDefaultBuilder line to read:
        public static IHostBuilder CreateHostBuilder(string[] args) =>
            Host.CreateDefaultBuilder(args)
                .ConfigureAppConfiguration((context, config) =>
                {
                    if (context.HostingEnvironment.IsProduction())
                    {
                        var builtConfig = config.Build();
                        var secretClient = new SecretClient(
                            new Uri($"https://{builtConfig["KeyVaultName"]}.vault.azure.net/"),
                            new DefaultAzureCredential());
                        config.AddAzureKeyVault(secretClient, new KeyVaultSecretManager());
                    }
                })
                .ConfigureLogging(x => x.ClearProviders())
                .ConfigureWebHostDefaults(webBuilder => webBuilder.UseStartup());
Finally, add an item to your appsettings.json with the name of your Key Vault:
"KeyVaultName": "tellmeallyoursecrets"The code we’ve added:
- first checks if we‘re running in production configuration, i.e. not on your local machine, because we only want to use Key Vault once deployed to Azure,
- builds a URL to connect to the Azure Key Vault service,
- and finally adds the contents of the Key Vault to the IConfiguration.
Because later values override earlier ones, the empty connection string loaded from appsettings.json now gets set with the securely loaded value from our Key Vault.
Managed Identity
We next need to ensure that our Azure Web App has permissions to access the secrets in the Key Vault; recall that these are secured and not just available to anyone unless specifically allowed.
Normally Azure Web Apps run without any specific identity, but we need to configure the app to use an internally Azure-managed identity so that it can authenticate to Key Vault.
This is a simple toggle in the Azure Web App‘s Identity blade:
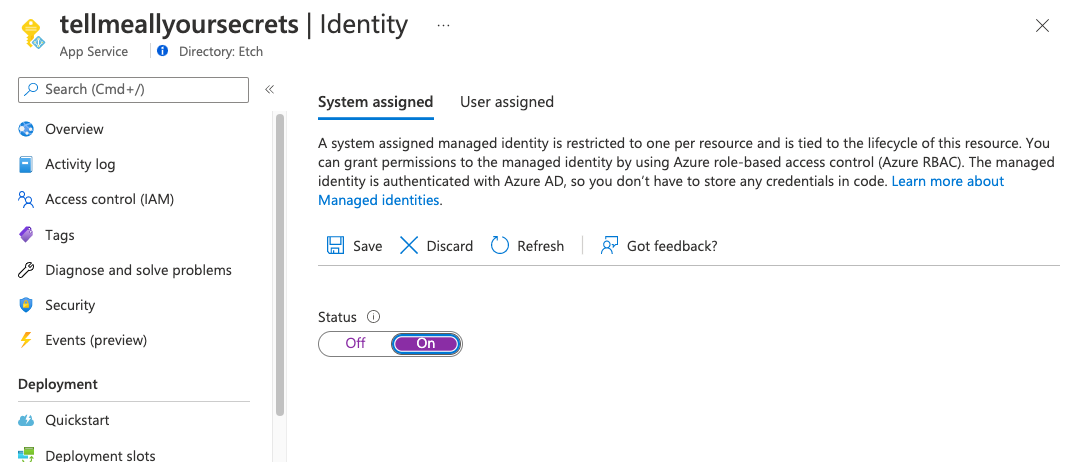
Toggle this to ‘On‘ and remember to Save.
Lastly, we grant access to this Managed Identity to the Key Vault, back in the Key Vault‘s Access Policies blade, by selecting + Add Access Policy searching for the identity (i.e. the Web App‘s name), and granting the Get and List Secret permissions, remembering to Save once done.

Finally, don‘t forget to remove the connection string from the Web App‘s Configuration blade that you added earlier so that it can‘t be viewed by others — the only place that should have your connection string is Key Vault, readable only by your Web App and you.
Now we're secure
To recap, first we configured Umbraco to use the .NET User Secrets manager during local development to avoid storing secrets (including connection strings) in our git repository.
For subsequent production deployment, we made use of Azure Key Vault to store these secrets securely, changed the way that Umbraco loads configuration by adding the Azure Key Vault configuration provider, and configuring our Web App to run using an Azure Managed Identity to authenticate to the Key Vault.
You can finally rest easy knowing that your secrets are now secure from prying eyes, and the bots will find easier targets to attack!
