

Blazor is an exciting upcoming technology, making it possible to use C# to create client-side logic, like you would with JavaScript. Since the upcoming version of Umbraco (Umbraco 9) is built on .NET 5, the opportunity to use Blazor components arises, but how?
So you have created a new .NET 5 solution, successfully installed Umbraco 9, and are ready to use Blazor components, but don't know where to start. Most documentation on the web is focused on Blazor-only applications or plain MVC applications and are not focused on Umbraco. Since we had the same problem we decided to write this article to explain what is required to run Umbraco combined with Blazor components and highlight some things to take into account when adding and using Blazor components.
Before you read: Blazor is available in two separate variants: Server Side and WebAssembly. The main focus of this article is the use of Server Side Blazor. For more information about the pros, cons and differences take a look at Microsoft's documentation on Blazor.
I've created an Umbraco 9 solution, what's next? 🤔
Blazor components are supported out-of-the-box in .NET Core 3 and up, but are not enabled by default in an MVC application. Let's dive right into some code to see how to enable Blazor!
Startup.cs
For Blazor to work we first need to add the necessary Server Side Blazor services to the service collection. Fortunately, there is a built-in Service Collection extension that we can use: AddServerSideBlazor(). This results in the following ConfigureServices function:
public void ConfigureServices(IServiceCollection services)
{
    services.AddUmbraco(_env, _config)
        .AddBackOffice()
        .AddWebsite()
        .AddComposers()
        .Build();

    //This adds all necessary Server Side Blazor services to the service collection
    services.AddServerSideBlazor();
}
Server-side Blazor heavily depends on a SignalR connection between the client and the server. This connection enables our Blazor components to communicate with the server before (re-)rendering itself.
Read more about Blazor and SignalR in Microsoft's documentation on Blazor.
For the SignalR connection to work, we need to register an endpoint. As with the Service Collection, another built-in extension provides the logic to add this endpoint.
Important: Since this extension depends on the EndpointRoutingMiddleware being initialized, it is important that the extension that adds this endpoint is executed after Umbraco has initialized the routing-middleware.
///
/// Configures the application
///
public void Configure(IApplicationBuilder app, IWebHostEnvironment env)
{
    if (env.IsDevelopment())
    {
        app.UseDeveloperExceptionPage();
    }

    app.UseUmbraco()
        .WithMiddleware(u =>
        {
            u.WithBackOffice();
            u.WithWebsite();
        })
        .WithEndpoints(u =>
        {
            u.UseInstallerEndpoints();
            u.UseBackOfficeEndpoints();
            u.UseWebsiteEndpoints();
        });

    //Register an endpoint for Blazor to communicate with the server
    app.UseEndpoints(endpoints =>
    {
        endpoints.MapBlazorHub();
    });
}
_Imports.razor
Furthermore, for the application to recognize the logic used in Blazor components, we need to add the _Imports.razor file to the root of the project and import a few namespaces. In addition we can import project-specific namespaces, so Blazor components can be recognized in all .razor files.
Important: Be aware that the namespaces will only be recognized in other razor files, if imported in the _Imports.razor file. Simply adding these to the _ViewImports.cshtml file will not work (trust us, we tried 😉).
@using System.Net.Http
@using Microsoft.AspNetCore.Authorization
@using Microsoft.AspNetCore.Components.Authorization
@using Microsoft.AspNetCore.Components.Forms
@using Microsoft.AspNetCore.Components.Routing
@using Microsoft.AspNetCore.Components.Web
@using Microsoft.JSInterop

@*NOTE: The following project-specific usings, can be used to recognize other components within .razor files*@
@using Umbraco9.Blazor.Web
@using Umbraco9.Blazor.Web.Shared
Blazor script
For the client to be able to establish the aforementioned SignalR connection with the server, the blazor.server.js file needs to be loaded into the application's client, which can be done by adding a script-tag at end of the <body>.
Important: Since the JavaScript file depends on Blazor being loaded, it is important that we load the script in the <body> instead of the <head>. This is because adding a script tag in the <head> prevents the application from being rendered until the specific script is loaded.
<head>
    <!-- Note: this is optional, and is only used to add some styling to our Alerts later on -->
    <link href="https://cdn.jsdelivr.net/npm/bootstrap@5.0.1/dist/css/bootstrap.min.css"
        rel="stylesheet"
        integrity="sha384-+0n0xVW2eSR5OomGNYDnhzAbDsOXxcvSN1TPprVMTNDbiYZCxYbOOl7+AMvyTG2x"
        crossorigin="anonymous">
</head>
<body>
    <!-- All other HTML here -->

    <script src="~/_framework/blazor.server.js"></script>
</body>
Finally... Blazor Components! 🎉
It is time to add our own Blazor components. In the following example we are going to add a simple Bootstrap-alert component, that shows alerts triggered by user interaction.
Setting up the files
First of all we need to add the .razor file that represents the view of our component. This can be done by right-clicking on the folder in which you want to add the file (in our case the /Shared folder) as shown on Figure 1.
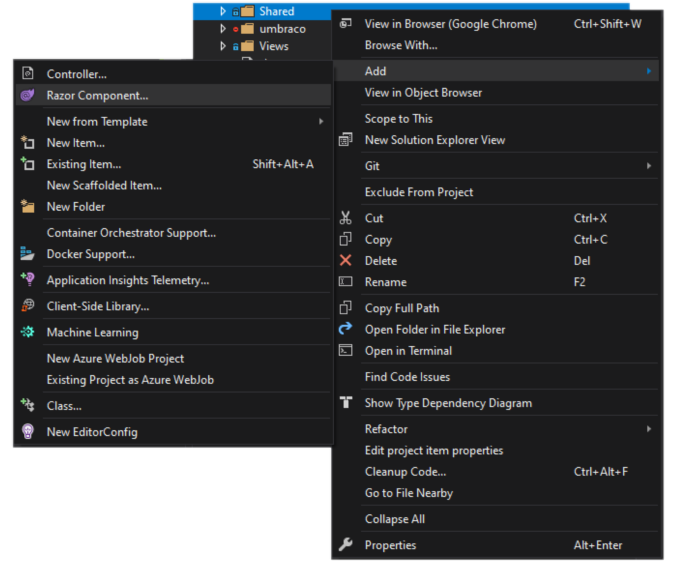
Figure 1: Creating the .razor file
Then add the following code to the file.
@foreach (var alert in ActiveAlerts)
{
    <div class="alert alert-@alert.Type alert-dismissible fade show" role="alert">
        @if (!string.IsNullOrWhiteSpace(alert.Title))
        {
            <h4 class="alert-heading">@alert.Title</h4>
        }

        @alert.Text

        <button @onclick="@(() => CloseAlert(alert))" type="button" class="btn-close" aria-label="Close"></button>
    </div>
}

<button @onclick="@FetchAlert" type="button" class="btn btn-primary mt-3" aria-label="Add new Alert">Add new Alert</button>

@code {
    public List<AlertModel> ActiveAlerts { get; set; }

    protected override void OnInitialized()
    {
        ActiveAlerts = new List<AlertModel>
        {
            new AlertModel
            {
                Title = "Umbraco ❤ Blazor",
                Text = "Initial alert",
                Type = "info"
            }
        };
    }

    private void CloseAlert(AlertModel alert)
    {
        ActiveAlerts.Remove(alert);
    }

    private void FetchAlert()
    {
        ActiveAlerts.Add(new AlertModel
        {
            Title = "Umbraco ❤ Blazor",
            Text = "A new alert!",
            Type = "success"
        });
    }
}
And the following class to your solution.
public class AlertModel
{
    public string Title { get; set; }
    public string Text { get; set; }
    public string Type { get; set; }
}
Finally, add the component to the page (for example Home.cshtml) by adding the following code:
@inherits Umbraco.Cms.Web.Common.Views.UmbracoViewPage
@{
    Layout = "Main.cshtml";
}

@(await Html.RenderComponentAsync(RenderMode.ServerPrerendered))
Note
According to sources on the web there is a multitude of ways to render a Blazor component, but because we are combining MVC with Blazor, only the following two methods actually work:
1. <component type="typeof(Alerts)" render-Mode="Server" />
2. @(await Html.RenderComponentAsync<Alerts>(RenderMode.Server))
In Blazor-only applications, rendering a component is also possible by calling the component's TagHelper like so: <Alerts/>. Unfortunately, these generated TagHelpers are not available in non Blazor-only applications.
If we run our application now, we can see that we have a working Blazor component, that loads a removable initial alert and a button that adds a new alert realtime!
Figure 2: Functioning Alert Blazor component
Advancing...
From here on you can get into more advanced stuff. For example, in addition to writing the C# code in the view, a code-behind file is also an option. A code-behind file can be created by adding a partial class with the following name and file-naming conventions:
- View filename:
Alerts.razor - Code-behind classname:
Alerts - Code-behind filename:
Alerts.razor.cs
The code should then look something like this.
public partial class Alerts
{
    private List ActiveAlerts { get; set; }

    protected override void OnInitialized() { ... }

    private void CloseAlert(AlertModel alert) { ... }

    private void FetchAlert() { ... }
}
Read more about code-behind in Microsoft's documentation on Blazor components.
Other things to consider are the use of the [Parameter] attribute to add a parameter that can be set from the page that loads the component, or the [Inject] attribute to use Dependency Injection within the component, as seen in the snippet below.
[Inject] public AlertStateProvider AlertState { get; set; }

[Parameter] public int? MaximumNumberOfAlerts { get; set; }
Component life-cycle
One thing to take notice of, when using multiple components that communicate with each other, is that only client-side events (like onclick or bind) directly trigger the re-rendering of the component. Therefore, an external event changing values within the component does not trigger a re-rendering of the component. In that case, the StateHasChanged method needs to be called.
The figure below shows a visual representation of the life-cycle of a Blazor component, illustrating that StateHasChanged only gets triggered on initialization of the component or a user interaction.
Read more about this on this article by Blazor University.
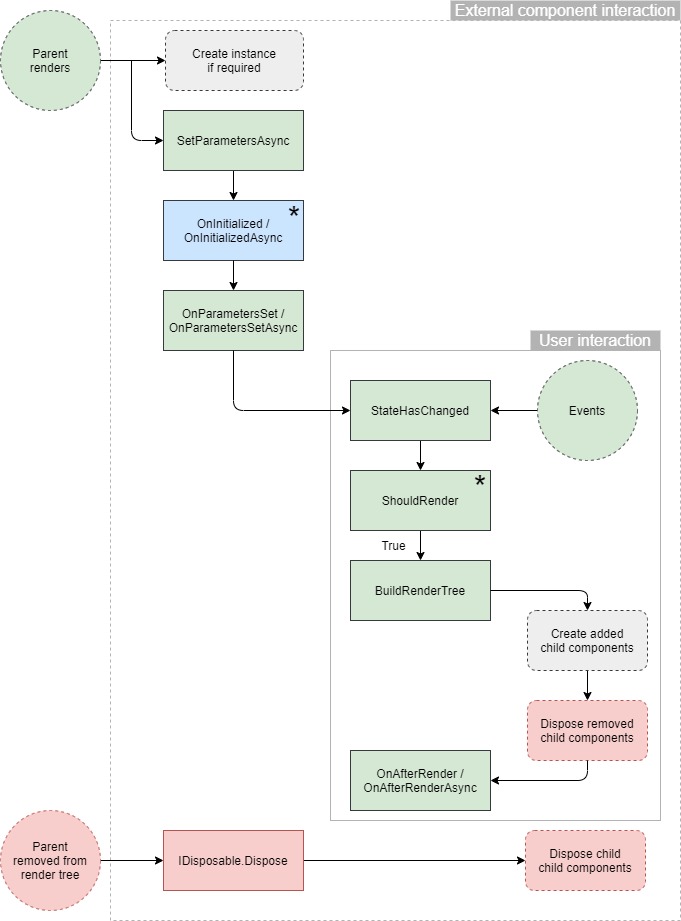
Figure 3: The life-cycle of a Blazor Component
Wrapping up 🙌
Now that we know how to use Blazor components within our Umbraco 9 solutions and what to take notice of while building components, the possibilities are endless. You can build a real-time search or alerts or anything else you can think of.
More elaborate examples can be found in our GitHub repository.
Sources and interesting articles 🔍
Code
- Gists: https://gist.github.com/jerpenol/3339cc80ef6275080ae22f7e9ff45423
- GitHub: https://github.com/jerpenol/Umbraco9.Blazor
Sources
- A general overview of Blazor components: https://docs.microsoft.com/en-us/aspnet/core/blazor/components/?view=aspnetcore-5.0
- Read more about the life-cycle of Blazor components:
- Triggering JavaScript from your Blazor component: https://docs.microsoft.com/en-us/aspnet/core/blazor/javascript-interoperability/call-javascript-from-dotnet?view=aspnetcore-5.0
- Or the other way around: https://docs.microsoft.com/en-us/aspnet/core/blazor/javascript-interoperability/call-dotnet-from-javascript?view=aspnetcore-5.0