
Developers on open source projects often have a lot of other commitments, and can sometimes take a while to review and accept pull requests. This can be especially frustrating when the project you are working has a supporting library which requires a small change, or you want to try out a new feature in an as-yet unreleased version.
In the JavaScript ecosystem, both yarn patch and the patch-package package provide mechanisms for managing local patches to referenced libraries locally. Unfortunately, as NuGet packages are distributed as binaries rather than sources, we have to use a slightly different approach.
In this series of articles, I'm walking you through how to go about using your own forked version of a library.
- Part 1: Setting up a Forked Library In Part 1, we started by forking the library and incorporating the projects as direct references.
- Part 2: Using a Local NuGet Repository In Part 2, we'll swap to re-building the libraries independently and referencing them using a local NuGet folder.
- Part 3: Resolving Library Compatibility Issues In Part 3, we'll look at how to resolve some of the build conflicts you might get when referencing pre-release versions of libraries.
Using a Local NuGet Repository
In this article, we're going to build private versions of our forked library from the previous article and reference them using a local nuget repository.
To do this we need to complete the following steps:
- Set up Local NuGet repo
- Refencing using NuGet
- Build private binaries
- Update build Pipelines
Swapping to a Private NuGet feed
Sometimes it can be useful to keep the entire libraries sources in-lined into your project. Often though, it makes it harder to revert to the original library, apply other bug fixes or patches, or share your updates with other projects in a wider multi-repo solution.
For this project I decided I would like to keep the source tree as clean as possible, so we are now going to swap our approach and to building the package locally and referencing it using a local NuGet repository.
Setting up local NuGet
This solution is actually part of a mono-repo, so I'm going to create a folder based local nuget repository at the base of my mono-repo. That approach will allow me to share the patched library wth the other projects in this mono-repo.
If your application architecture has multiple projects based in multiple git repos, you may want to consider an organization-wide private nuget feed, such as MyGet or Azure Devops Artifacts.
To create a local folder based repository, I'm going to make an empty nuget folder at the base of my Git repo, which will be where my packages live.
Alongside it I will create an empty NuGet.config with the following content:
<?xml version="1.0" encoding="utf-8"?>
<configuration>
</configuration>
My git repo folder structure now looks like this:
/
    apps/
        server/
            AdminWebsite/
                ...
            AdminWebsite.Models/
                ...
            AdminWebsite.Tests/
                ...
            AdminWebsite.sln
        web/
            src/
            package.json
            ...
    nuget/
    node_modules/
    packages/
        components/
        ...
    NuGet.config
    package.json
    ...
To configure nuget to use my /nuget folder as a source I can run the following command from the root of the repo:
dotnet nuget add source ./nuget --name "AdminWebsite Local" --configfile ./nuget.configOur local nuget folder is now ready to use. Any .nupkg files we put in this folder will be visible to any solutions in our repo.
Building the Private Binaries
Now we need to convert our Examine projects we copied over back into a separate solution again. As I copied the entire Examine folder over as a sub-folder of my Web project, I just need to move the Examine folder up a couple of folders so it sits as a sibling to my Web project instead of inside it.
The original Examine solution file should be there too, but if not you should go copy it over from the source repo. Then you can open the solution in new Visual Studio window and compile it again.
Once it's all compiling, we need to build the nuget packages. We can do this using the dotnet pack command, which we saw in the GitHub action file we were looking at earlier.
The Examine library build script has been configured to take the version numbers in as parameters on the command line, so I've got to work out what version to give it. Other libraries you are working with may just use the data directly from the project files, in which case you would want to go and update the project files first.
I'm going to use the version number "3.0.1.0-private01" for this build, which will mark it as a pre-release and remind me that it's my private build rather than an official one.
Here's the full command to build my private packages:
dotnet pack Examine.sln \
    --configuration Debug \
    -p:PackageVersion=3.0.1.0-private01 \
    -p:AssemblyVersion=3.0.1.0 \
    -p:FileVersion=3.0.1.0 \
    -p:InformationalVersion=3.0.1.0-private01 \
    -p:ContinuousIntegrationBuild=true \
    --output=./out
Once the build and packaging is complete, I can copy the .nupkg files from the out folder to my nuget folder, and I'm ready to go.
Nuget will read both a flat folder structure as well as a hierarchical one based on the package name, so we don't need to do anything other than copy the .nupkg files into the folder. (The hierarchical folder structure is more efficient if you have large numbers of packages, but for only a few the flat folder structure works fine.)
Update the Projects
The final step in the process is to go back to our Website solution and remove the packages we added and replace their references with our private versions.
You can add the package using your favourite GUI, or by using the command line:
dotnet add package Examine -v 3.0.1-private01You should now be able to rebuild your solution using your private version on the library.
Update your build pipelines
If you are using Azure Devops or TFS you may need to update your pipelines to make them work correctly with the local Nuget.config file.
There are two different tasks that can trigger the NuGet restore:
- Dotnet Task (
DotNetCoreCli@2) - NuGet task (
NuGetCommand@2)
Even though the dotnet task has the option for specifying a path to a NuGet.config in your repository, the dotnet tool runs from a separate tool directory and won't find it.
Change to the NuGet task instead to restore using the local NuGet.config:
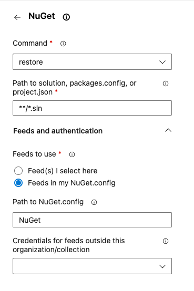
Or in Yaml:
steps:
  - task: NuGetCommand@2
    inputs:
      command: "restore"
      restoreSolution: "**/*.sln"
      feedsToUse: "config"
      nugetConfigPath: "NuGet.config"
Summary
In this article, we've looked at how to:
- Create a local nuget feed
- Build private versions of our patched library
- Publish to our local nuget library