
I was recently planning out a personal project when I ran into a new problem. If I had an “Events near me” component where a user could enter their postcode and a distance and then be shown a map or list of results, how could I figure out the distance between their postcode, and any postcodes in my database?
I knew I’d probably have to store my postcode data as latitudes and longitudes so the postcode was a point in space I could measure against, but if you had tens of thousands of data points, it would be quite a heavy load on the server to calculate the distance between every point every time someone searches. Keen not to reinvent the wheel here, as tons of websites have very similar features, I did what every developer does and looked for *inspiration* to see how others had solved the problem.
I discovered there are lots of methods for this, for example, if you want to use Examine and Lucene for spatial search I read this great article. But, I liked the idea of leveraging SQL server as I will already have a database for my Umbraco site and it can do all the heavy lifting in terms of querying so that all my code has to do is pass around the data. It also has the added benefit of being fully flexible in the data you store and the methods available to you to query your data. It's also very well documented by Microsoft.
Using SQL Server to store spatial data
There are 2 spatial data types you can use in SQL Server: geography and geometry. They are very similar to each other but with 1 main difference. If you want to store spatial data in a Euclidean (flat) coordinate system such as mapping the floorplan of a building or a 2D plane you should use the geometry data type. If you want to store data over a large enough area that the curvature of the earth will affect your distances, you should use the geography data type. Within these data types are many subtypes depending on the exact data you want to store such as points, lines, circles and polygons. For my use case, I just needed to track individual points and measure the distance between them, so that is what this example will cover. However, if you are using more complex subtypes there are lots more query options available to you such as points of intersection. Check out this overview of SQL server spatial data types (fair warning, it’s a heavy read).
How to store points on the Earth into your database
Once you have a database set up, the first thing you will need to store your data is either a geography or a geometry column within your table.
CREATE TABLE Postcodes (
    Postcode NVARCHAR(10) PRIMARY KEY,
    Location Geography,
);
Once you have that setup you can start to store your point data (as shown below).
INSERT INTO Postcodes(Postcode, Location)
VALUES('EX33 1PJ', geography::Point(51.130798, -4.218671, 4326));
The first value we insert is simply a string for the postcode and in the second parameter we create a geography point that has three parameters passed in. The first and second are the latitude and longitude of that postcode. In my project, I used postcodes.io API to retrieve that data. It's free to use and doesn’t require any authentication so it’s quick to set up. The final parameter is the Spatial Reference System Identifier (SRID); this is an identifier for the coordinate system you're using. Depending on where you get your latitude and longitude coordinates from, the SRID might change. However, SRID 4326 is the most common system.
Once you insert this into your database, it will become unreadable if you try to select that column, it will looks something like this ‘0xE6100000010C000000A0F0924C40000000E087CE00C0’ so you’ll have to use different queries to manipulate the data and display it in a readable format.
Retrieving spatial data from the database
You can now leverage SQL Server to perform simple and complex manipulation of your data.
To simply retrieve any points within a certain radius of another you can use the following query:
SELECT P.Postcode
FROM [Postcodes] AS P
WHERE P.Location.STDistance(geography::Point(52.60222, 1.231901, 4326)) < (25 * 1000)
You can see here we are using the STDistance method on the location column which accepts an argument of another geography instance and returns the distance between them. As we are using SRID 4326 the distance will be in meters. We can then use a WHERE clause to only return results within 25km (the distance returned will be in meters so I have multiplied by 1000).
In my case, I want to return four things: postcode, latitude and longitude of the point so I can plot a map of the results and the distance in km between the location passed in and that location rounded to one decimal place. Here is the query I’m using:
SELECT P.Postcode, P.Location.Lat AS 'Lat', P.Location.Long AS 'Long', ROUND((P.Location.STDistance(geography::Point(52.60222, 1.231901, 4326)) /1000),1) AS Distance
FROM [Postcodes] AS P
WHERE P.Location.STDistance(geography::Point(52.60222, 1.231901, 4326)) < (25 * 1000)
ORDER BY Distance ASC;
This returns the results sorted from shortest to longest distance. It’s then much simpler in my code to map this to a model and it’s ready to be used to render my list view and map view without any further manipulation or calculation.
Setting up a spatial index in your database table
To make your queries more efficient, you may want to index your spatial data to increase the efficiency of your queries. SQL Server has a special way of indexing spatial data in a four level grid system. You may need to play around with the exact configuration of your index to get it to work best for your data and the type of queries you will be performing. You can create your index with a SQL query but I found it easier to do this with the SSMS UI.
First, in SSMS, expand the table you want to add an index to, then right click on Indexes and go to New Index > Spatial Index. It will only allow you to create a spatial index if your table has at least one spatial data type column.
Start by naming your index and then click Add and add the spatial column(s) you want to be part of your index. In this case, I just want to index the location column. Then, on the left go to the Spatial tab. You have 3 sections here, the first is your bounding box, which defines the geographical area that you want to index. For example, you may know that the majority of your data is within a certain city so you could just index that area and leave any outliers out of your index as to not have lots of empty cells in your grid.
Next is the Tessellation Scheme, you must select either geometry grid or geography grid depending on the data type that you are indexing. You can then choose the cells per object and the density of the four grid levels of your index. To know what you need to choose here you have to understand how the data is indexed, as you can imagine, it’s a complex topic, but here is a snippet of what the Tessellation process actually does that helped me a lot…
“The spatial index performs a tessellation process for that object. The tessellation process fits the object into the grid hierarchy by associating the object with a set of grid cells that it touches (touched cells). Starting at level 1 of the grid hierarchy, the tessellation process proceeds breadth first across the level. Potentially, the process can continue through all four levels, one level at a time.
The output of the tessellation process is a set of touched cells that are recorded in the spatial index for the object. By referring to these recorded cells, the spatial index can locate the object in space relative to other objects in the spatial column that are also stored in the index.”
- Spatial Index Overview (Sorry, it's another heavy read!).
This method of indexing means that if you perform a query to retrieve items within a distance around a point and that distance is very small compared to your whole data set, it can rule out most cells in the index and not have to measure the distance between points in those cells speeding up your query.
If you are unsure about the cells and level density you can select geography/geometry auto grid and it will decide the bounding box and grid density for you.
Performance (and why you should be careful with indexing)
I began by testing with 10,000 postcodes in my database, however this wasn’t enough for me to prove that indexing vs. not indexing was beneficial to performance because every test I ran returned in under a second. I then went a bit over the top and imported the almost 1.8 million UK postcodes into my database for some real performance testing! (1,786,365 to be exact).
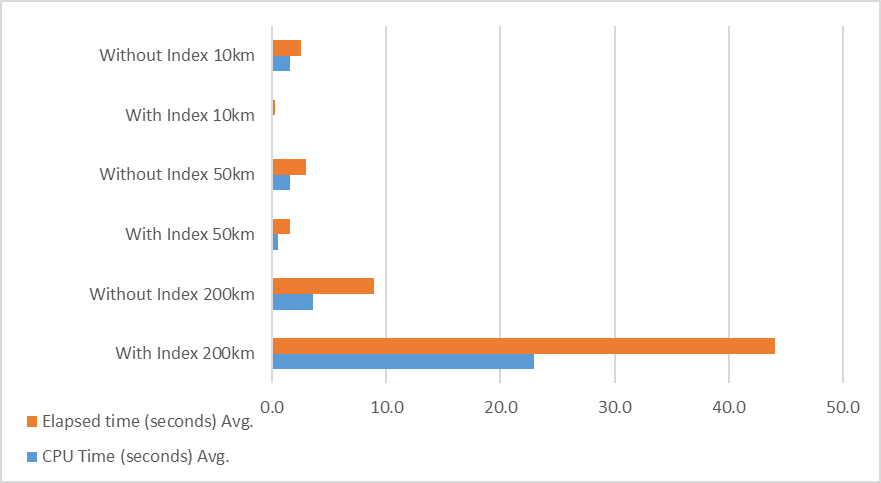
As you can see from the graph above, this gave some more tangible results. For all tests, I returned the postcode, lat, long and distance between the two points and the index I used was the geography auto grid so I didn’t customise the configuration at all.
This testing shows that you need to consider how your index should be configured as well as how you will be querying your data. If you will be searching through small subsets of your dataset (e.g. 25 km across the whole of the UK), you will see an efficiency gain with an auto grid index. If you are constantly searching through large sections of your data you may be better off with a custom index configuration or no index at all, as this significantly increased the efficiency of the large search area queries I ran.
It is however worth noting that this is with a very large amount of data and only using the auto-index, it is more to demonstrate that there isn’t a ‘one size fits all’ approach. You will have to test with the type of data you are storing, the types of queries you are running and the size of your data set.
Repo
This is a repo demonstrating this example. It wasn’t originally meant to see the light of day as it was just a proof of concept so apologies in advance if anything is unclear. You’ll see I’ve used a few different tools to set this up; Umbraco 13, Leaflet.js to plot results on a map on the front end and postcodes.io to retrieve location data.
I used Dapper to execute SQL queries mainly because I’d not used it before and I wanted to try it, but this could be switched out with an ORM of your choice. Dapper is a nice, lightweight ‘micro-ORM’ with no configuration needed so great if you are just executing parameterised SQL.
If you’d like a copy of the database with every UK postcode to test out or have any questions, feel free to get in touch!