

Once upon a time...
We didn’t have Umbraco 7 with the nice Angular-based backend. Instead, the Umbraco backend was built on ASP.NET webforms using usercontrols and webcontrols, which made it hard to tailor it to the specific needs of your editors.
People who have used older versions of Umbraco most likely have heard about a package called uComponents. For most of them this was the first thing they would install after setting up Umbraco.
The package contained a collection of very useful datatypes like Multi Node Tree Picker (MNTP), Url Picker, Character Limit, and Image Point.
But that’s not all. Other than datatypes it also contained other useful things like:
- XSLT extensions
- NotFoundHandlers
- uQuery
- uMapper
- and more!
Some of uComponents features, like some of the datatypes and uQuery, have been integrated in the Umbraco core over time.
At that time multinode tree picker was the king of the content pickers.
But then the package massacre called Umbraco 7, aka Belle, was released and all the datatypes in uComponents became obsolete all at once. This is because all the .NET based datatype editors don’t work in the new angular based backend
The king is dead.
Back to the Future
Luckily, the guys who developed uComponents put their great minds together and created a new package for v7, called nuPickers. This package is not a port of uComponents to v7, but a completely new set of property editors that can be used.
It consists of the following kinds of pickers:
- Checkbox picker
- Dropdown picker
- Prefetch list picker
- Radiobutton picker
- TypeaheadList picker
All of these come in different flavors depending on the source of their data.
These pickers support the following datasources:
- DotNet: you write your own class implementing the interface IDotNetDataSource for retrieving the list values
- Enum: create an enum in C# that serves as the datasource of your list values.
- Json: use an URL or JSON file as the source of your list values
- Lucene: use a Lucene index as the source of your list values
- Relations: use Umbraco relations as the source of your list values
- SQL: use a SQL query as the source of your list values
- XML: you can use Umbraco content xml or your own xml file as the source of your list values
The combination of the different pickers and datasources makes it very powerful.
Long live the king.
talk is cheap, show me the code
It’s time for a real world example. The image below shows the structure of the site we will be working on.

The Document Type hierarchy is as following:
- Homepage
- Departments overview : a list of all our departments
- Department : department detail page
- Employee : employee detail page
- Articles overview : a list of all articles
- Article detail : article detail page
One of the requirements is that on the article detail page we must set at least one employee as an author, but multiple authors should be possible.
We'll examine two ways that you can solve this requirement. One with just core Umbraco, and one that takes advantage of the power of nuPickers.
Solution 1: Using a multinode Tree Picker (MNTP)
If you're just using core Umbraco, the first step you would undertake is to create a datatype based on the MNTP property editor with the settings below:
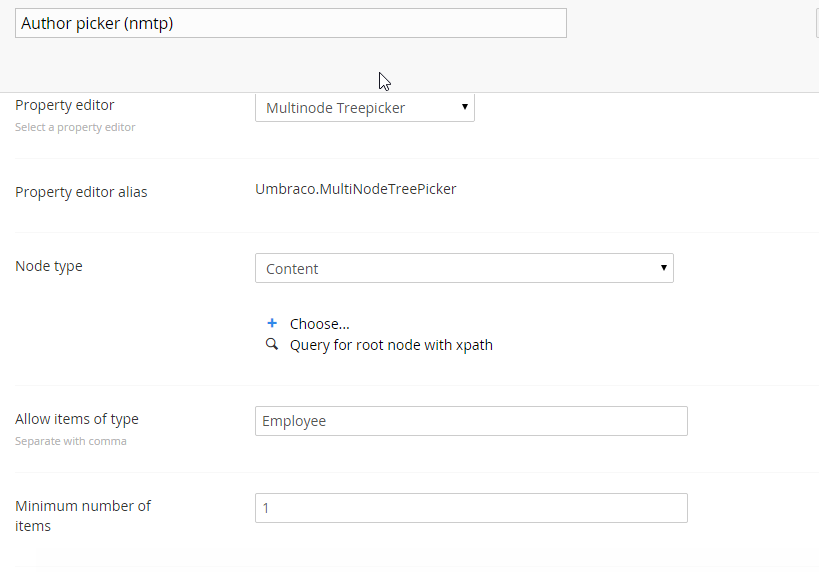
You set the node type to Content and Minimum number of items to 1. To make sure your editors can only pick nodes of the Employee document type you will set Allow items of type to Employee. If you do not set this filter, editors can pick any type of content and you as a developer have to make sure that only nodes of the type Employee are shown on the page.
After you have added the datatype to your article doctype your editors can now select Employees as authors of an article.
As a developer you also have to keep in mind that editors can select unpublished nodes as well, or that a selected node can get unpublished after it has been assigned. So make sure you only try to display published content nodes.
A simple rendering of the selected authors could be something like this:
@*Render authors MNTP *@

@if (Model.Content.HasValue("authorMntp"))
{
    // get the selected authors (this will return a comma seperated string of node Id's)
    var authors = Model.Content.GetPropertyValue("authorMntp");

    if (!string.IsNullOrEmpty(authors))
    {
        // create a array of author id's
        var authorIds = authors.Split(new[] {','});

        // get the published author nodes only, that is why there is the check on null
        var authorsNodes = Umbraco.TypedContent(authorIds).Where(x => x !=null).ToList();

        if (authorsNodes.Any())
        {
            foreach (var item in authorsNodes)
            {
               <p><a href="/umbraco/@item.Url">@item.Name</a></p>
            }
        }
        else
        {
             <p>No published authors selected</p>
        }
    }
}
This code could be simplified by using the package Umbraco Core Property Value Convertors. After you have installed this package getting the value for the picker returns a list of IPublishedContent objects instead of a comma separated string of ids. Now you will only get published items and you do not have to code the check for this yourself.
The code to render the authors would look like this:
@*Render authors MNTP with property value convertor *@

@if (Model.Content.HasValue("authorMntp"))
{
    // get the selected authors (this will return a list of published content objects)
    var authors = Model.Content.GetPropertyValue<IEnumerable<IPublishedContent>>("authorMntp").ToList();

    if (authors.Any())
    {
        foreach (var item in authors)
        {
    <p><a href="@item.Url">@item.Name</a></p>
        }
    }
    else
    {
    <p>No published authors selected</p>
    }
}
Now that we have tackled all issues as developer to render the selected authors we will have a look what is wrong with this implementation in the perspective of an editor.
The first problem is that for selecting employees a dialog will be opened and the editor will have to drill down the content tree to find the employees they want to assign. In our example setup this might not be a big issue, but imagine that you have a site with thousands of content items and the employees are somewhere deep in the site structure, maybe even on various locations like in our example. Then it will require a lot of clicking down the content tree for the editor.
A second problems is that the picker shows only the name of the picked item and no other useful information, such as its location in the site, a picture of the author, whether it published or not, etc.
Now let’s have a look at a better way of picking the authors, using nuPickers.
Solution 2: Using nuPickers
The first thing we need to create a new datatype based on the “nuPickers : Lucene PrefetchList” property editor.
For now we will set the following configuration:
- Examine Searcher : InternalSearcher
- Raw Query : nodeTypeAlias:Employee
- Key Field : id
- Label Field : nodeName
- Enable filtering : true
- Allow sorting : true
- Min items : 1
- Max items : 0 (means unlimited)
- Hide used : true
- Save format : CSV
We will get back to some of the other configuration settings later on.
If we add a new property to our Article doctype based on the new datatype we get something looking like this:
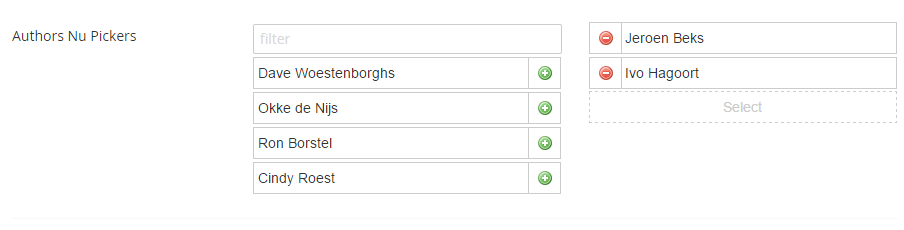
As you can see, you will get a list of all employees in the site which you can select. Now the editor doesn’t have to drill down the content tree dialog to pick the items. It’s just a simple matter of selecting them.
But we are still only seeing the node name of the items in the list and no other useful information.
Luckily we can solve this by creating a Custom Label for our picker. A custom label is a macro that gets rendered for each of our items in the list.
So let’s set up a macro for that. You can find the document of the available macro parameters here. For our example we are only going to use the key (id of item in the list).
First, create a macro called CustomLabelNuPicker, and use a MVC partial view to render it. We’ll add one parameter with the name and alias set to “key” and of type “text box”.
The code in our partial view will look like this:
@inherits Umbraco.Web.Macros.PartialViewMacroPage
@{
    // get the key from the parameters
    var id = Model.MacroParameters["key"].ToString();
    var name = string.Empty;
    var imageUrl = string.Empty;
    var department = string.Empty;
    var status = "Published"; // if the item is unpublished we give it a nice pink background color

    // try to get published content
    var publishedAuthor = Umbraco.TypedContent(id);
    if (publishedAuthor != null)
    {
        // published content found so get values from cache
        name = publishedAuthor.GetPropertyValue<string>("name");
        imageUrl = publishedAuthor.GetPropertyValue<IPublishedContent>("picture").GetPropertyValue<string>("umbracoFile");
        department = publishedAuthor.Parent.Name;
    }
    else
    {
        // no published content found for key so get content from db, could also be examine index for performance reasons
        var content = ApplicationContext.Current.Services.ContentService.GetById(int.Parse(id));
        if (content != null)
        {
            name = content.GetValue<string>("name");
            department = content.Parent().Name;
            imageUrl = Umbraco.TypedMedia(content.GetValue<int>("picture")).GetPropertyValue<string>("umbracoFile");
            status = "Unpublished";
        }
    }
}
<div @Html.Raw(status== "Unpublished" ? "style=\"background-color:#FF9999\"" : string.Empty)>
    <div>@name</div>
    <div>@department</div>
    <img src="@imageUrl?width=150" width="150"/>
</div>
Now that we have our macro in place, the next thing we need to do is assigning our macro as a custom label on the datatype. So we’ll go back to the author picker and in the configuration setting “Custom Label” select the macro.
If we now have a look back at our picker on the article datatype we see something like this:
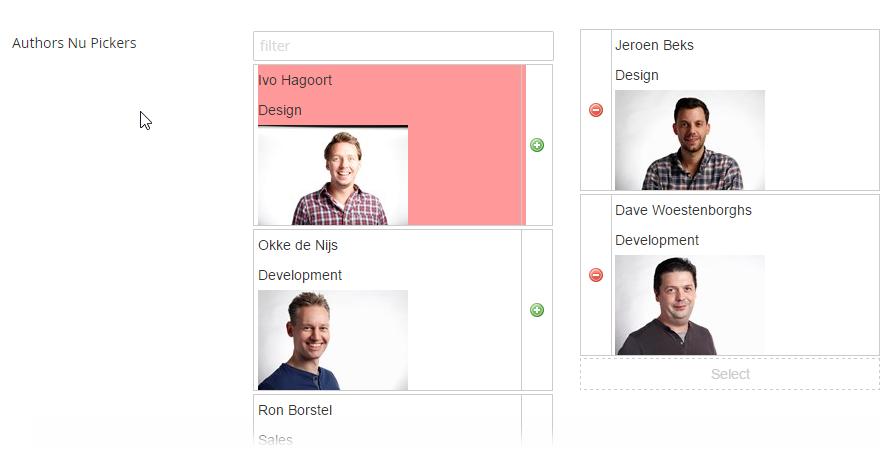
As you can see, this gives the editor a lot more information about the content they are picking. Even if the item is published or not.
So without huge amounts of code you can give an improved editor experience. Setting this up took me less than half an hour.
For rendering the picked authors you can use this code snippet:
@if (Model.Content.HasValue("authorsNuPickers"))
{
    var authors = Model.Content.GetPropertyValue<nuPickers.Picker>("authorsNuPickers").AsPublishedContent();

     if (authors.Any())
    {
        foreach (var item in authors)
        {
    <p><a href="@item.Url">@item.Name</a></p>
        }
    }
    else
    {
    <p>No published authors selected</p>
    }
}
Relations
One of the most underused features of Umbraco, in my opinion, is relations. For example, when saving an article creating a relationship between the article and the authors.
Normally you would have to create a relation type and write the code to create the relation in a save event handler. But luckily for us, nuPickers supports this out of the box.
What we want to do is to show on each employee item which articles they have been assigned too.
First we are going to create a relation type. Go to the Developers section and create a new relation type with the following settings:
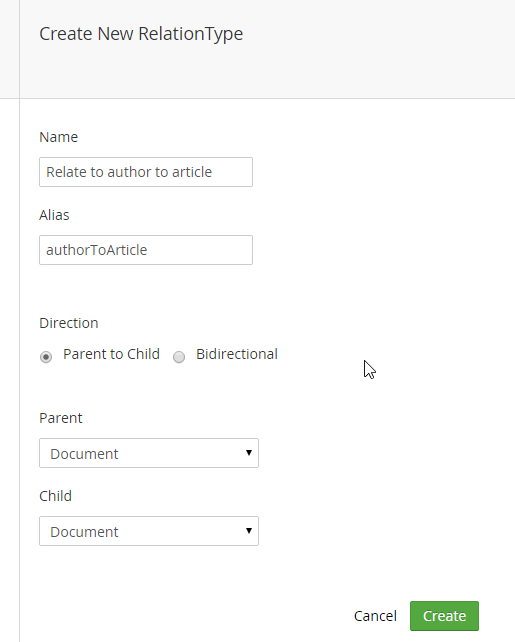
The next step is to go back to our author picker datatype and set the configuration setting “Relation Mapping” to our newly created relation type.
After we have done that we need to republish our articles. To check if the relation mapping works you can go back to the relation type and on the tab “relations” you should now be able to see the relations.
After we have checked this we are going to create a new datatype for displaying the related articles of the authors.
Create a datatype called “Employee articles” and choose “nuPickers: Relation Labels” as the property editor. Choose our relation type as the “Relation mapping”.
Now we add a property to our Employee document type based on this newly created datatype.
Giving us something like this in the backend:

Now you see the articles where this employee has been assigned as an author. This also supports custom labels so you can change the look and feel to meet your needs.
Another advantage of using relationships is that it makes your rendering code a lot easier. Normally if you wanted to show the articles where an employee is assigned as author, you would first have to get all articles and then filter them so you that you only show the ones where the employee is assigned as the author.
With the use of relations you can do this using the relations API.
@{
    var relatedArticles = umbraco.cms.businesslogic.relation.RelationType.GetByAlias("authorToArticle").GetRelations(Model.Content.Id);


    if (relatedArticles.Any())
    {
        foreach (var relatedArticle in relatedArticles)
        {
            var content = Umbraco.TypedContent(relatedArticle.Child.Id);

            if (content != null)
            {
                <p>@content.Name</p>
            }
        }
    }
    else
    {
        <p>This person has no articles</p>
    }
}
Wrap up
I hope this article will help you make content picking more user friendly for your editors. I also just have scratched the surface on what you can do with nuPickers. So give it a try and see the possibilities it has to offer.
If you are still using Multi node tree picker after reading this article, then my opinion is that you are doing it wrong.
For questions or suggestions look me up on twitter: @dawoe21
And to conclude: A big #h5yr for the nuPickers team!